If you have been avoiding making the switch to Google Analytics 4 (GA4) because the setup process feels intimidating, then this tutorial is for you. In this video and post, Dana guides you through how to set up your GA4 with the basics, from creating a property to adding an event.
This resource is a part of our video series on How to Set Up GA4 Right Now:
Video transcript
Hopefully we’ve convinced you that you need to make the switch to GA4 right now. Or if you already had an auto created GA4 from Google, and then watched our previous video in this series, you may have realized the setup is a total mess so now you need to start from scratch and make sure that your data is tidy and understandable.
Creating a GA4 property
Creating the GA4 property is the easy part. Let’s walk through that. We will start in the admin of Google Analytics to create our GA4 property.
Step 1 – Create your own GA4 property:
- Login to your Google Analytics account. You’re going to want to click on the link to the Admin link, which is at the bottom left hand corner (gear icon) in both UA and GA4
- Then from the Admin screen, click the +Create Property button
- For this walkthrough, we’re going to set up a property for Kick Point, the agency’s website. So this will be kickpoint.ca, and typically we name our properties the same as the domain name that will be used for capturing data.You might wanna name this, the business name. Just make sure it’s something that is easy for you to remember what it is that you named it so you can find it again later.
- You’ll also want to change the Reporting time zone and select the Currency that makes sense for you. (Note: Make sure to pick the right time zone now as you cannot retroactively change the data in the future if it needs to be changed).
- Click Next

Something to keep in mind, especially if you have an international business, if a session crosses midnight it will be considered a single session for reporting purposes, but you’ll see two sessions counted, one on each day. If someone visits your website on a Tuesday in their time zone, but it’s still Monday in the time zone you selected, the visit will be recorded as having occurred on Monday.
So make sure to pick the right time zone, and if you do change the time zone later on, know that it does not retroactively change the data. You will see a message telling you that you can edit these property details later, but you may not want to because you will only be changing the data going forward. This means you’ll see a flat spot or a spike caused by the change to your time zone.
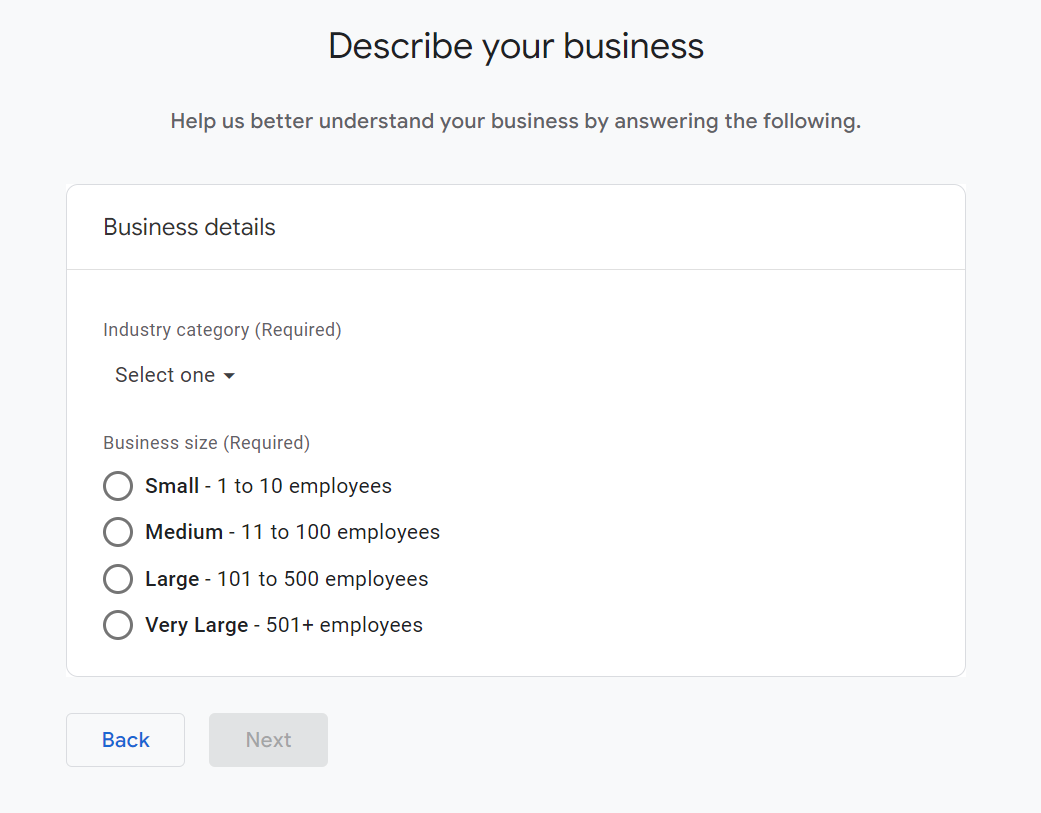
Step 2 – Add business details:
When we click next we are brought to the Business details screen.
- Select Industry category
- Select your Business size
- Click Next
Previously Google didn’t require the industry category and business size to be selected. But, now they do. Select what makes sense for you here. Then click next.
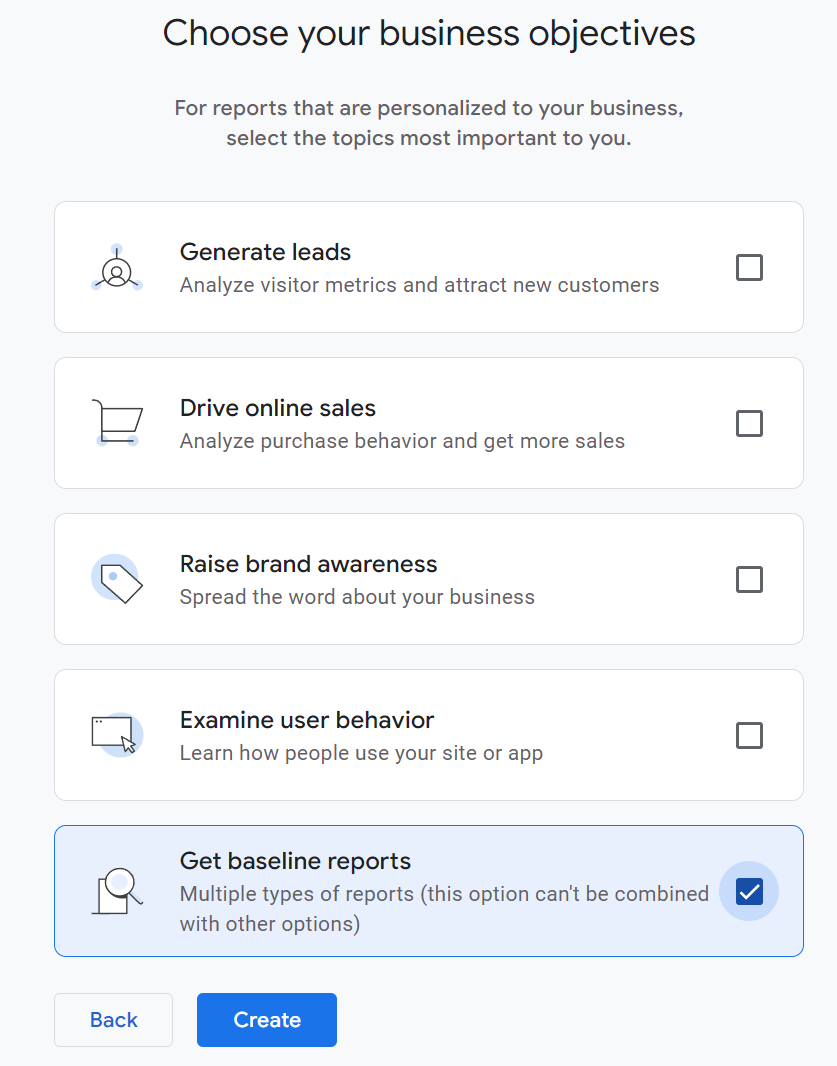
Step 3 – Choose your business objectives:
Now for business objectives, this is interesting. I find it really odd that they’re going to change the reports you get based on what you select here (but unfortunately they do).
- Select your business objectives
-
- Generate leads
- Drive online sales
- Raise brand awareness
- Examine user behavior
- Get baseline reports*
*Personally, I would say pick Get baseline reports. It gives you everything, and then if there’s something you don’t want to have later, we’ll show you how to remove that because you don’t need to see what you don’t want to see. I like to get everything and then I can choose what I want to remove as opposed to Google giving me just a subset of the reports to start with.
-
- Click Create
Step 4 – Start data collection:
The final step is data collection, where you get to set up the web stream, which is what it’s called when you’re collecting data from the site.
Now, in this case, we’re not looking at apps (Android app or iOS app) we’re just dealing with websites.
- We’re going to choose Web for our platform, and then
- We’re going to put in the website URL Now make sure to check if your website has a www or not or something else. Enter that in correctly. And again, for the stream name, typically we paste in the domain name again, so that you know exactly what it is that you’re capturing.
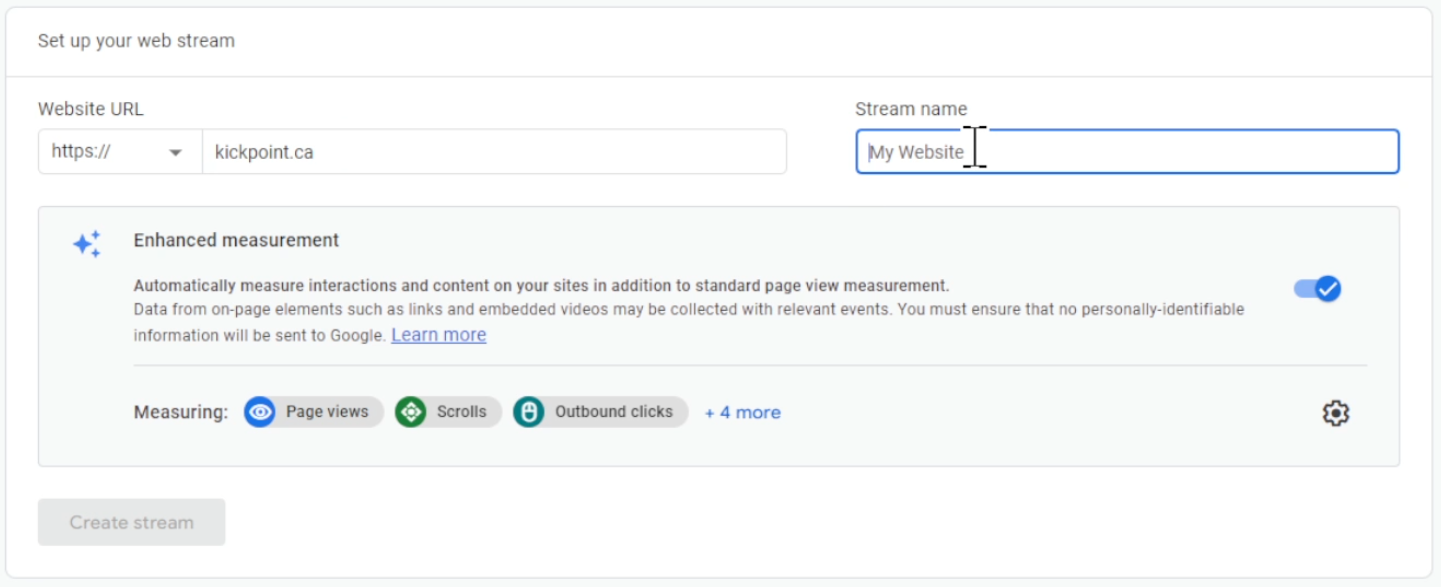
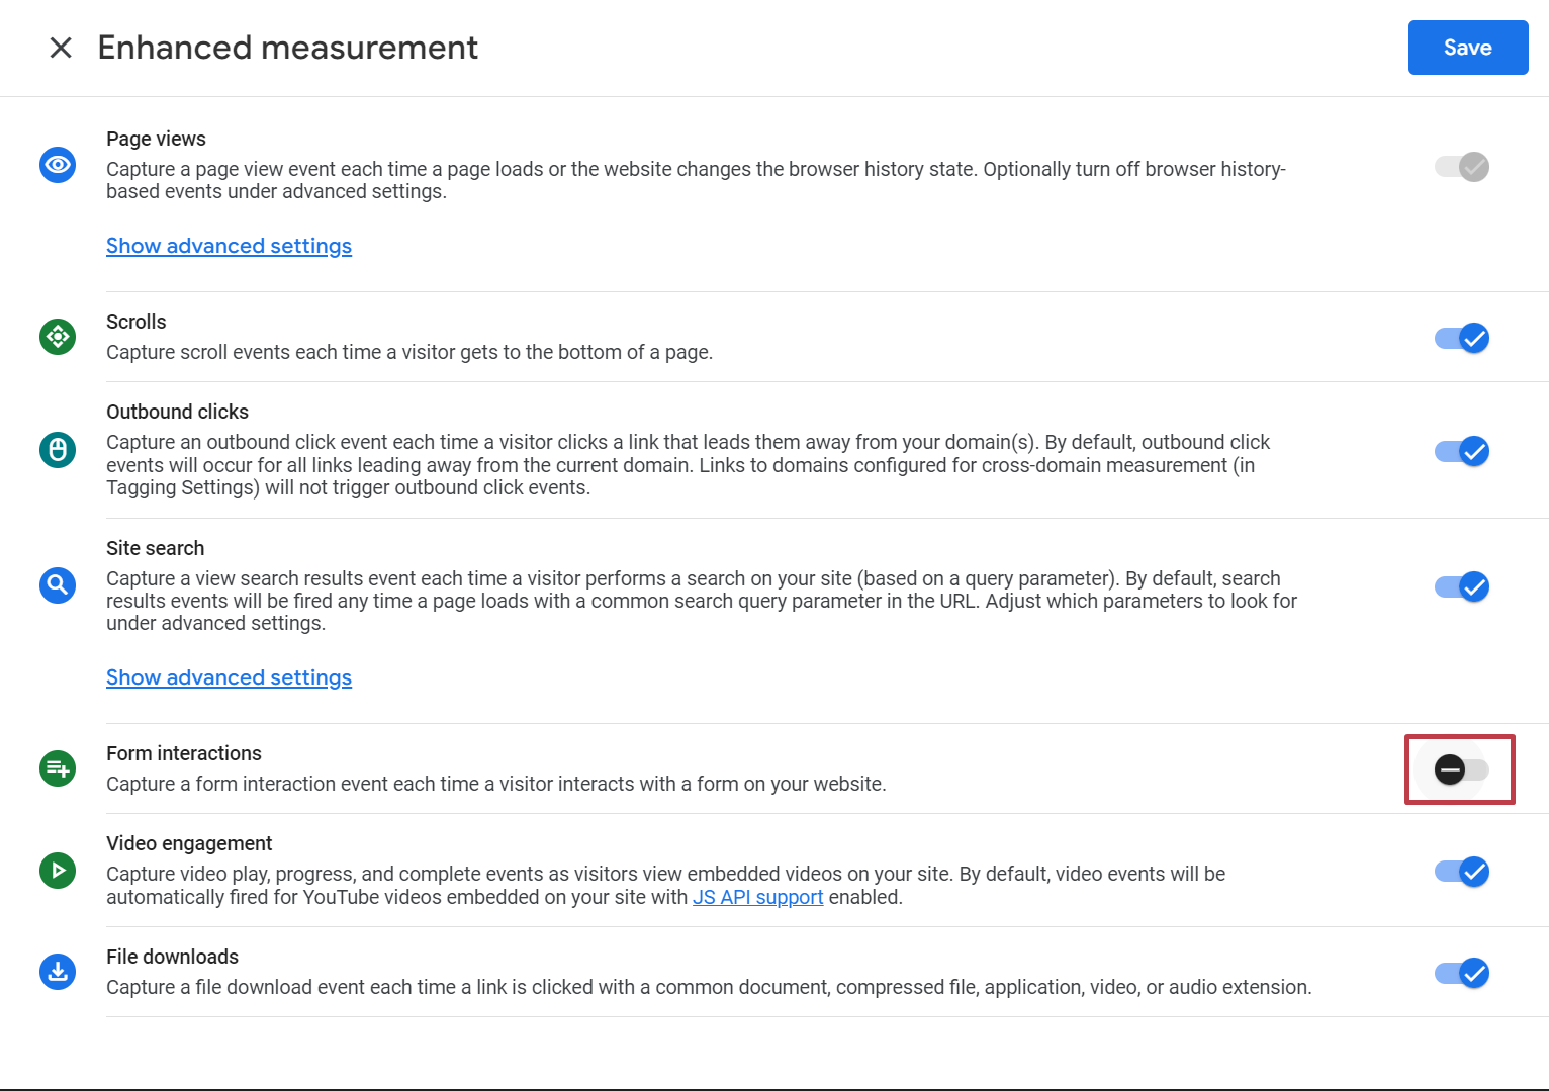
- Now before you click create stream, you’re going to click on the wheel (gear icon) on the bottom right to configure Enhanced measurement. Enhanced measurement is truly one of the greatest features in GA4.By default, GA4 captures all sorts of extra stuff that UA did not (well, at least not without some custom setup and some work in Google Tag Manager). Usually we turn off form interactions (see screenshot below), but in your case, you might want to leave that turned on for now. One of the dangers of form interactions is if you have the Facebook pixel on your website, the Facebook pixel technically sends data off to Facebook as a form submission, so you might see a lot of extra form submits, but if you’re just testing at the beginning, then you can definitely leave this turned on and you can always shut it off later. Now you’re going to click Save.
- Then click Create stream.
You just created your GA4 property!
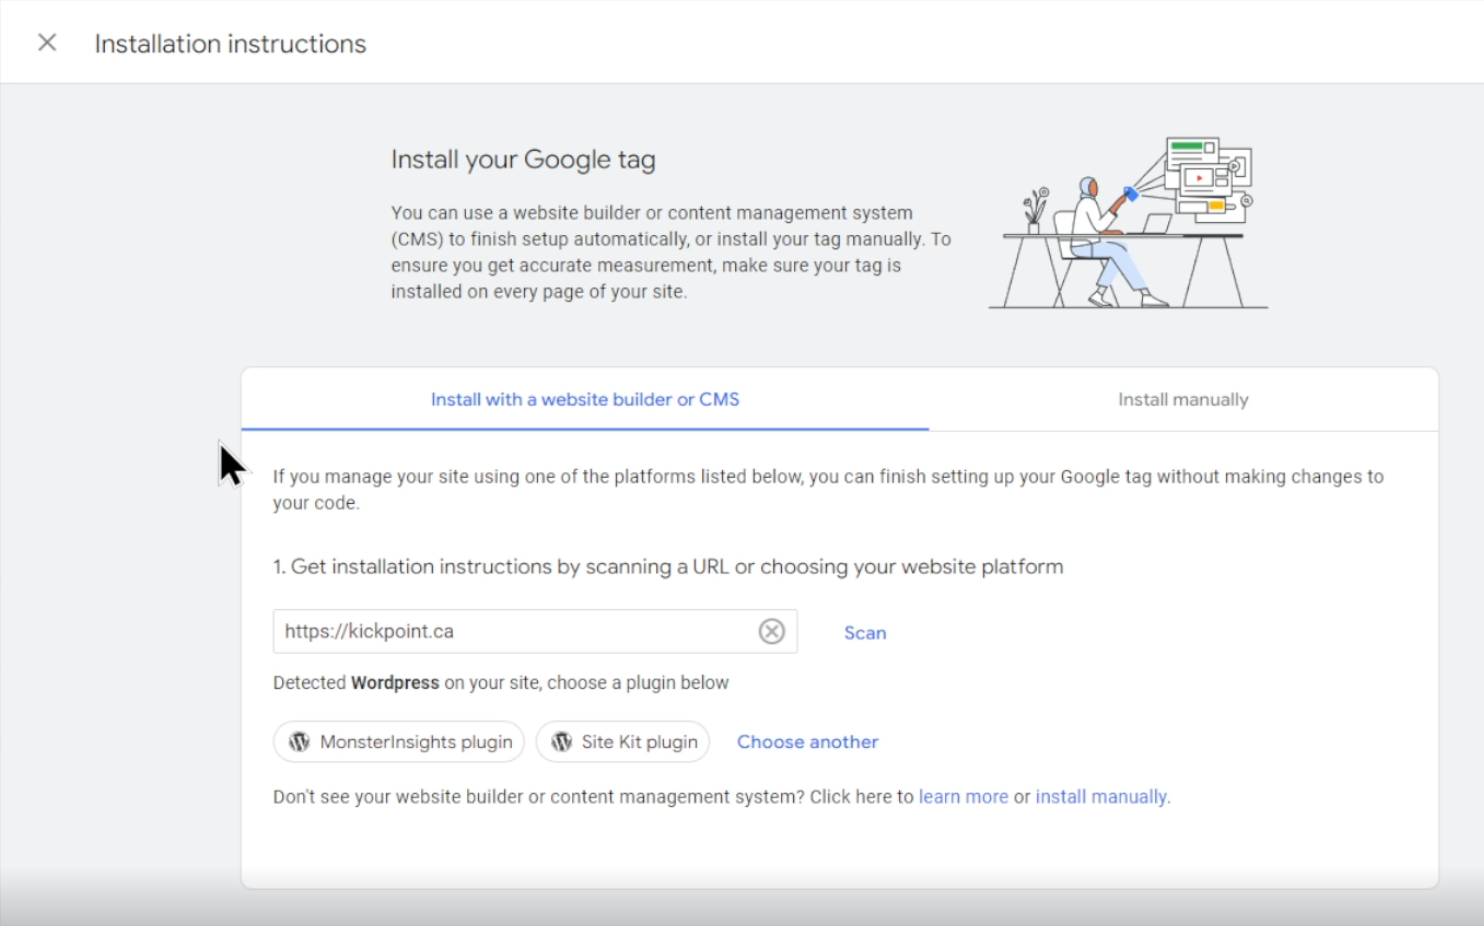
Installing your Google Tag
Now we’re taken to the Web steam details screen and then immediately a pop-up for Install your Google tag comes up. You have a couple of choices here to install the Google tag:
- You can get installation instructions. So for example, they know that we use WordPress on the Kick Point website, so it’s giving us some different options.
- You can click install manually and it will give you the code that you would copy in and put directly on the website.
- You can choose another plugin (Drupal, Duda, Monsterinsights, One, Site Kit, Squarespace, Typo3, Wiz) so it gives you different options for your different platforms here.
How you get this on the website is really going depend on what you’re using for your website builder. So for example, if we’re using Squarespace, then they give us a bunch of different examples, copy your tag ID, and then set up your Google Tag integration with Squarespace.
Just follow the steps Google provides. But if you know what you’re doing and you just want to move right on past this, then just click back on the screen to go to the Web Stream details view.
GA4 Measurement ID
On the Web Stream details view you’ll see your Measurement ID which is what you’ll use on a website.
You are not going to use the stream ID. This is not how data gets into GA4.

Your measurement ID is how data gets into GA4. I see a lot of people making this mistake, so make sure to avoid that part. You’re gonna take this measurement ID and add it to your website either based on the instructions that Google provided or what your website builder showed you. Or maybe you use Google Tag Manager and you’re comfortable coding and can put the code on your website yourself.
Checking that your code works in real time
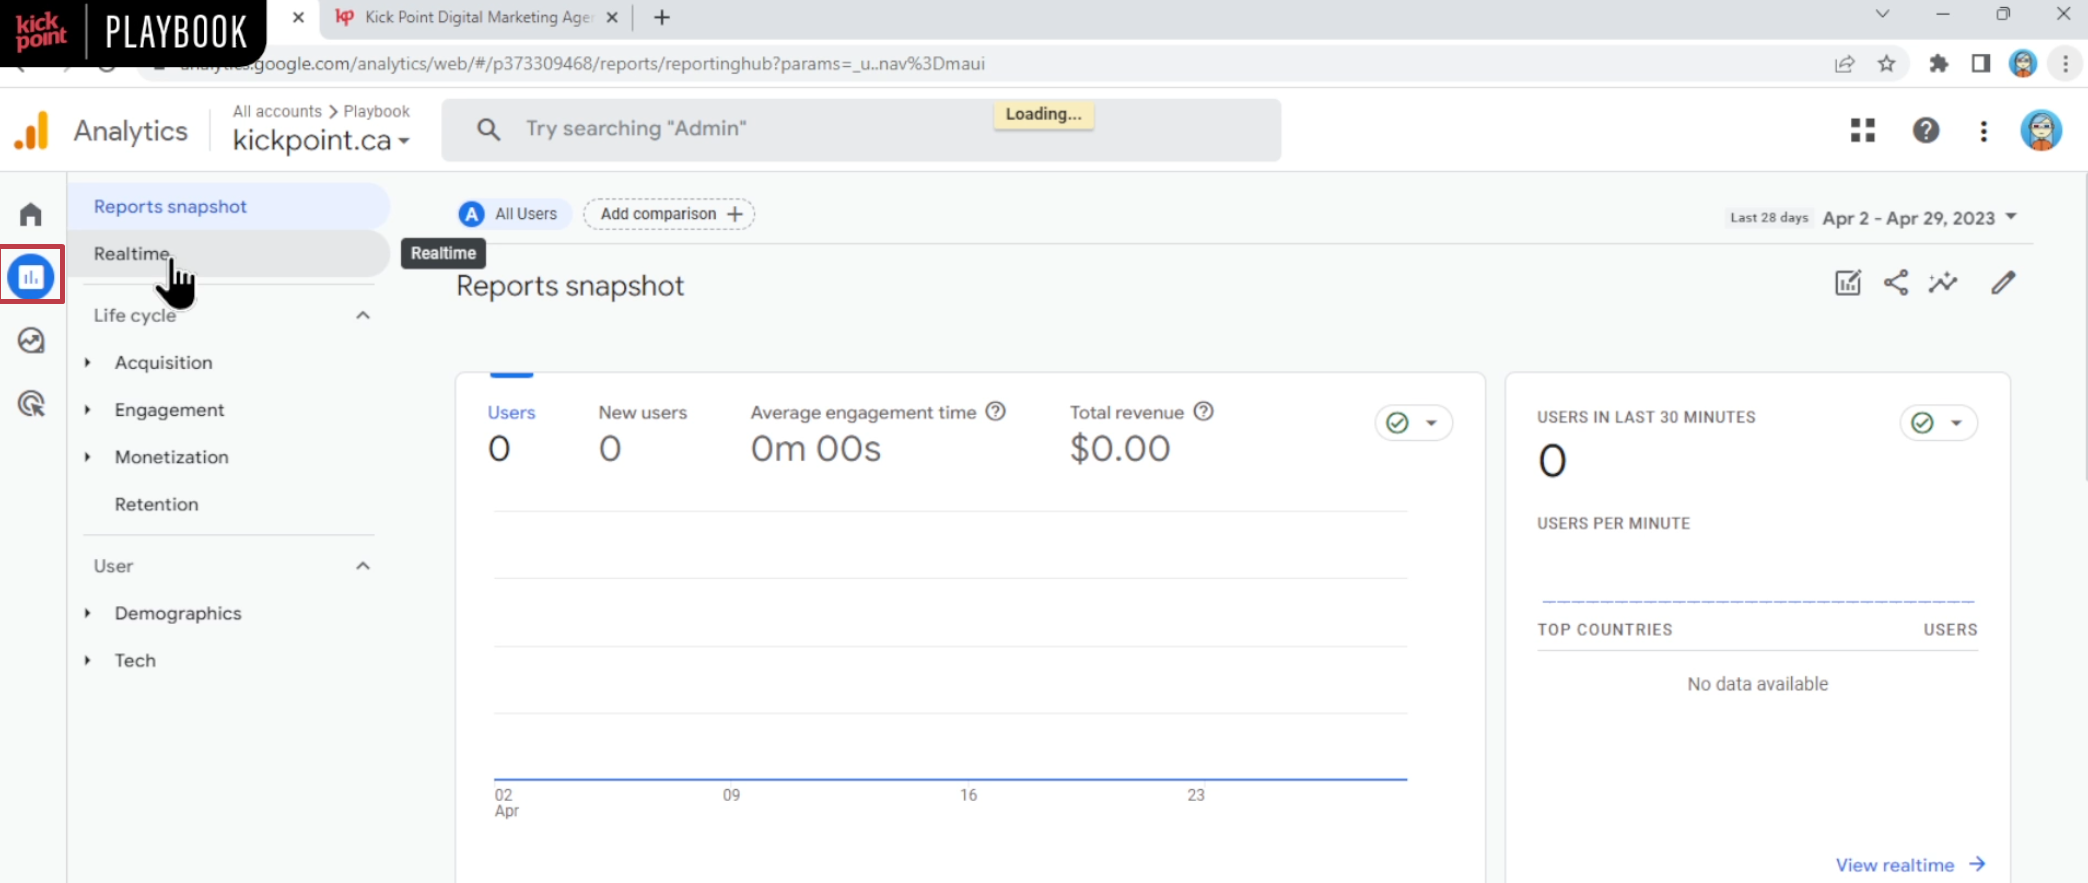
Once you’ve added the code to your website, you’re going to want to open up an incognito session or another browser tab, and then you’re going to look at the realtime view in GA4.
Close out of webstream details and click Next on the screen and continue to home. Then select Reports > Realtime. You’ll see no data is received from your website yet. If you do have anything showing up on your site already, you would click on reports and then you can go into the real time.
If there was anyone coming to the website, we would start to see this show up right away. You wouldn’t see any data in the reports just yet, but you would see stuff start to show up in the real time view. Now, to actually see the data in GA4 itself, you’re gonna need to give it at least 24 to 48 hours, as we’ve seen in some cases.
Want to improve your GA4 Skills?
Optimize your GA4 data settings
Now, we’re going to set up some important stuff in the admin area. Go back to admin, by clicking on the Gear icon in the bottom left of the screen.
Turn on data collection
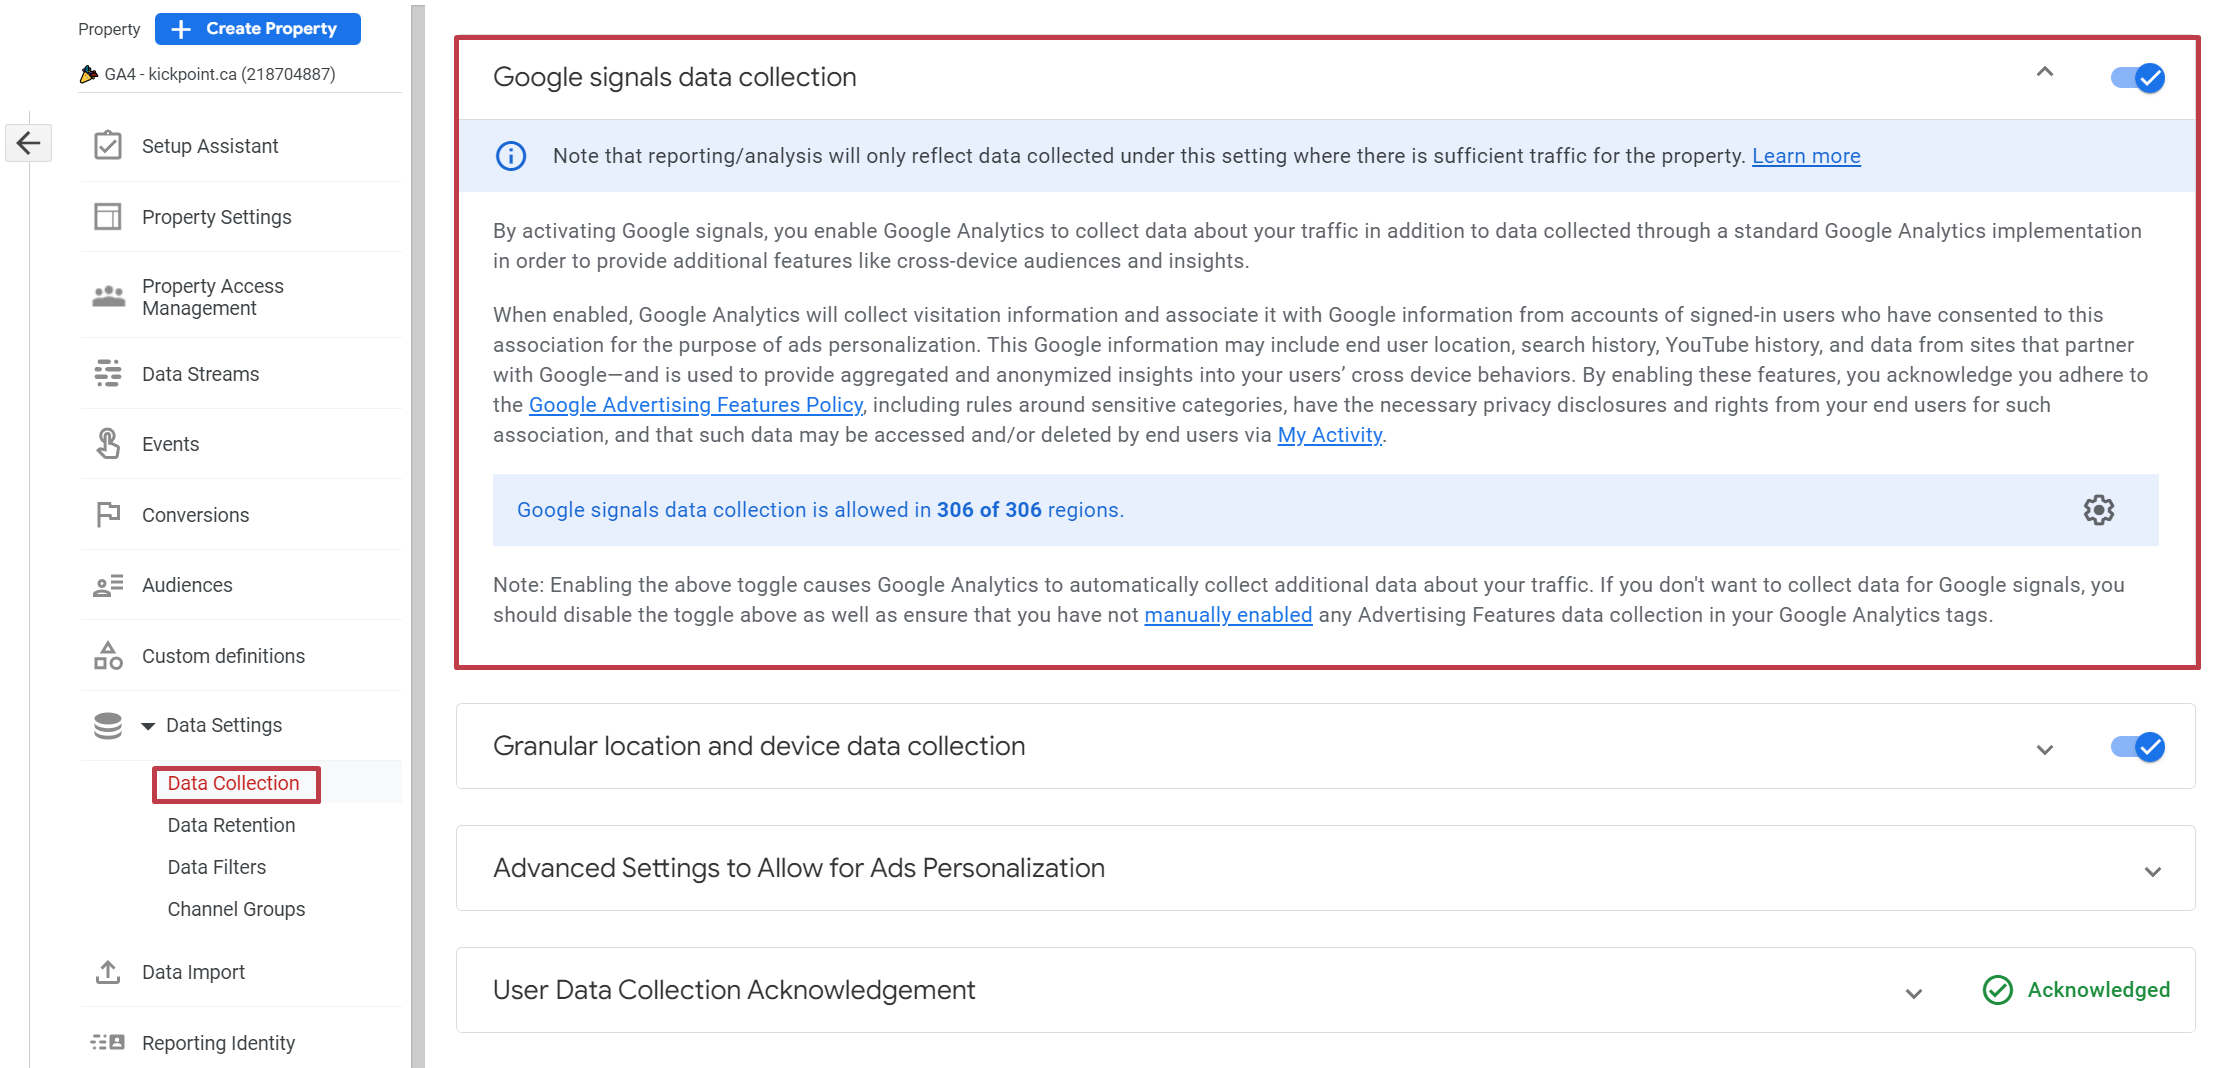
The first thing we’re going to do is go into the Data Settings section in the admin (in the second column where you see your GA Property number).
- Click on Data Settings
- Then click on Data Collection
- If you’re using Google Ads or if you want to collect demographic data on your website, you have to turn on Google signals data collection. Click Get started.
I recommend checking your privacy policy and making sure it doesn’t need to be updated before you do this. - Click Continue
- Scroll down and select Activate
Setting up data retention
Next is data retention. Now, this User and event data retention setting is a bit of a misleading setting because people think it means that Google is ditching your data completely after 2 months because this is the default length of time. That isn’t true.
What they are doing is removing extra details on your events, (these are called event parameters) that are saved with events.
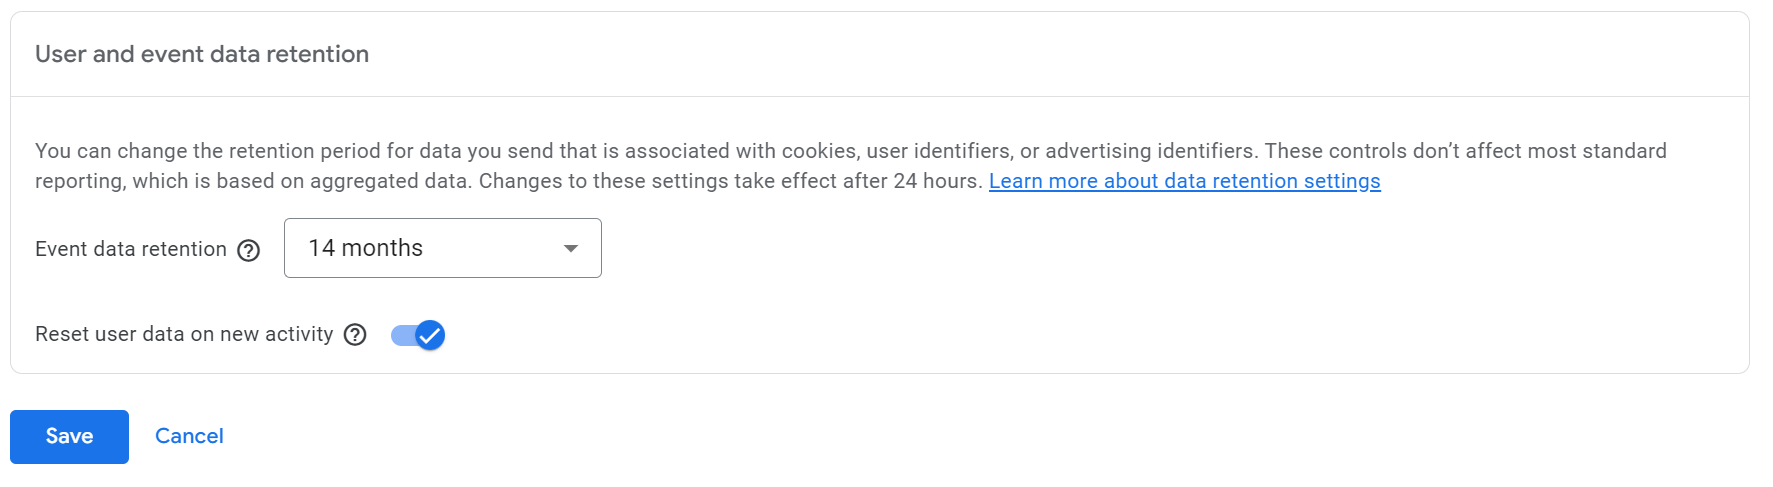
It’s important stuff. You definitely want to have more than just 2 months of that. So change this:
- Click the dropdown
- Select 14 months instead
- Click Save
Configuring cross domain settings
Now, if you’ll be using this GA4 property in more than one domain, you’re going to need to configure the cross domain settings. That’s how GA4 knows that it’s okay that it’s collecting data from two separate domains, and if a visitor moves from domain A to domain B, that Google should carry that session through.
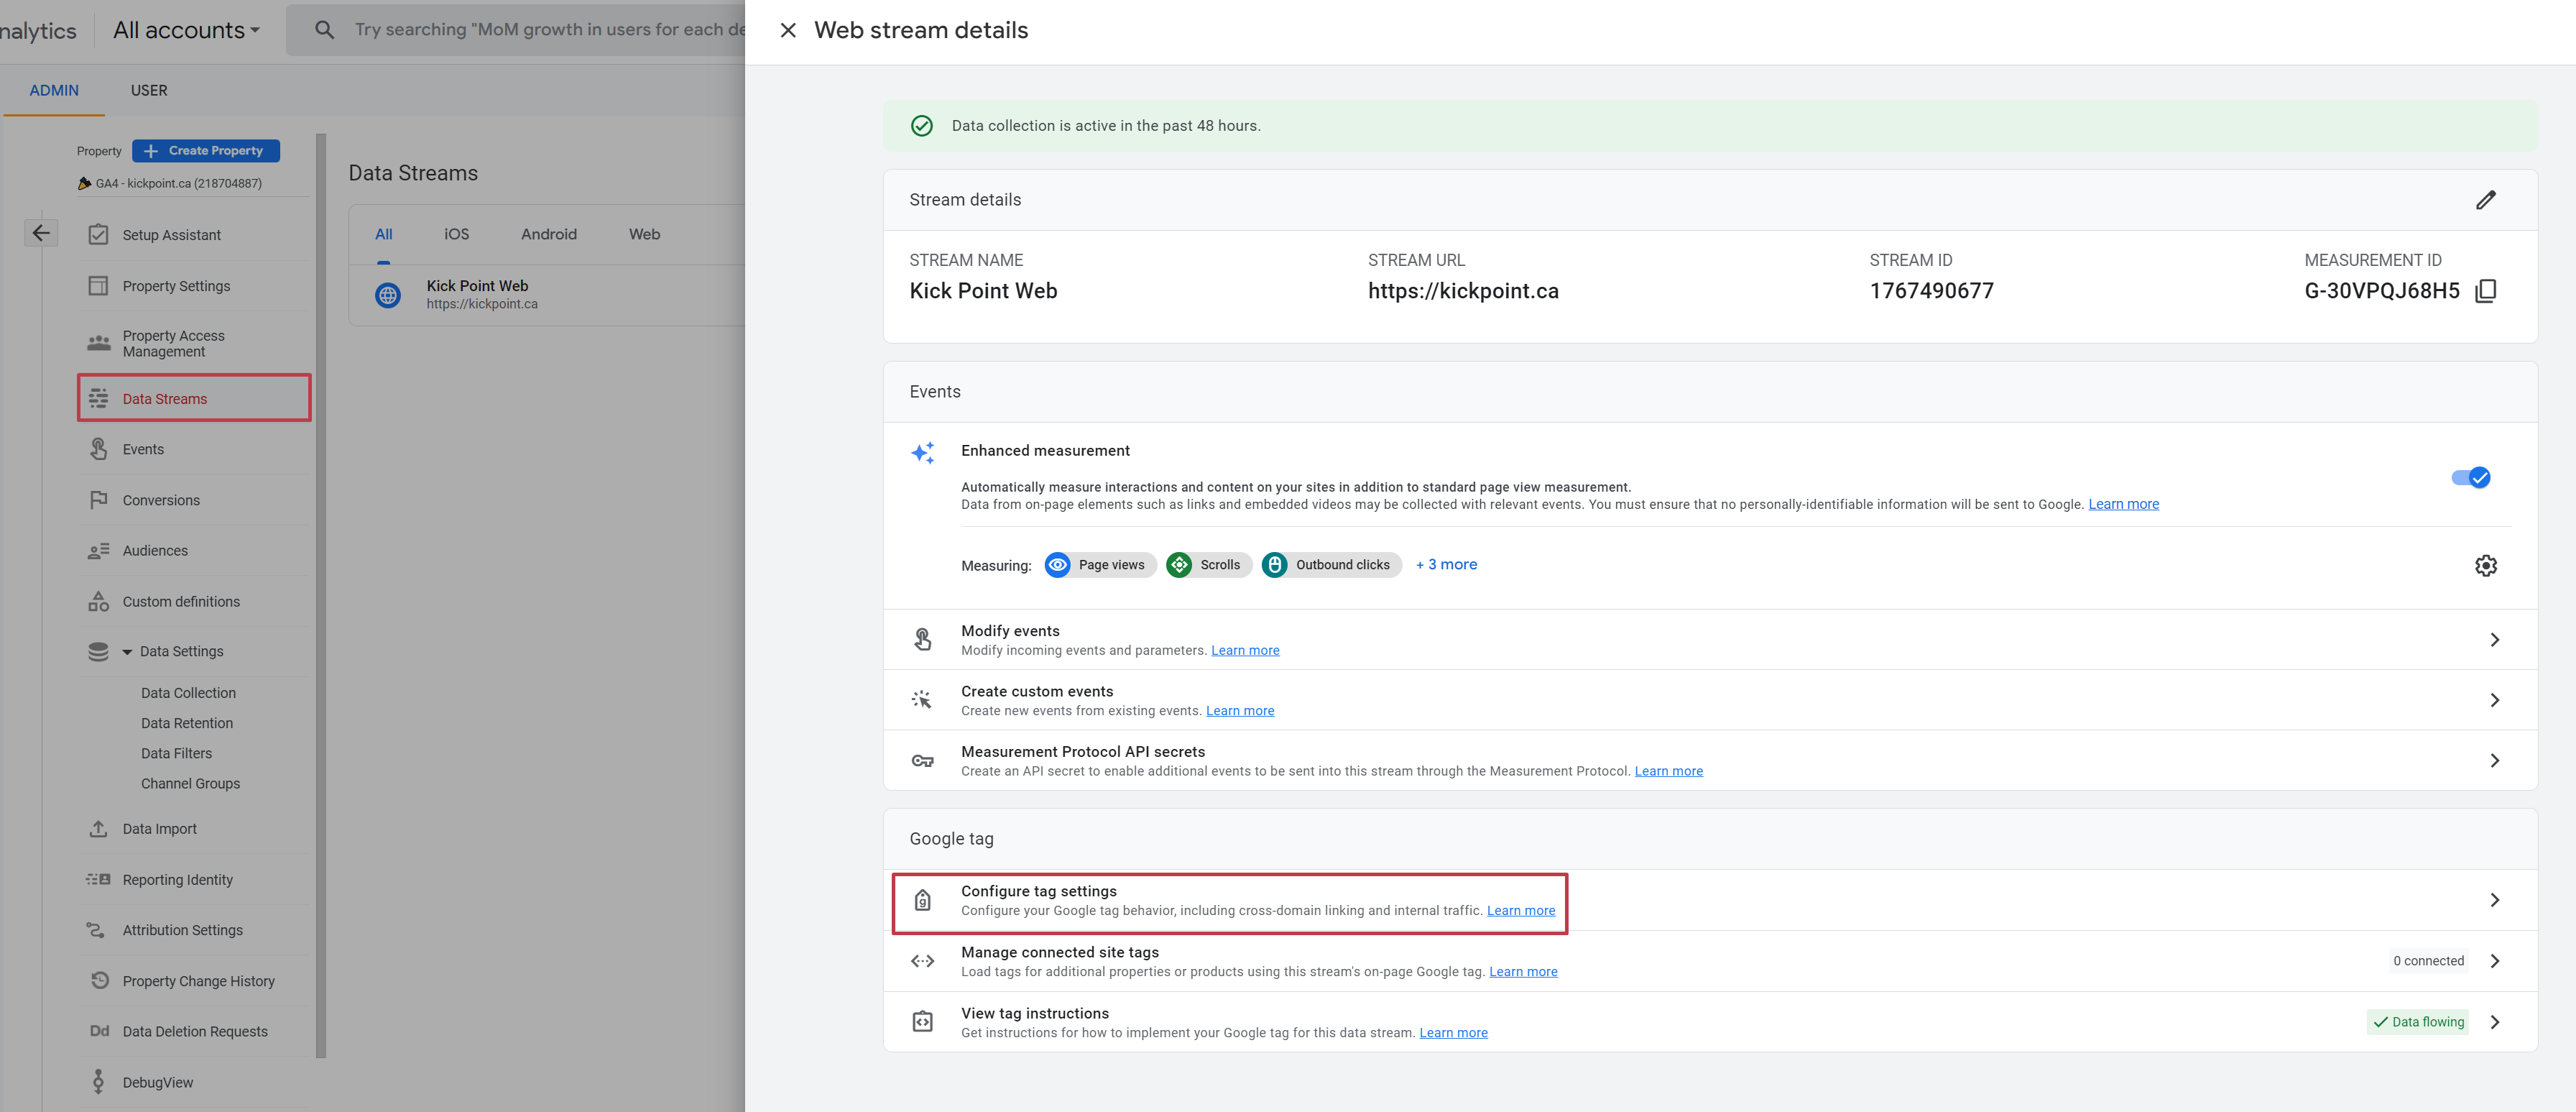
Otherwise, it would just get lost in between. If you need to do that, we’re gonna go back to the side panel and then:
- Click Data Streams
- Click on the stream
- Then select Configure tag settings
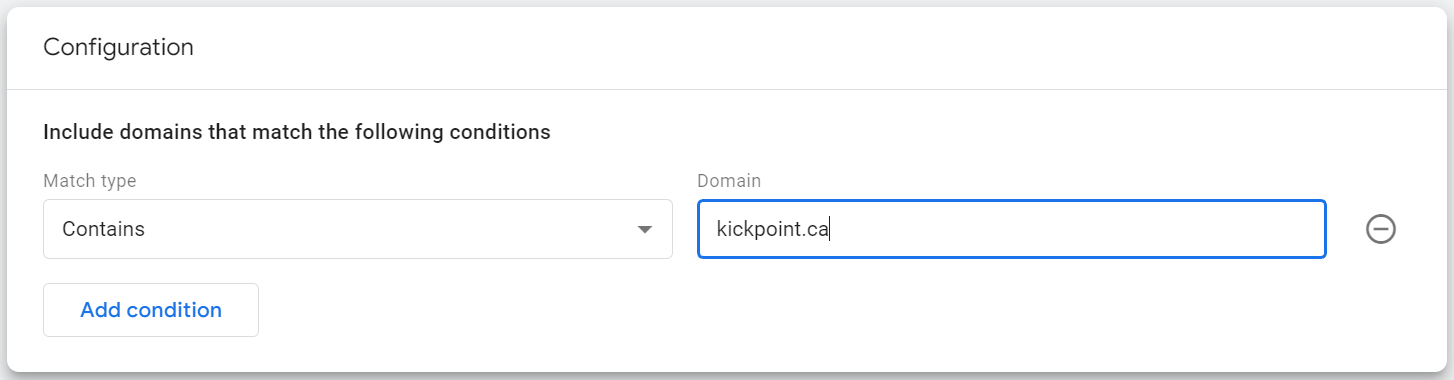
From here you’re going to click on Configure your domains. In this case, we do have it set up for kickpoint.ca, but let’s say for example, we want to make sure that any domain that contains kickpoint.ca, so instead of just our main website, we want to make sure we’re recording the Playbook brand, and anything else we might use.
- In this case, we’re going to say any domain that
- Match Type = Contains
- Domain = kickpoint.ca is okay for cross-domain measurement
- Then we’re going to click Save
Make sure to set that up based on what makes sense for you and your own properties.
Adding unwanted referral traffic
Related to cross-domain measurement, you may also have some third party sites like PayPal or payment gateways that you use if you’re an e-commerce site and you wouldn’t want those to show up as referral sources.
You may be familiar with that from UA, you can include those referrals here as well.
- In the Configure tag settings go to the Settings section and click Show all (dropdown)
- Then you’ll click on List unwanted referrals
- Click Add condition
- Now enter your parameters, so for example you’ll say
- Match type = Referral domain contains
- Domain = paypal.com
- Then Save
Excluding internal traffic
While you’re here in the configure tag settings, you may also want to indicate any internal traffic as well, such as people on your office network. We’re still in the same settings screen.
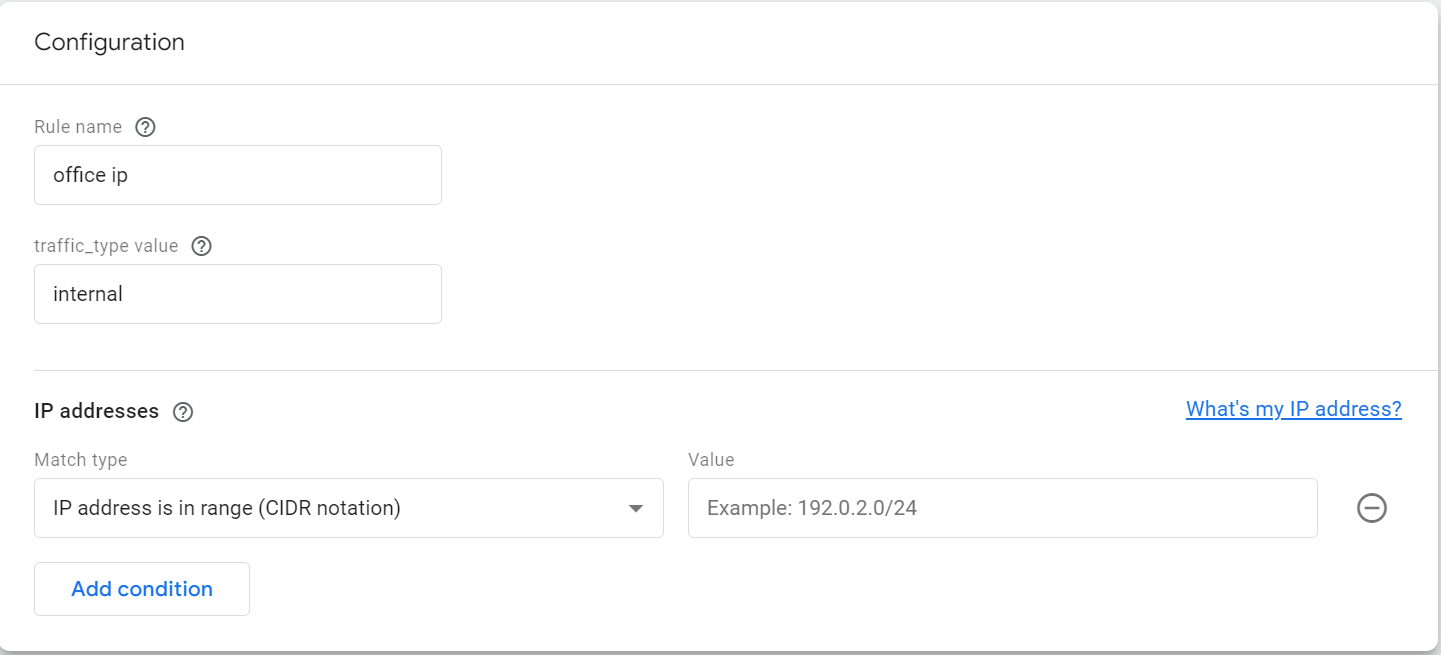
- We’re going to click on Define internal traffic
- Under Internal traffic rules, click Create
- Make sure to keep the traffic_type value as internal
- Add a Rule name, in this example it’s office ip,
- Now we’re going to add in the office IP address. If you’re not sure what your IP is, you can Google “what’s my ip?”. Just remember that if you’re at home, your IP address will probably change quite a bit. If you’re at an office, it probably will change less often.
Now we have to decide what’s going to happen with that excluded traffic. To do that,
- Go back to the Admin screen
- Select Data settings
- Then click on Data filters. You’ll see here there’s one filter already called excluded internal traffic. It’s added by default and it’s excluding anything with a traffic type parameter that is internal.
In the Define internal traffic step you may recall that we saw that the traffic_type value parameter was internal when we set up that office IP address. If we scroll down a little bit, then we have an option for the Filter state.
The default filter state is testing, or there’s active, or inactive. I recommend that you leave this filter status testing until you’re absolutely sure you’re capturing internal traffic correctly.
📢 Once you set this to active, that data is gone. You cannot get it back. It is not like UA where if you have an all website data view, it would go into that view and then you have a filtered view and then you could still see it in the all website data if you wanted to.
It’s just gone. It disappears. Keep that in mind. You might not want to set this as active right away. Just make sure you’ve got it, set it up right before you start ditching your data entirely.
Adjust session timing
The last thing you’re going to want to do in the Google tag settings, is that you might want to adjust some of the basic timings in GA4,
Session timeout is how long it takes from when a user is active to when their session ends.
Engaged session timer is how long you want someone to be active on the site before they count as an engaged session.
- To do that, you want to be on the Admin screen
- Select the Data streams section
- Click on the Data stream
- Scroll down and click on Configure tag settings
- Click Show all dropdown
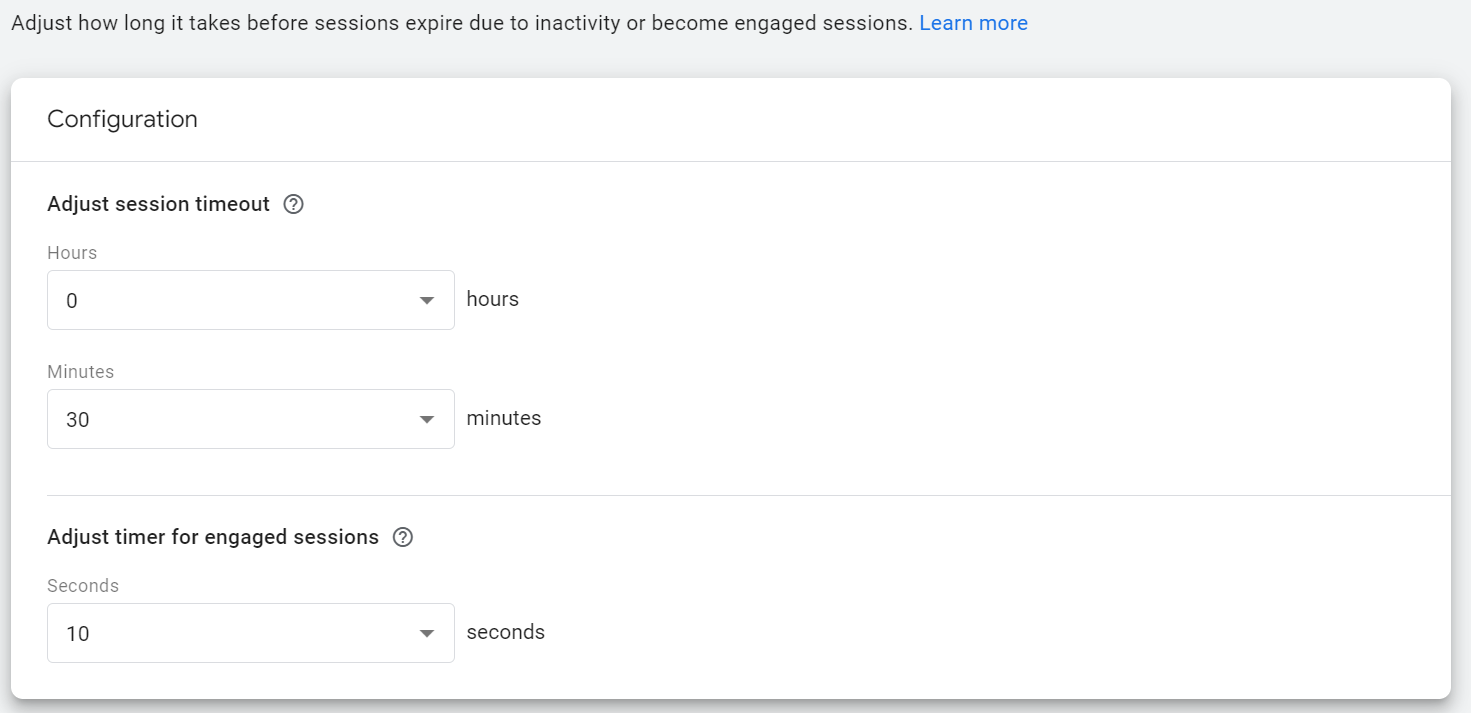
- Scroll down and select Adjust session timeout
- Here you can change the defaults:
- The default timeout is set to 30 minutes,
- You can change it to whatever makes sense.
- The longest time period you can choose the session timeout is 7 hours and 55 minutes.
Should you adjust the session timeout defaults?
That’s definitely a longer discussion. We’ll make sure to have a video covering that in the future. For now, you might want to leave those alone unless you’ve already changed them in UA and GA4 to match.
Now at this point, you’re all set with your bare minimum GA4, and you can wait for that data to roll on in. 🎉
Learn GA4, GTM, and reporting with our online course
How to set up conversions, custom dimensions and metrics
If you don’t care or don’t need to learn about setting up conversions or custom dimensions and metrics, you can stop here. Sometimes you just don’t need that stuff set up or you don’t need me to explain it to you. You know what to do. Or maybe you’re feeling overwhelmed and you want to come back to it later. Totally fair. If you continue, we’ll get into those additional configuration options now.
Events in GA4
Let’s get into some of the additional configuration options in GA4. You’ve probably heard that GA4 is all about events, and if you were used to using events in UA, you were used to how those were set up, where events had a category action label.
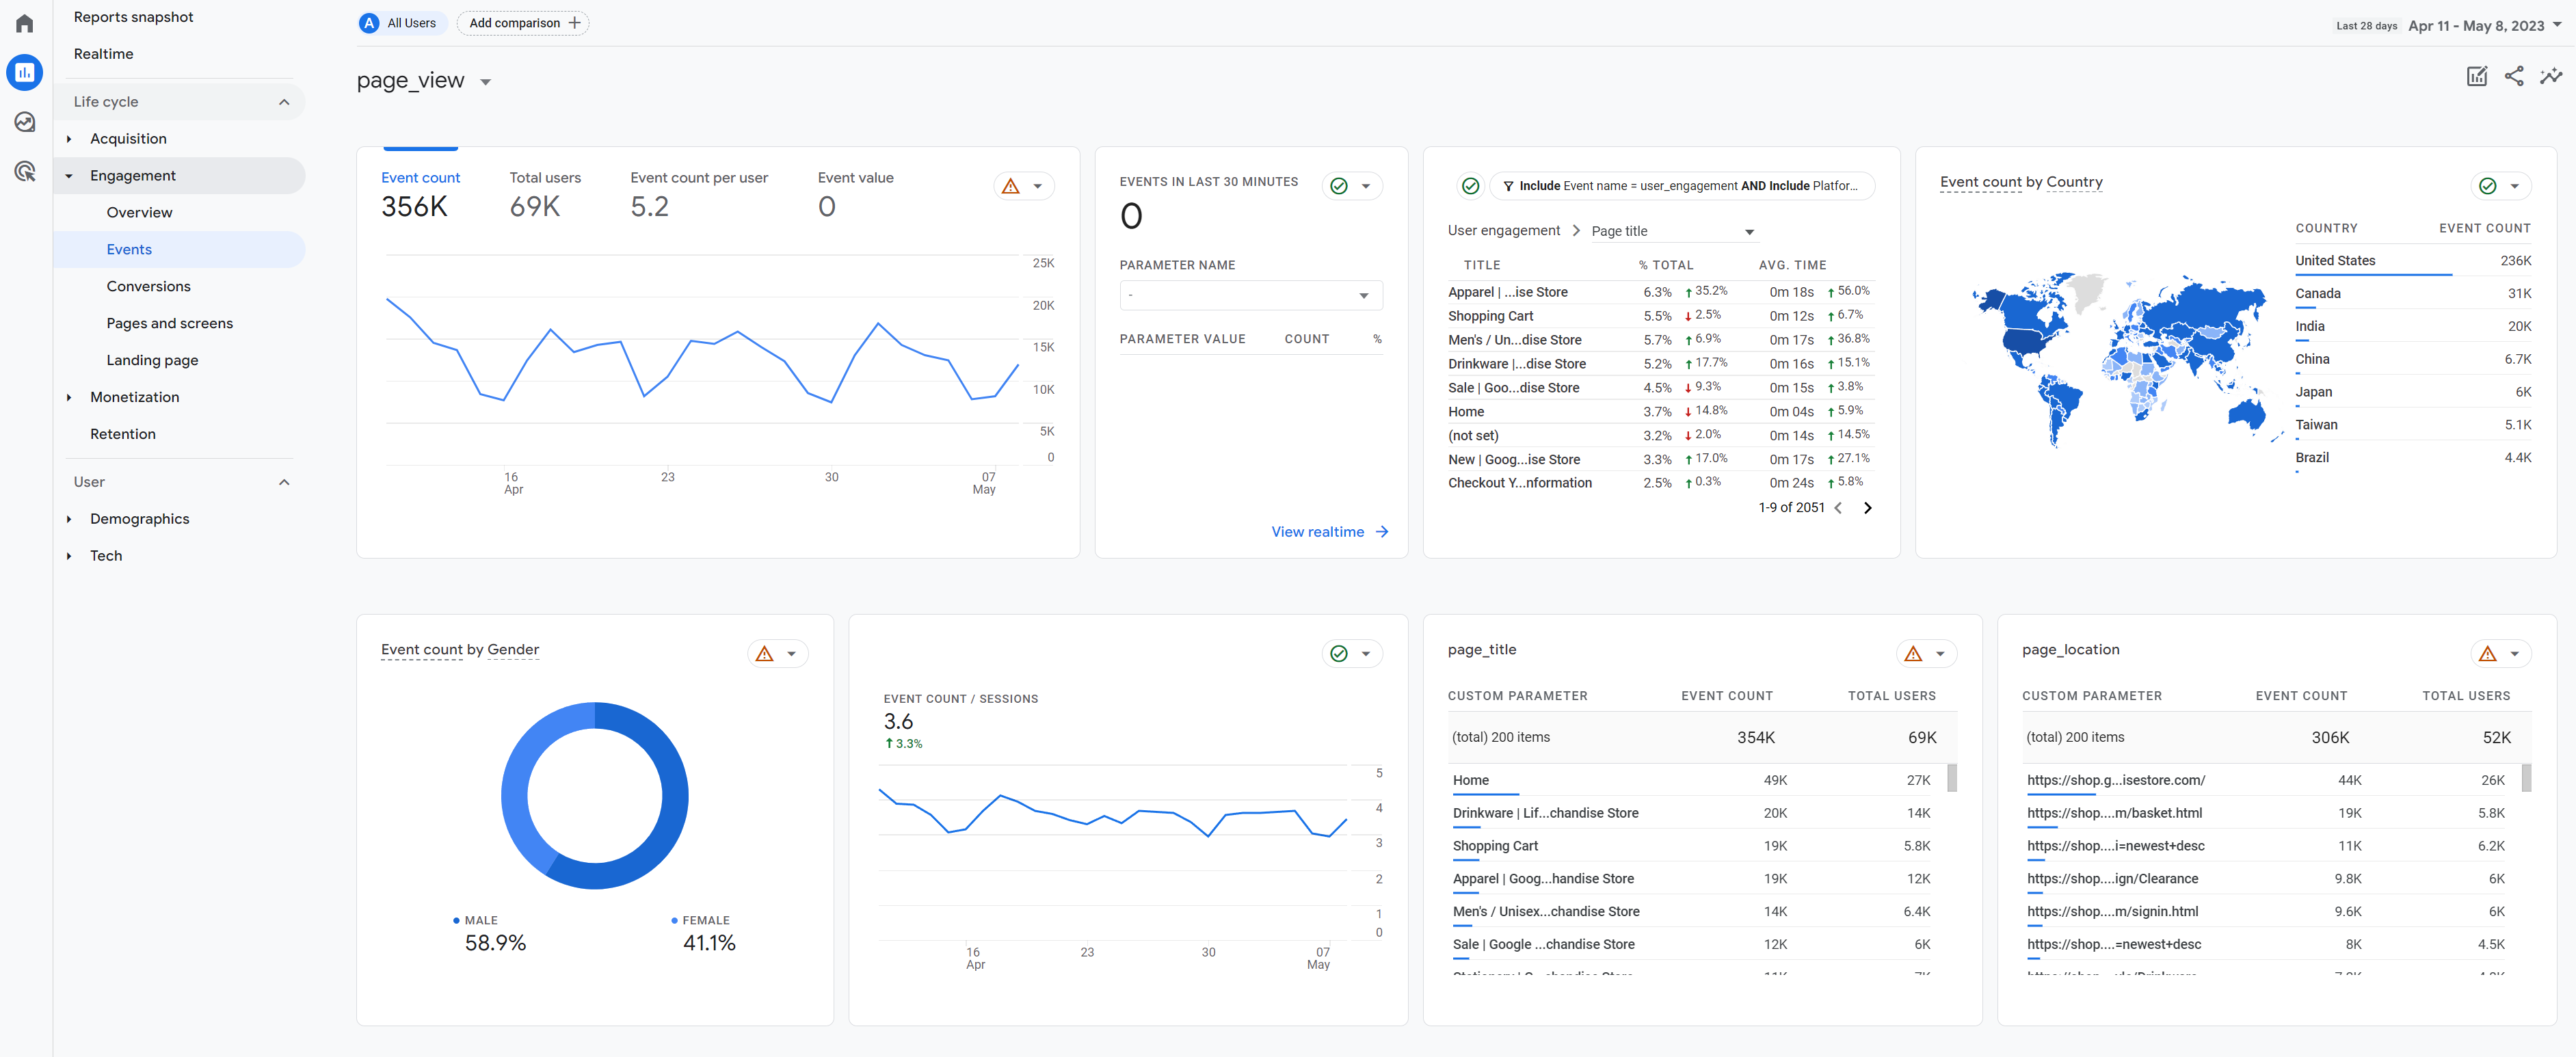
Let’s take a look at the GA4 Demo Account – Google Merch Shop (click the link to visit that page and follow the instructions to get access to the GA4 account or watch along in the video). If we go to the Reports section and select Engagement and then click Events in GA4, you’ll see that the following Event names:
- view_promotion
- view_item_list
- page_view
- scroll
- user_engagement
- session_start
- view_item
- first_visit
- new_recent_active_user
- view_cart
If we click on an event name, such as page view, and then we scroll down. What we’re going to see are Event Parameters,
- page_title
- page_location
- page_referrer, etc
Now, of course we’re seeing this here in the GA4 Demo Account, but when you go back to your own account and click on the page view event, you may not see these additional boxes. Why is that? That’s because of custom dimensions and custom metrics.
Custom dimensions and metrics did exist in UA, but they were used in very different ways where you had to specifically set them up and then send data to them.
📢 In GA4, you can send whatever parameters you want along with an event, but if you actually want to see them in the GA4 interface, you need to register them as custom dimensions.
Adding event parameters as custom dimensions to GA4
Here’s how to register your event parameters as custom dimensions in GA4:
- Go to the Admin section by clicking the gear icon on the bottom left of your screen
- Then click on Custom definitions in the second column.
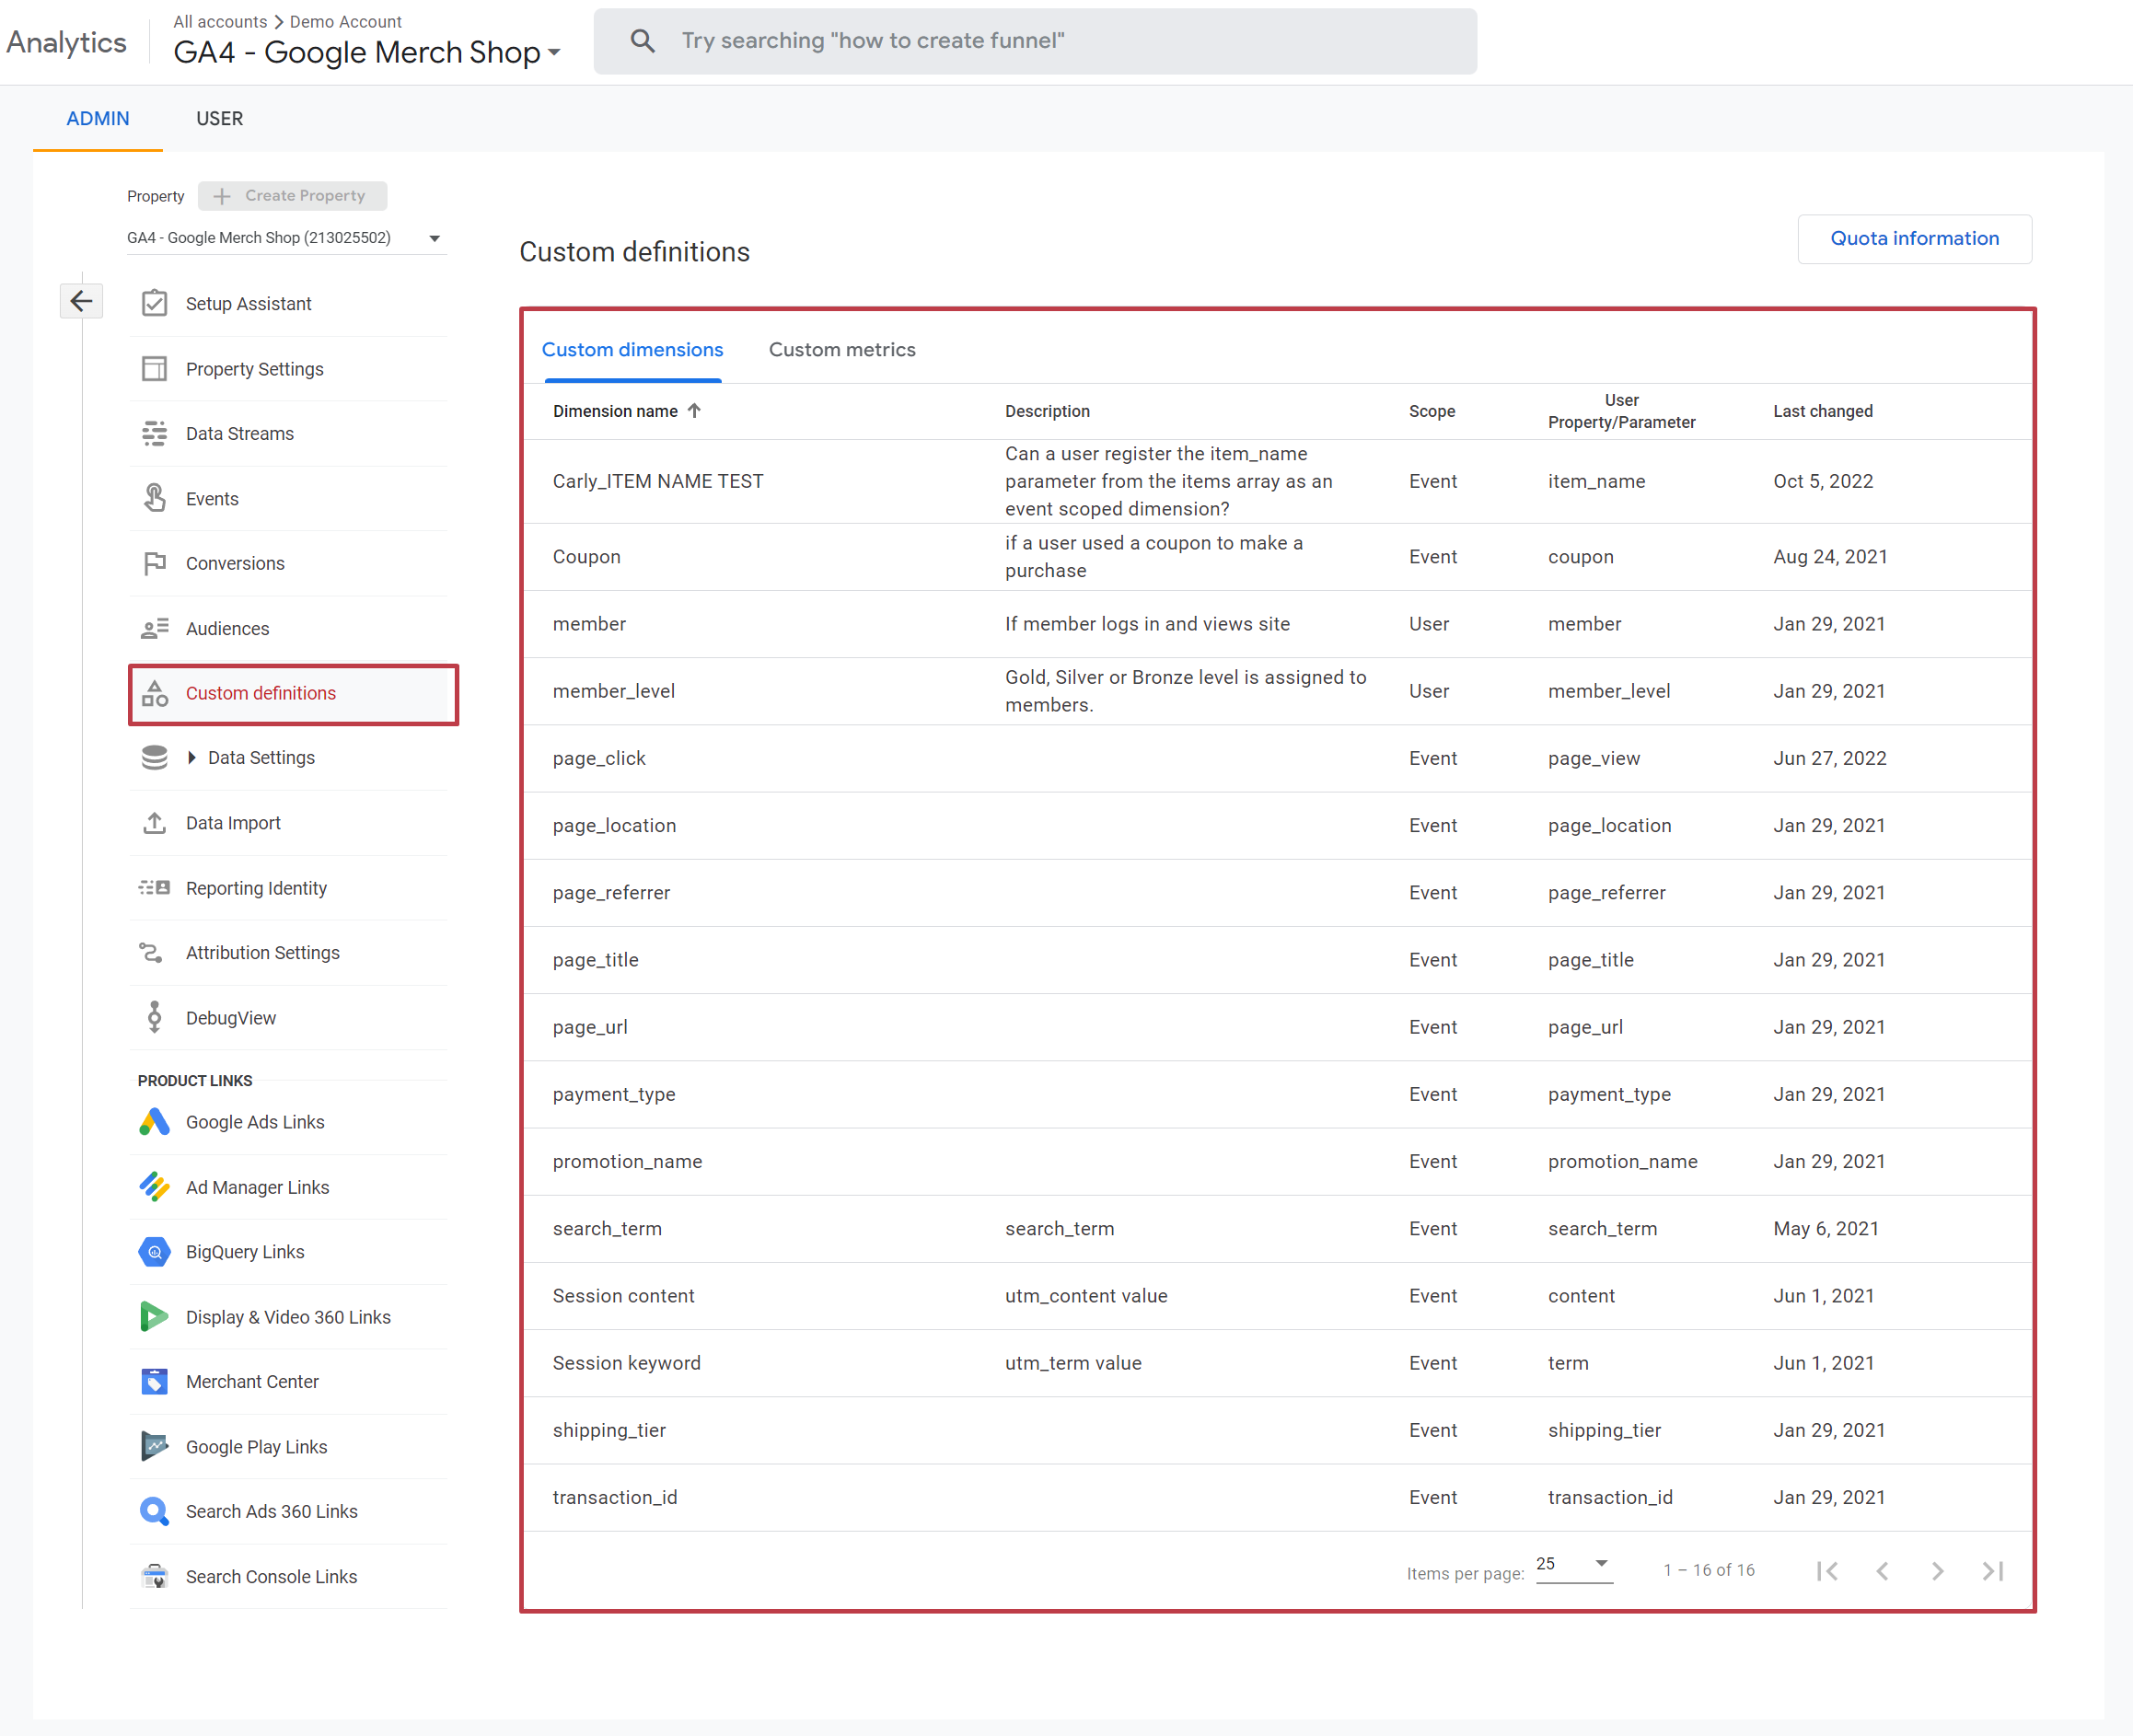
You can see in the example above of the Google demo account, they have the page title, page location, et cetera, already registered as custom dimensions.
Let’s go back to our own GA4 that we just created and take a look at the custom dimensions, since we haven’t created anything yet, it’s blank.
How to create custom dimensions:
- Click on Custom definitions
- Click the Create custom dimensions button
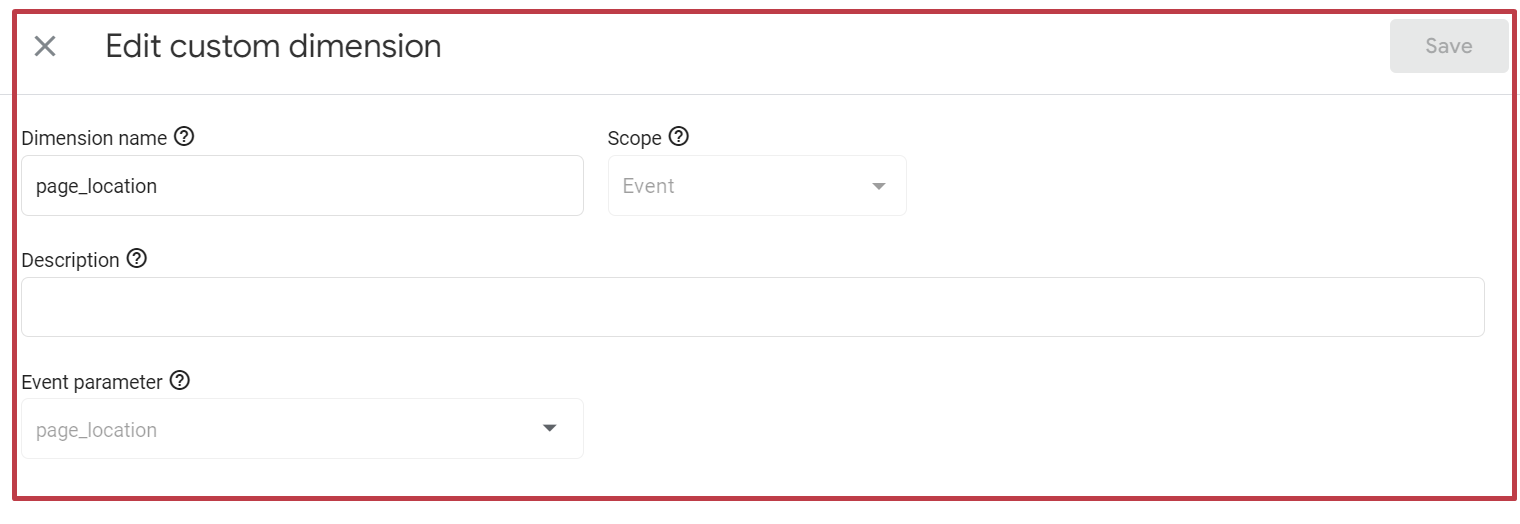
- Then select the Event parameter dropdown, which in this case we haven’t had any events come here yet. When you click the dropdown you’ll see a list of the different event parameters. Select the event parameter you would like to set up. For this example, we are using page_location.
- Now you can type in a display name for the Dimension name.What we do is we make the dimension name that’s shown in GA4 the same as the event parameter. Just to keep it simple, but you can choose whatever naming scheme you want and if you change something different.
- You might wanna add a Description so you know exactly what it is that you’re looking at.
- Click Save
It should show up in your GA4 reports within 24 hours.
Creating conversions based on events
Let’s take a look at conversions. All conversions are based on events! If you have, for example, the default form submit event, you would be able to have that as a conversion. Now, what if for example, you wanted to have a page view as a conversion.
You don’t want turn on every single page view as a conversion. For example, perhaps you only want your thank you page to be a conversion.
How to create conversion based on an event:
- Go to your Admin screen by clicking the gear icon at the bottom left of the screen
- Click Events in the second column
- Select Create event button. Now we can create an event that will be recorded when that specific page is viewed.
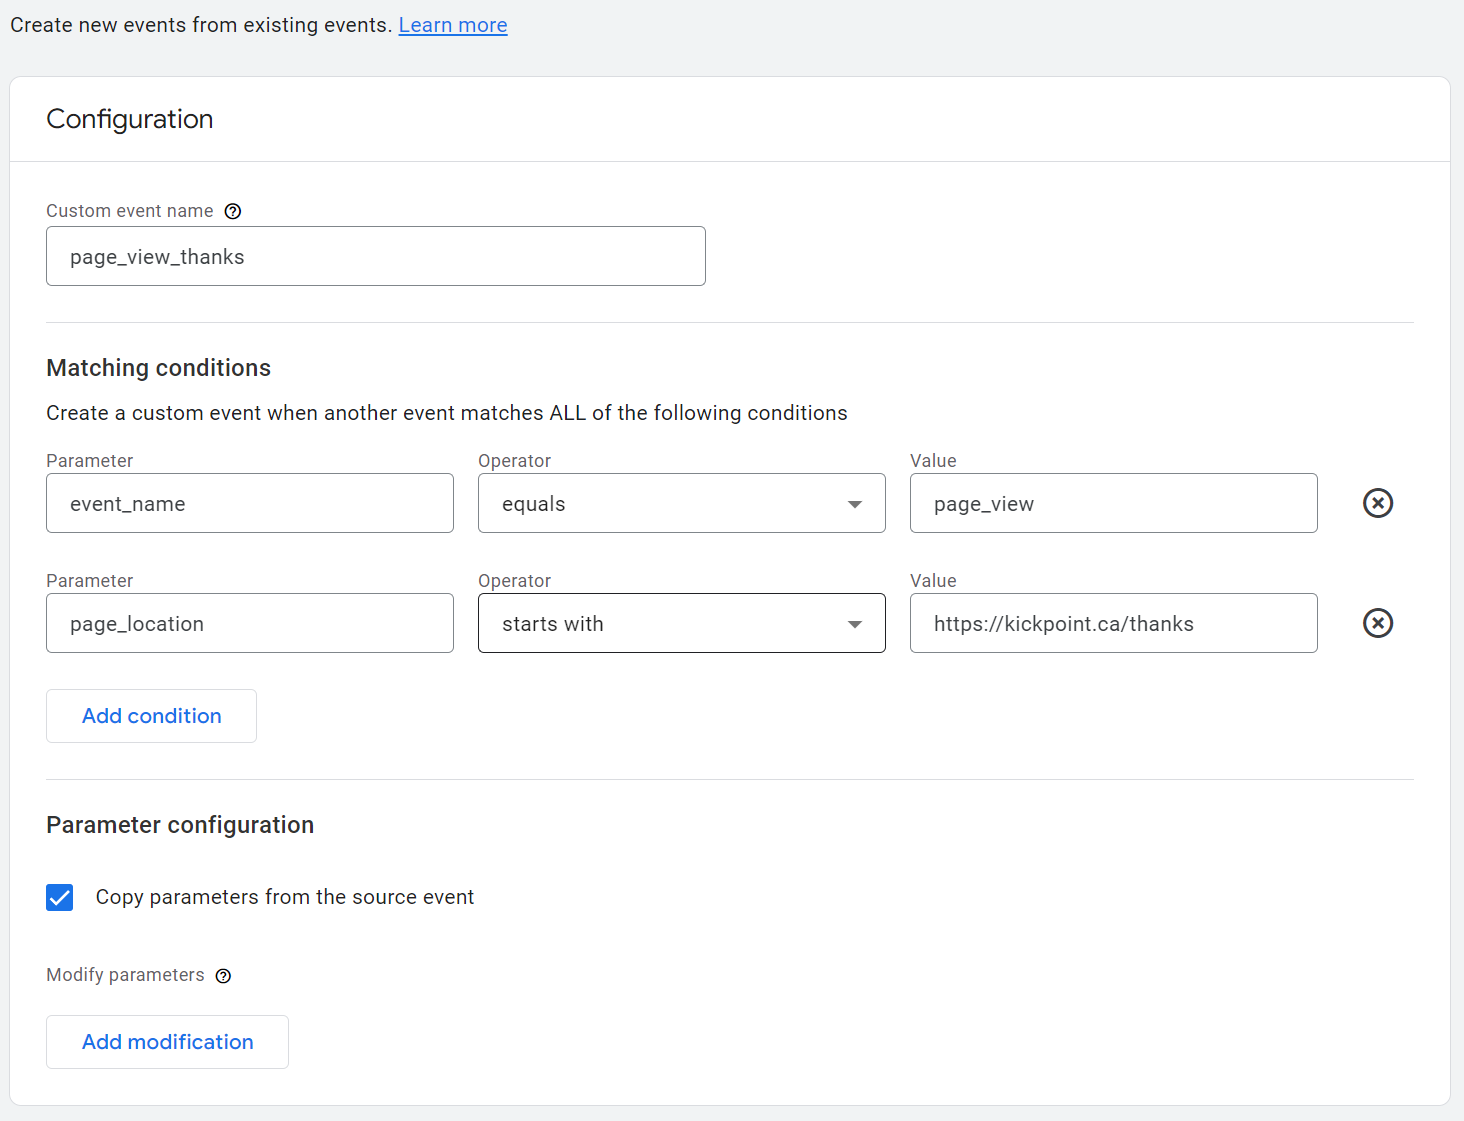
- Now we’re going to choose the Custom event name. In this case, because it will be based on a page view, we’re going to call it page_view_thanks, just to be really clear on exactly what’s going on.
- Now we pick our Matching conditions.
- We know that the Parameter is event_name
- Operator is equals
- Value is page_view
- Now we will click Add condition
- Parameter is page_location
- Operator is starts with
- Value is [add your thanks page url] in our example it is https://kickpoint.ca/thanks. For the value you will put in your own thank you page. Then, for the parameter configuration we’re going to choose to copy everything else from the source event. If you wanna get advanced with it, you can change parameters, but right now we’re just looking at the basics.
- Then we’re going to click on Create
Now we’ve got this custom event that exists and that will fire once someone actually gets to that thank you page. You may now see a pop-up of GA4 helpfully telling you to mark your event as a conversion.
Tracking your conversions
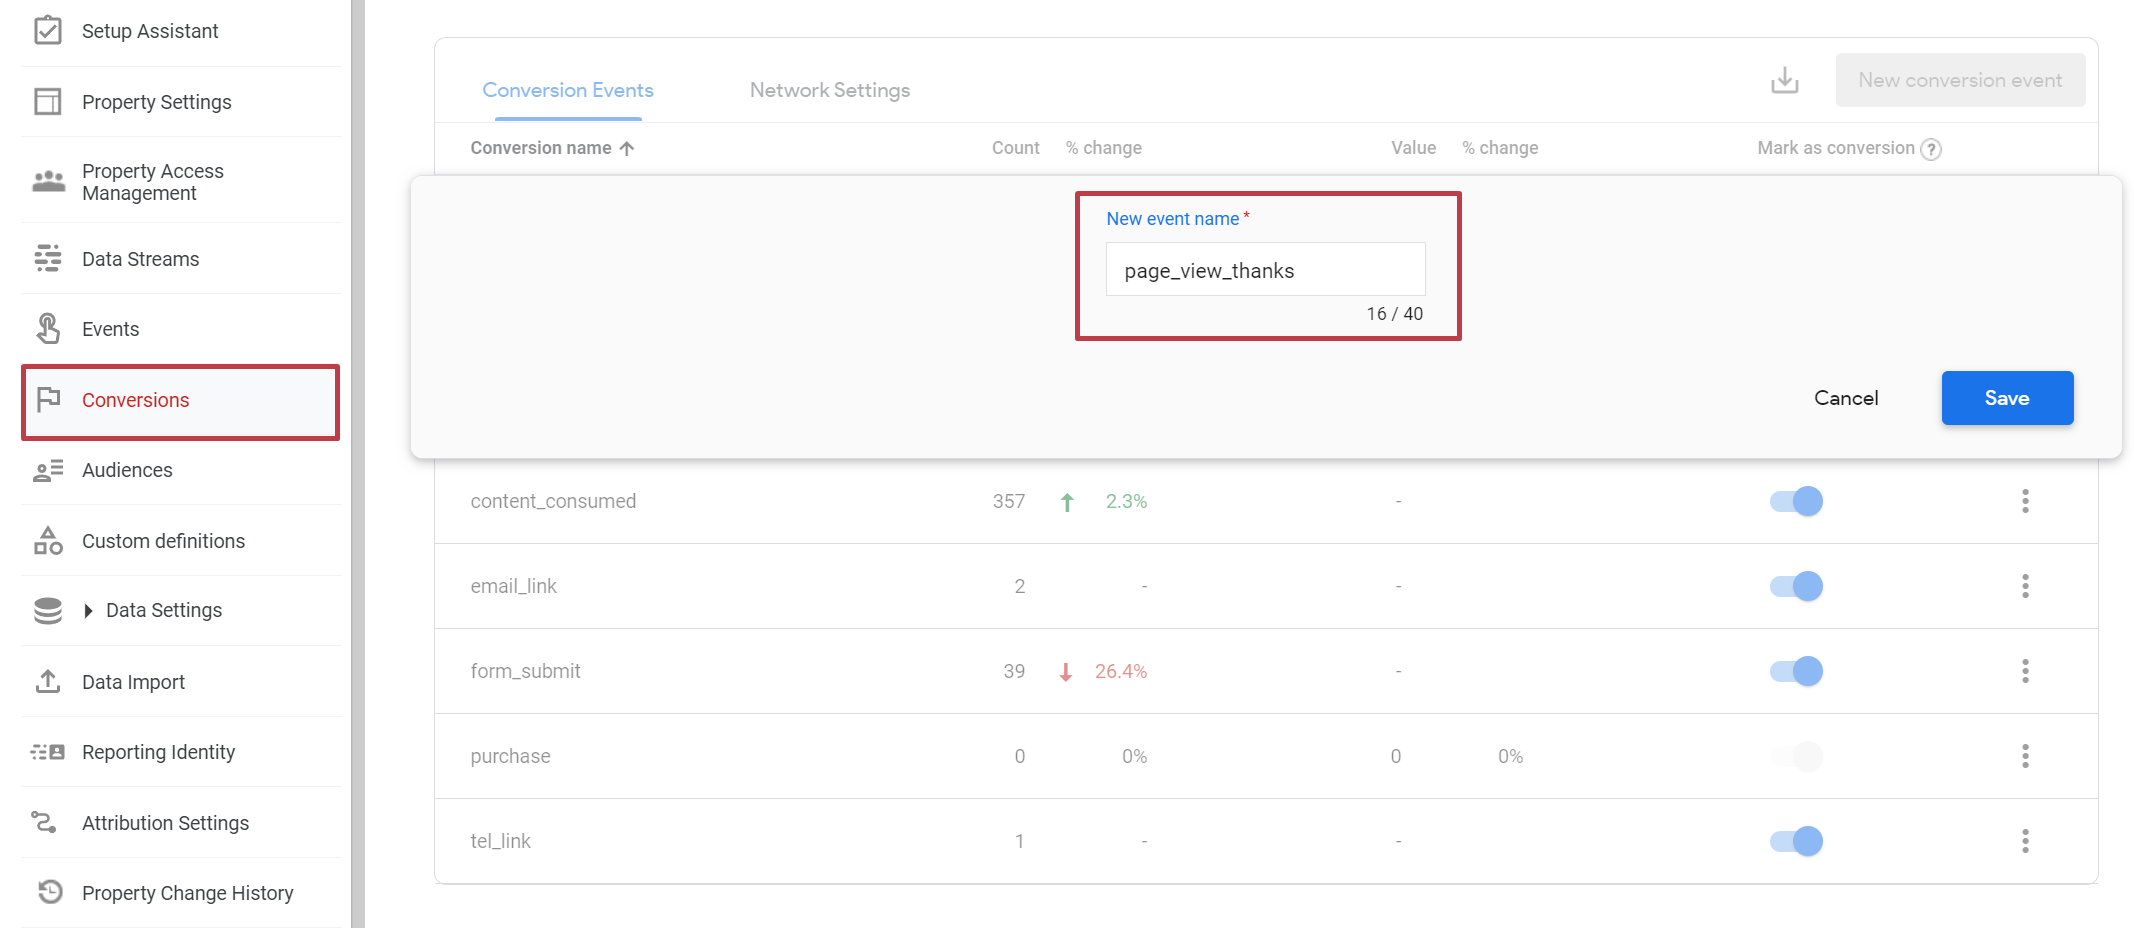
Now we’re going back over to conversions. You will not see this event in your conversion area yet, because the event hasn’t happened yet and we need to add the event to our conversions.
What we’re going to do is:
- Click New conversion event button
- Add a New event name*, this is where we’re going to add in the event that we just created. It will be page_view_thanks.
- Then click Save
Now when that event is recorded (visitor viewed your thank you page) you’ll actually have it ready to go as a conversion. You can do this for any event at all!
How to setup a form fill as a conversion event:
If you’re just setting up GA4 and you don’t have any form fills yet (because you just added it five minutes ago to your website), you can add the conversion event for a form submit .
- Click New conversion event
- Add your New event name*, we’re gonna type in form_submit
- Then we’re going to click Save
Once those form fills start happening, they’ll already be set up as conversions.
Linking your Google Ads and Search Console to GA4
While you’re here in the Admin dashboard you should link your Google Ads account and Search Console data.
Here are instructions to link your Google Ads account and Search console data in GA4:
- Scroll down to the Product Links section in the second column
- Click on Google Ads Links. If you have a Google Ads account, definitely link that up to your GA4 property.
- Click the Link button
- Choose the Google Ads account you would like to connect and click Next
- Complete the Configure Settings
- Review the information and then click Submit
- Then click on Search Console Links to link up your search console data to your GA4 property.
- Click the Link button
- Choose the Search Console property you would like to connect and click Next
- Select Web Stream and choose a data steam (should be URL for your domain) click Next
- Review the information and then click Submit
At this point, you should have the basics of a GA4 property ready to go!! Remember, it does take 24 to 48 hours before you start to see data showing up, but you can always go to the realtime view. Yu get to that under Reports and then click on Realtime. This will show if your property is indeed capturing website data.
Remember, in this guide, we have not added our newly created GA4 property to a website, so we don’t see any data showing up yet, but in your case, if you have added it to your website, you should start to see that show up.
Once you have some data in your GA4. I’d next recommend watching our video on How to Find Your Favourite UA Reports in GA4.
Do you still have more questions about GA4 and analytics in general?
Send them our way and/or let us know what topics you want us to cover in future videos and posts. We’re just getting started! Also, if you enjoyed this content please subscribe to our YouTube channel.
Not sure where to start in GA4?

Dana enjoys solving problems that haven’t been solved before. With her 20+ years experience in digital marketing and teaching, she has a knack for distilling complex topics into engaging and easy to understand instruction. You’ll find Dana sharing her knowledge at digital marketing conferences around the world, teaching courses, and hosting a technology column.
Learn more about Dana