Black Friday is one of the most popular events for driving sales for all types and sizes of businesses. In this beginner-friendly guide, I’ll cover easy steps for tracking Black Friday sales in Google Analytics 4 (GA4). In this beginner-friendly guide, I’ll cover easy steps for tracking Black Friday sales in Google Analytics, from setting up offline tracking tools like QR codes and UTMs to building custom audiences.
This is a free lesson from my Practical GA4 course! You can use this method to track any campaign, not just for Black Friday deals.
Ready to dive deeper into GA4?
Video walkthrough of how to track offline Black Friday campaigns in GA4
Why track offline campaigns?
Many Black Friday campaigns combine online and offline tactics, like radio ads, billboards, or in-store promos. If you want to see the full impact of these campaigns, driving people to your website and then capturing those visits in Google Analytics helps you see the complete picture (as much as possible).
Two methods for tracking Black Friday offline campaigns
1. Use QR codes with UTM parameters
Add QR codes to your offline ads, which then bring people to your landing pages, with UTM parameters added on. QR codes have made a big comeback, and they’re easy and convenient for people to use. By adding UTMs to your QR codes, you’re able to track visitors who came across your offline ads.
⚡ If you haven’t worked with UTM parameters before, grab my free guide to using UTM parameters for campaign tracking in GA4!
UTM parameters help GA4 identify specific ads, campaigns, or overall marketing channels. Here’s an example UTM structure for a Black Friday transit ad:
- utm_medium=offline — as in this is an offline marketing tactic
- utm_source=ooh — because it is out of home advertising
- utm_campaign=bf2025 — it’s for Black Friday 2025
- utm_content=blue+shoe+sale — this is the specific product or service that we’re advertising
💡 Tip: Use plus symbols (+) to separate words—plus symbols turn into spaces in GA4, making your campaign names easy to read.
2. Custom URLs with redirects
If you can’t use a QR code, or want to provide a URL as well, instead of trying to get visitors to remember a long URL with UTM parameters, create a short, memorable URL. You’ll then redirect visitors to this URL over to a final URL with your UTM parameters added on.
For example, let’s say I’m advertising on a radio station named The Zone (my local alt rock station in Victoria, BC!), and your campaign URL will be read out loud on the air. You can’t use a QR code in that case! Instead, create the URL of yoursite.com/thezone and then this URL would redirect the final, longer URL that has our UTMs added to it.
💡 Tip: If your website is built on WordPress, I recommend the Redirection plugin to manage these redirects. If you’re not using WordPress, there are lots of ways to redirect a URL. Check with your CMS provider or web host.
Setting up tracking for offline campaigns in advance
The best results come from proactive tracking. Of course, we can’t track everyone, but we can make sure we’re tracking as much as we possibly can by preparing in advance.
Before Black Friday, ensure that your tracking URLs, QR codes, and UTM parameters are all ready. The more data you can capture, the more complete your reporting will be.
💡 Tip: Add tracking numbers for phone calls if you’re expecting in-store traffic from Black Friday ads. People will call in advance to ask questions!
How to Create a Black Friday audience in GA4
Tracking visitors after Black Friday can reveal whether your campaign had a lasting impact. Audiences in GA4 can segment out interested Black Friday shoppers for future analysis.
💡 Tip: Create your audience before Black Friday as audiences can’t be backfilled in GA4.
Here’s how to create a custom GA4 audience for Black Friday traffic:
- Go to the GA4 Admin by clicking the gear icon at the bottom left.
- Click Audiences under Data Display.
- Click the blue New Audience button at the top right.
- Click Create a custom audience.
- Enter your audience name at the top where it says Untitled Audience, and add a description underneath so that other people on your team know how and why this audience was set up.
- Select the Membership Duration at right. The default duration is 30 days, which means that visitors will only be included in this audience for 30 days—probably not long enough. If you choose Set to maximum limit, visitors will be included for up to 2 years, depending on their privacy and cookie settings.
- Next we’ll add our conditions:
- Click Add new condition, then search for Session campaign.
- Click Add filter.
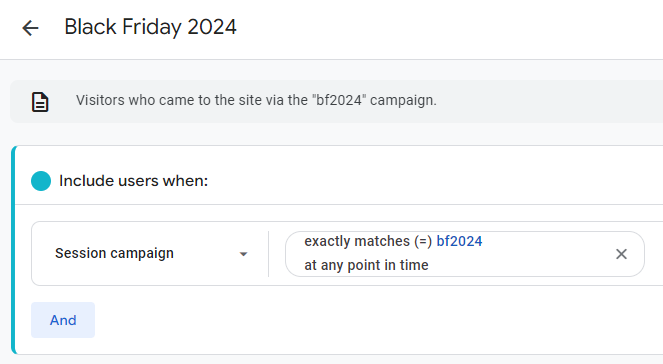
- Select Condition exactly matches, and then enter your campaign name (e.g. bf2024).
- Click Apply.
This is what your audience conditions should look like. Of course if you’re using a different campaign name, make sure to include that instead of this example one. Once you’re happy with your audience, click Save.
💡 Tip: You can’t change audience conditions once the audience is saved, so take a minute to make sure that it’s set up correctly before saving!
Use an audience trigger and GA4’s cohort analysis exploration for long-term insights
To understand the lasting effects of your Black Friday promotion, combine an audience trigger with GA4’s Cohort Analysis Exploration. This Exploration shows you how many visitors return, convert, or engage over time, but it works best when you have a specific event that it can use for the inclusion criteria.
First, let’s add in the Audience Trigger:
- Go to the GA4 Admin by clicking the gear icon at the bottom left.
- Click Audiences under Data Display.
- Click the three dots to the right of your Black Friday audience, then click Edit.
- Under the Audience Trigger section (in Additional Audience Settings), click + Create new.
- Enter the name of the event that will be recorded when visitors enter this audience. Keep in mind GA4’s event naming rules.
💡 Tip: Keep your event names obvious, and consider adding aud_ at the front of your audience triggered event so that everyone knows how this event is triggered. For example, you could name your event aud_blackfriday_2025.
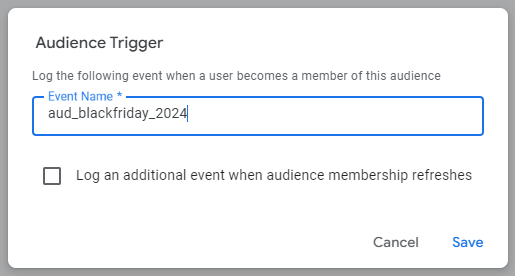
- Keep the Log an additional event when audience membership refreshes checkbox unchecked—that’s only really useful for short-term audiences, not long-term campaign tracking like what you’re doing here.
- Click Save.
After your Audience Trigger is set up, you will need to wait for this event to be recorded at least once before you can set up your Cohort Exploration. Once you see your new event recorded in GA4, create the Exploration:
- In GA4, go to Explore (in the left hand navigation) and click the right arrow until you see Cohort exploration. Select that option.
- In the Cohort Inclusion option (under Settings),
- Set your inclusion criteria to be the Black Friday audience triggered event that you created earlier.
- Select your return criteria—the default is any event (as in any visit) but you may want to limit this to events such as purchases.
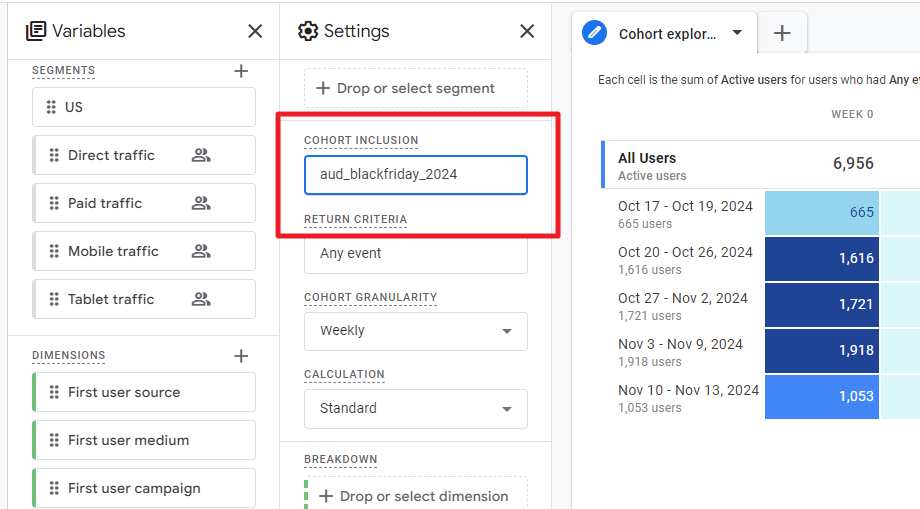
Now that you have your Exploration configured, use this to analyze metrics like repeat visits, transactions, or key events that result from your Black Friday promotions.
Improve your tracking efforts this Black Friday
Black Friday only comes once a year, but the data insights you gather can benefit your business all year round. With the right tracking, custom audiences, and explorations in GA4, you’ll have the data to prove your Black Friday success now and in the future.
Want more analytics tips? Sign up for my newsletter to keep learning!
