Generally if you need to track engagement with specific elements on your website, such as button clicks, we would recommend using Google Tag Manager (GTM), but what if you only have GA4 to work with and can’t use GTM?
This free lesson from our Practical GA4 course shows you how to track clicks to different elements and engagement directly in GA4 without needing Google Tag Manager.
Video Transcript: Tracking clicks & engagement in GA4
I have to admit that I personally turn to Google Tag Manager (GTM) as my first choice whenever there is anything beyond the basics in GA4 that needs to be tracked. But every once in a while we’ll work with a client who is unable to use GTM or can’t make changes to it for some reason—so we need to figure out how to track things without the luxury of GTM!
How to track clicks when a user moves from one page to another
First, let’s talk about tracking specific clicks, such as moving from one page to another. You can use the Path Exploration, but if you want to track movement specifically from one page to another, there are a couple of ways to accomplish that. One option is to create an audience based on a sequence.
1. Let’s start by creating a custom audience
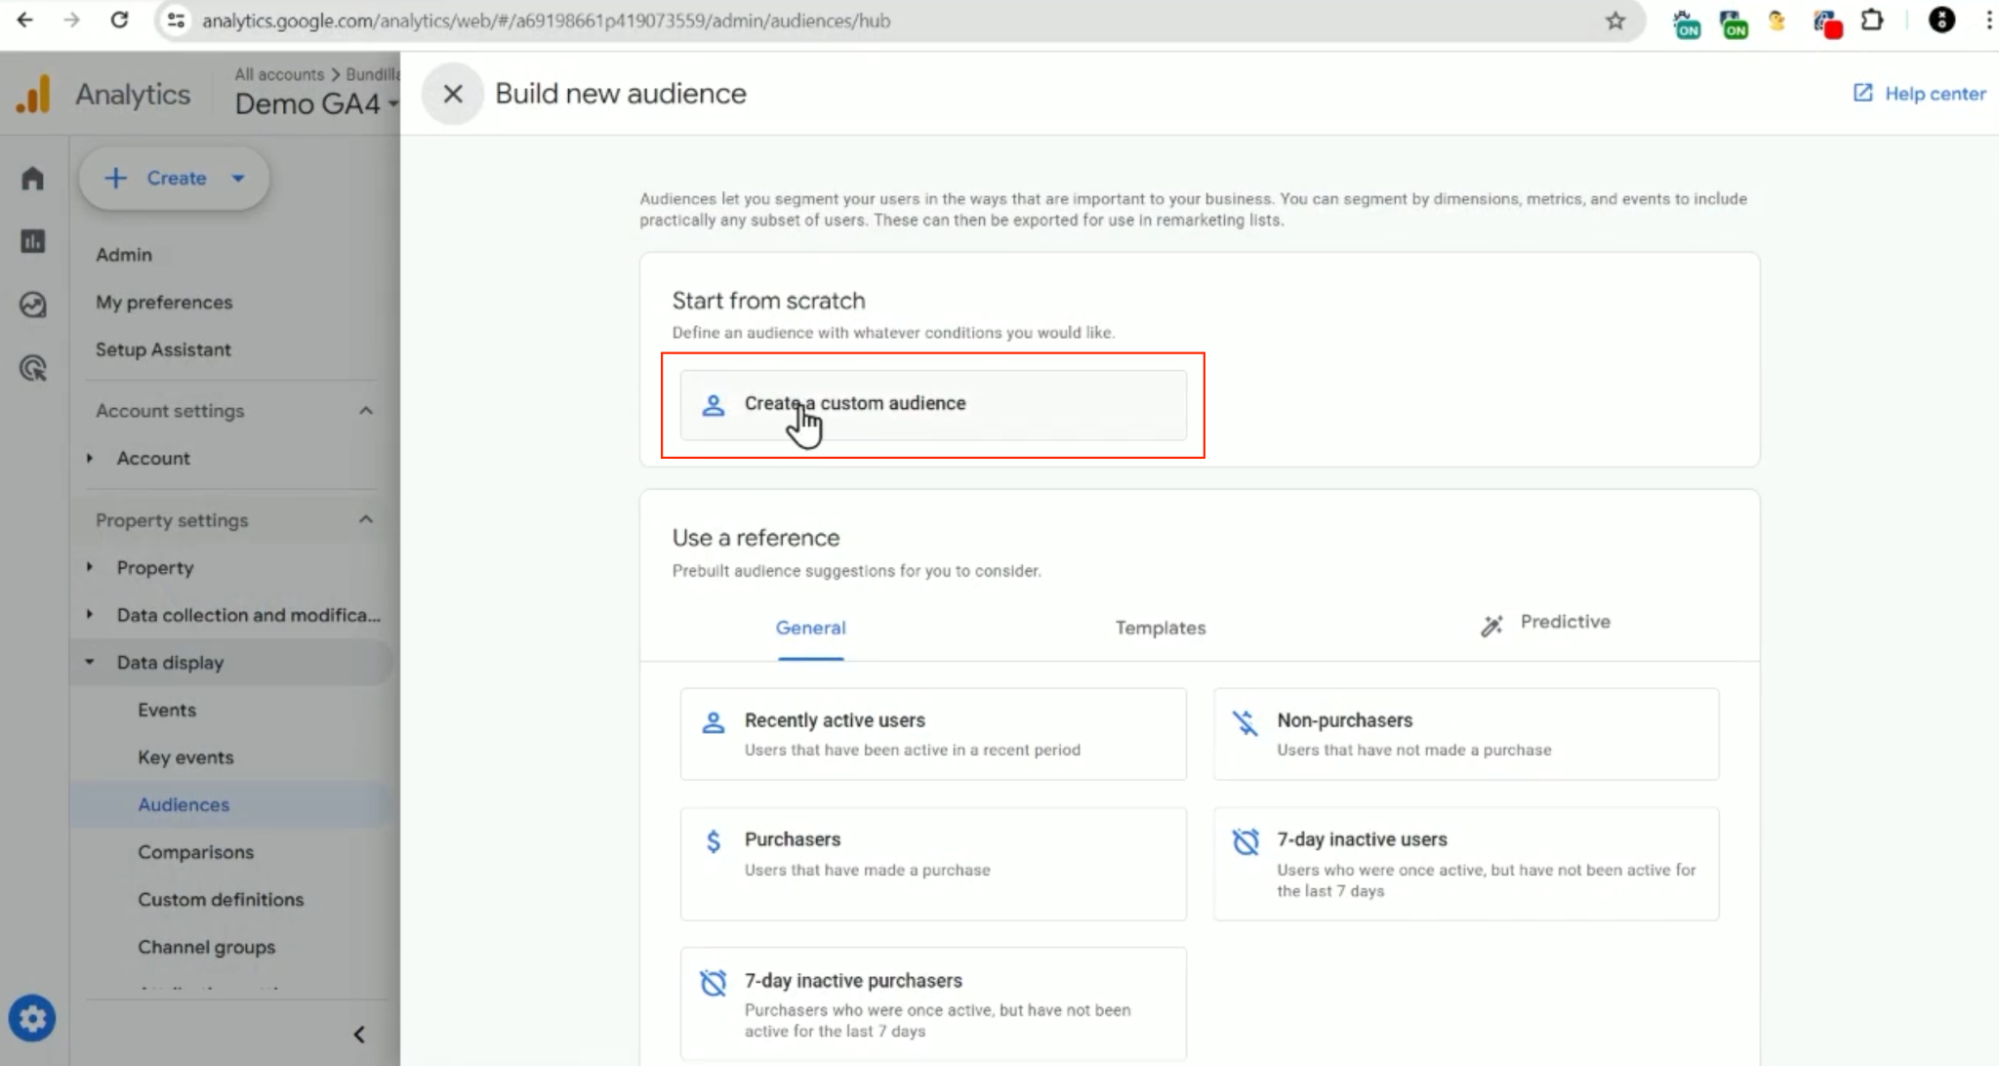
2. Click “Add sequence to include”
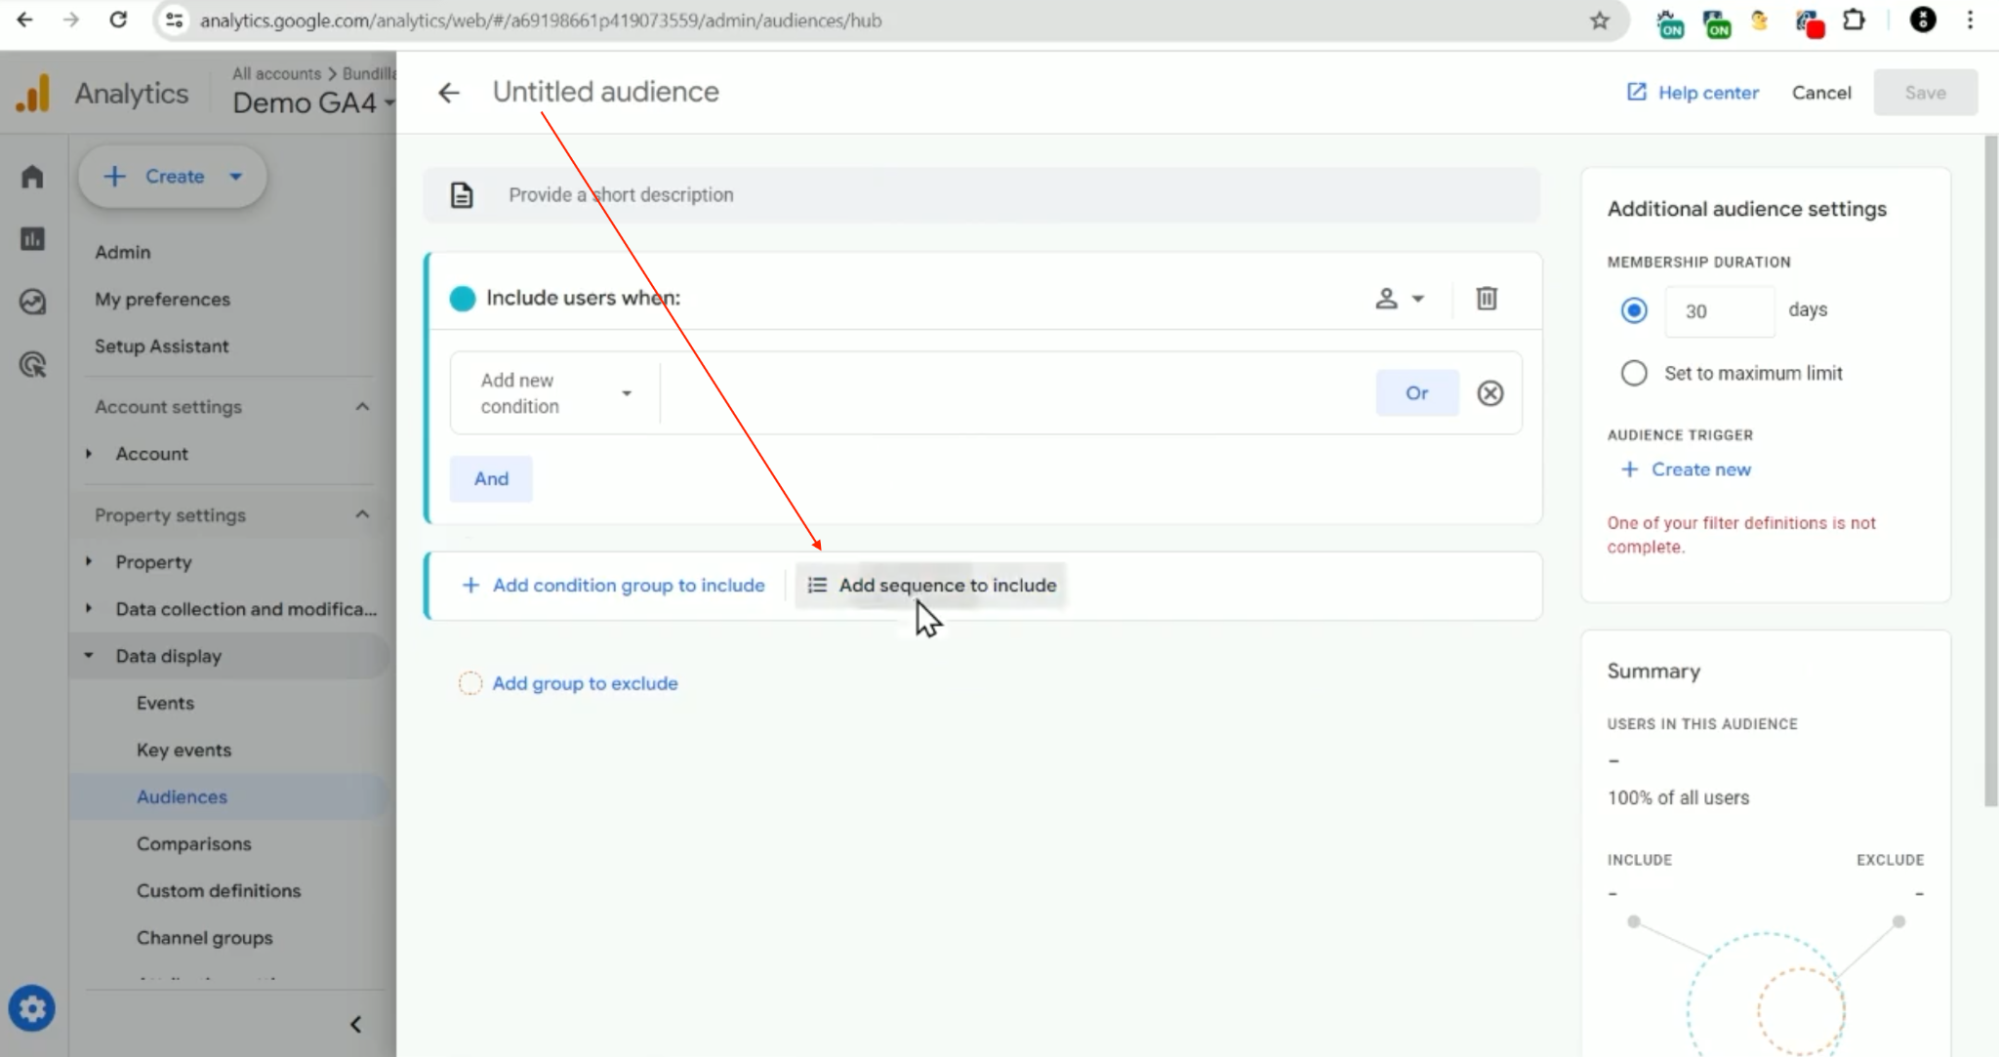
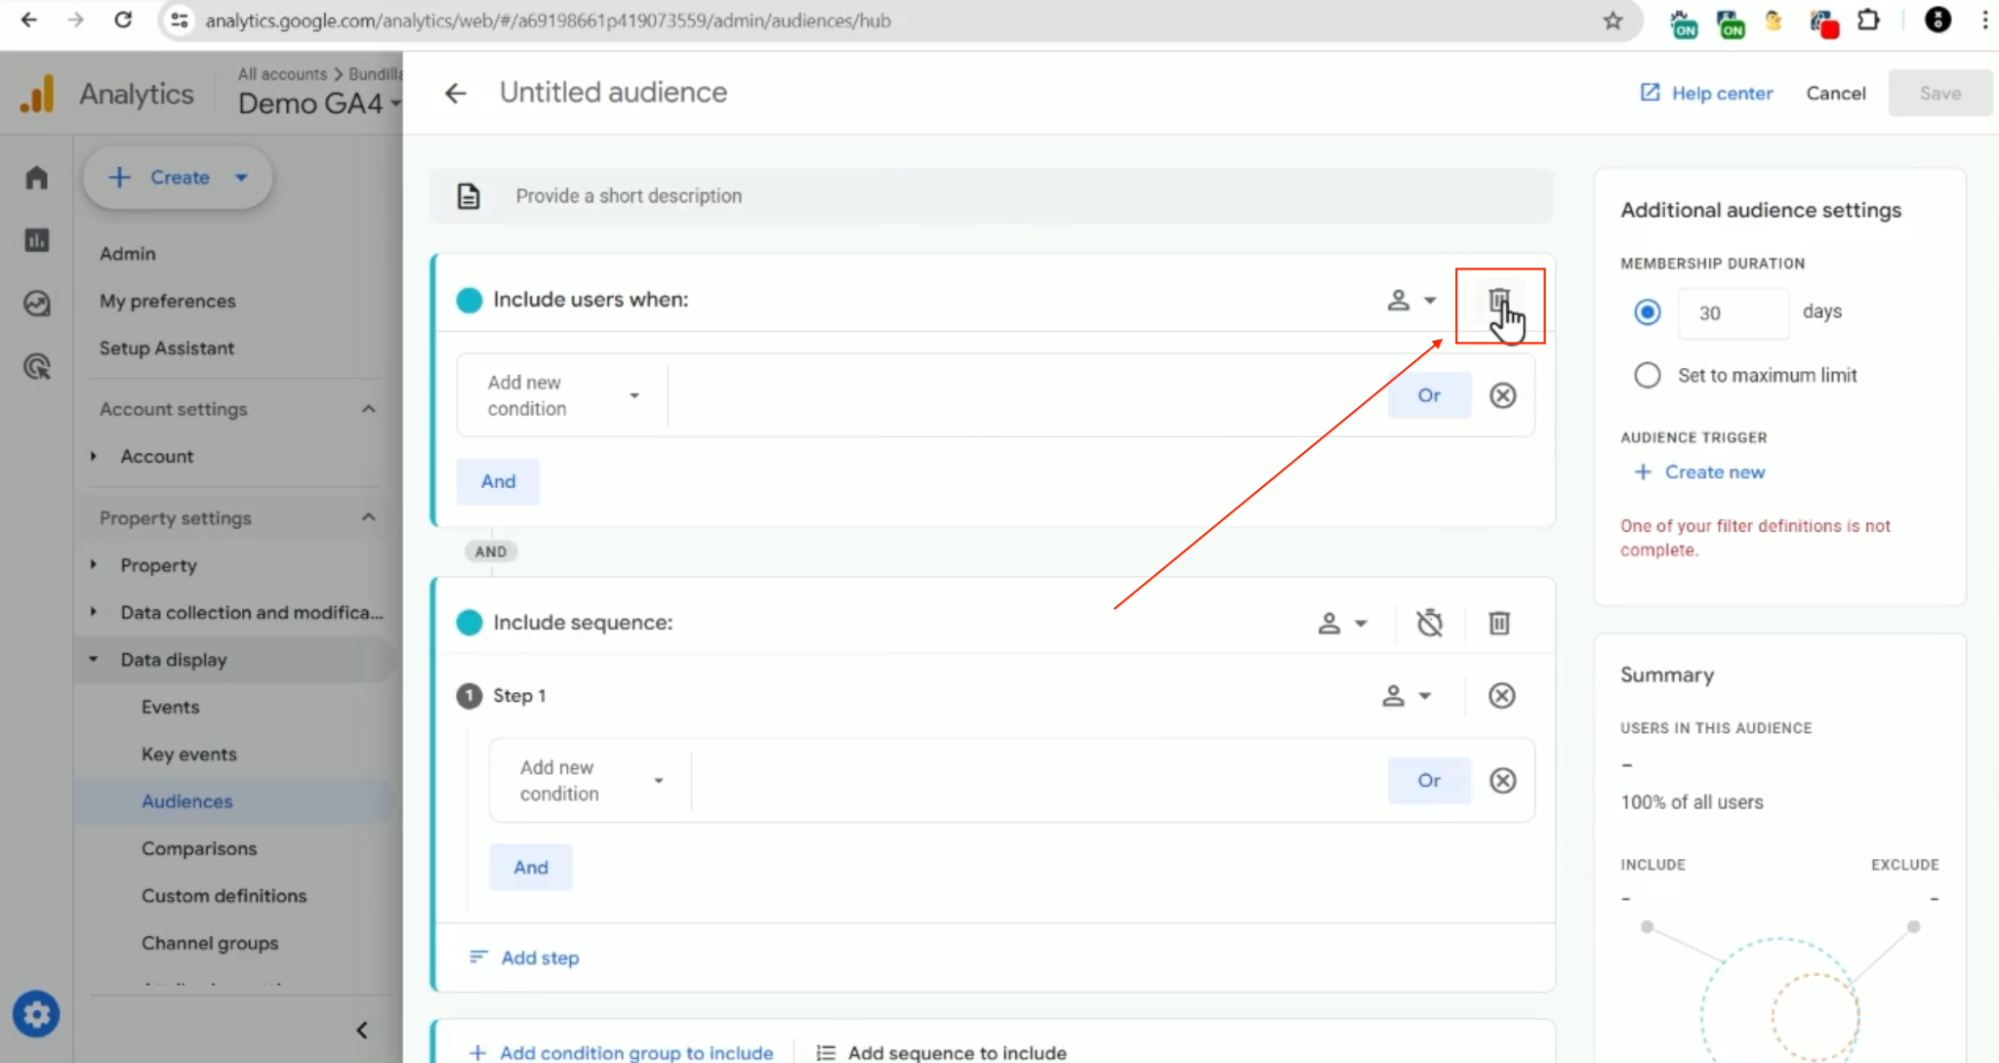
3. Delete the original “Include users when:” option at the top, “click the trash can icon” to remove.
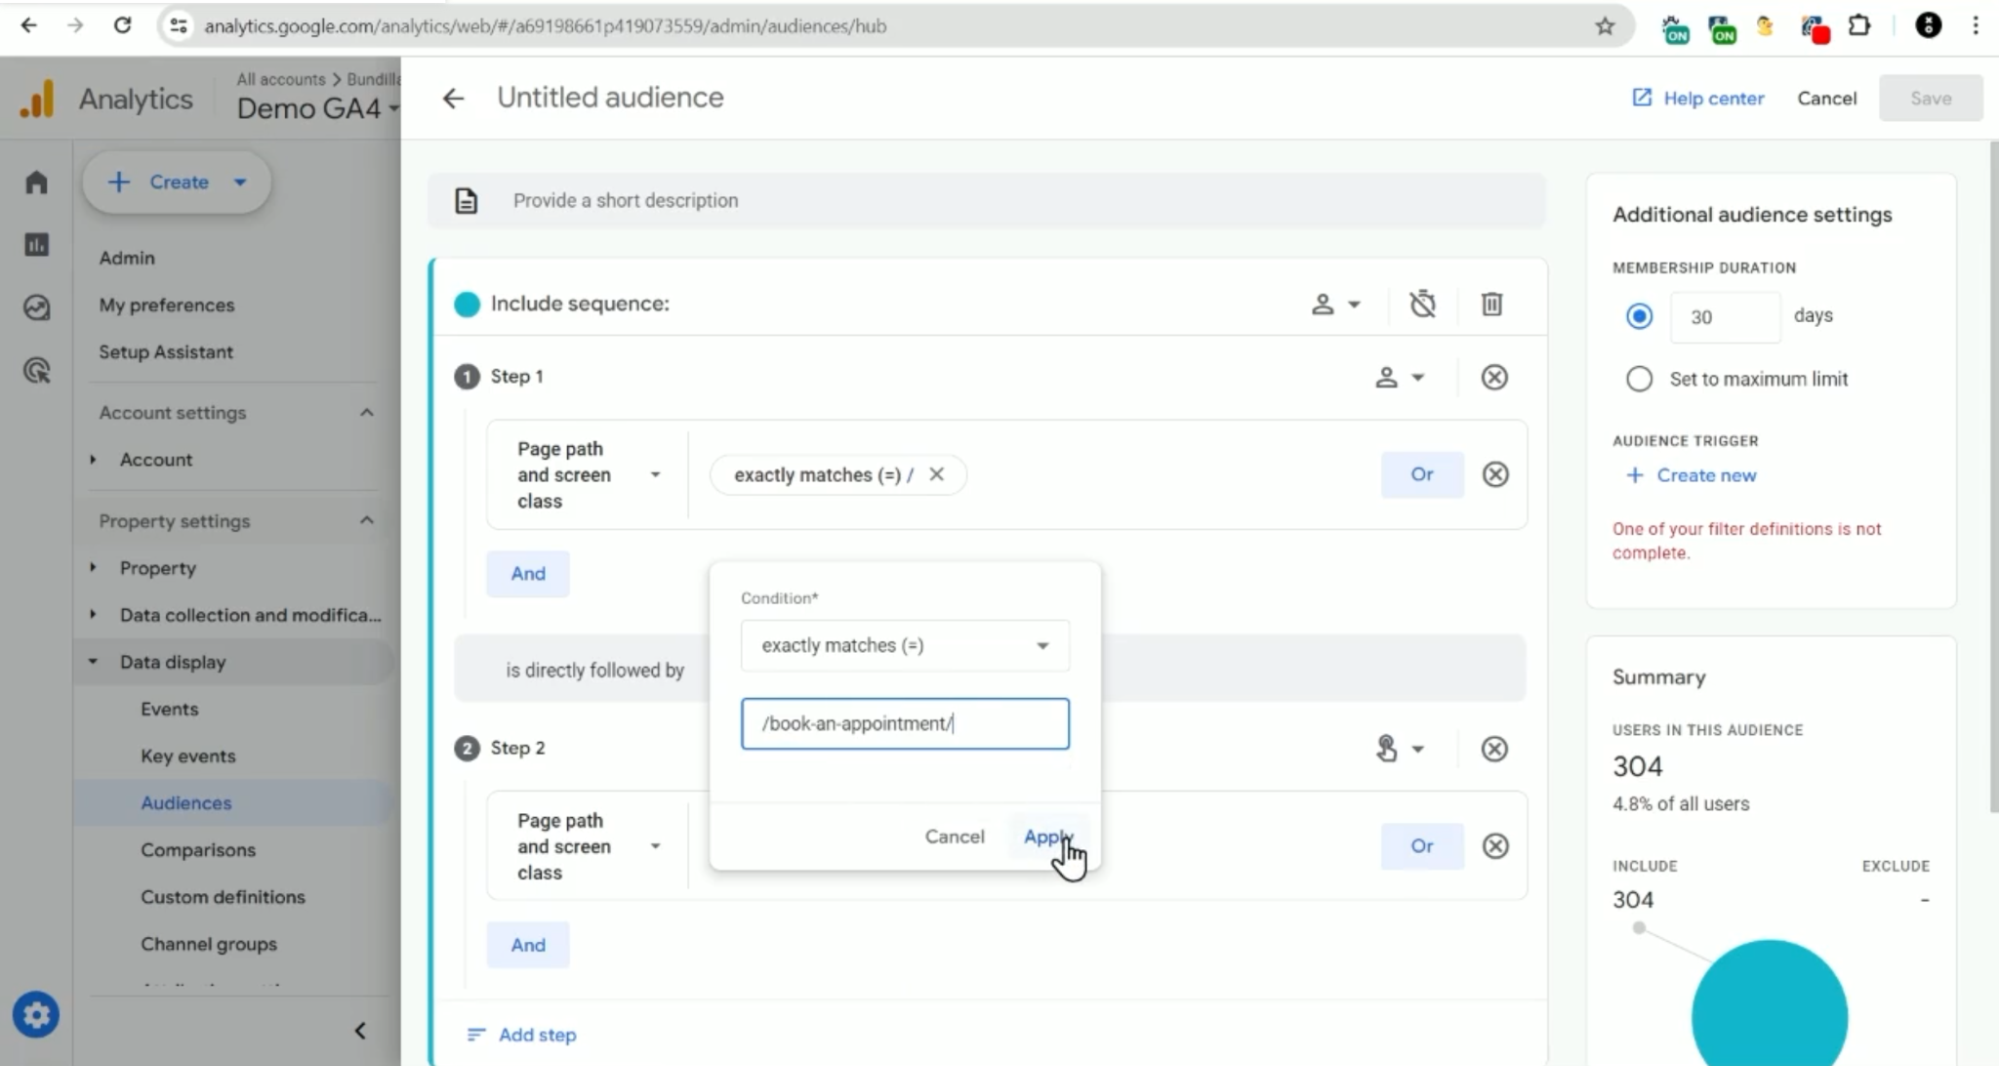
4. If our sequence will be people who visit the home page and then go to the book an appointment page—step 1 for the “Add new condition” will be “Page/screen”, then “Page path and screen class”
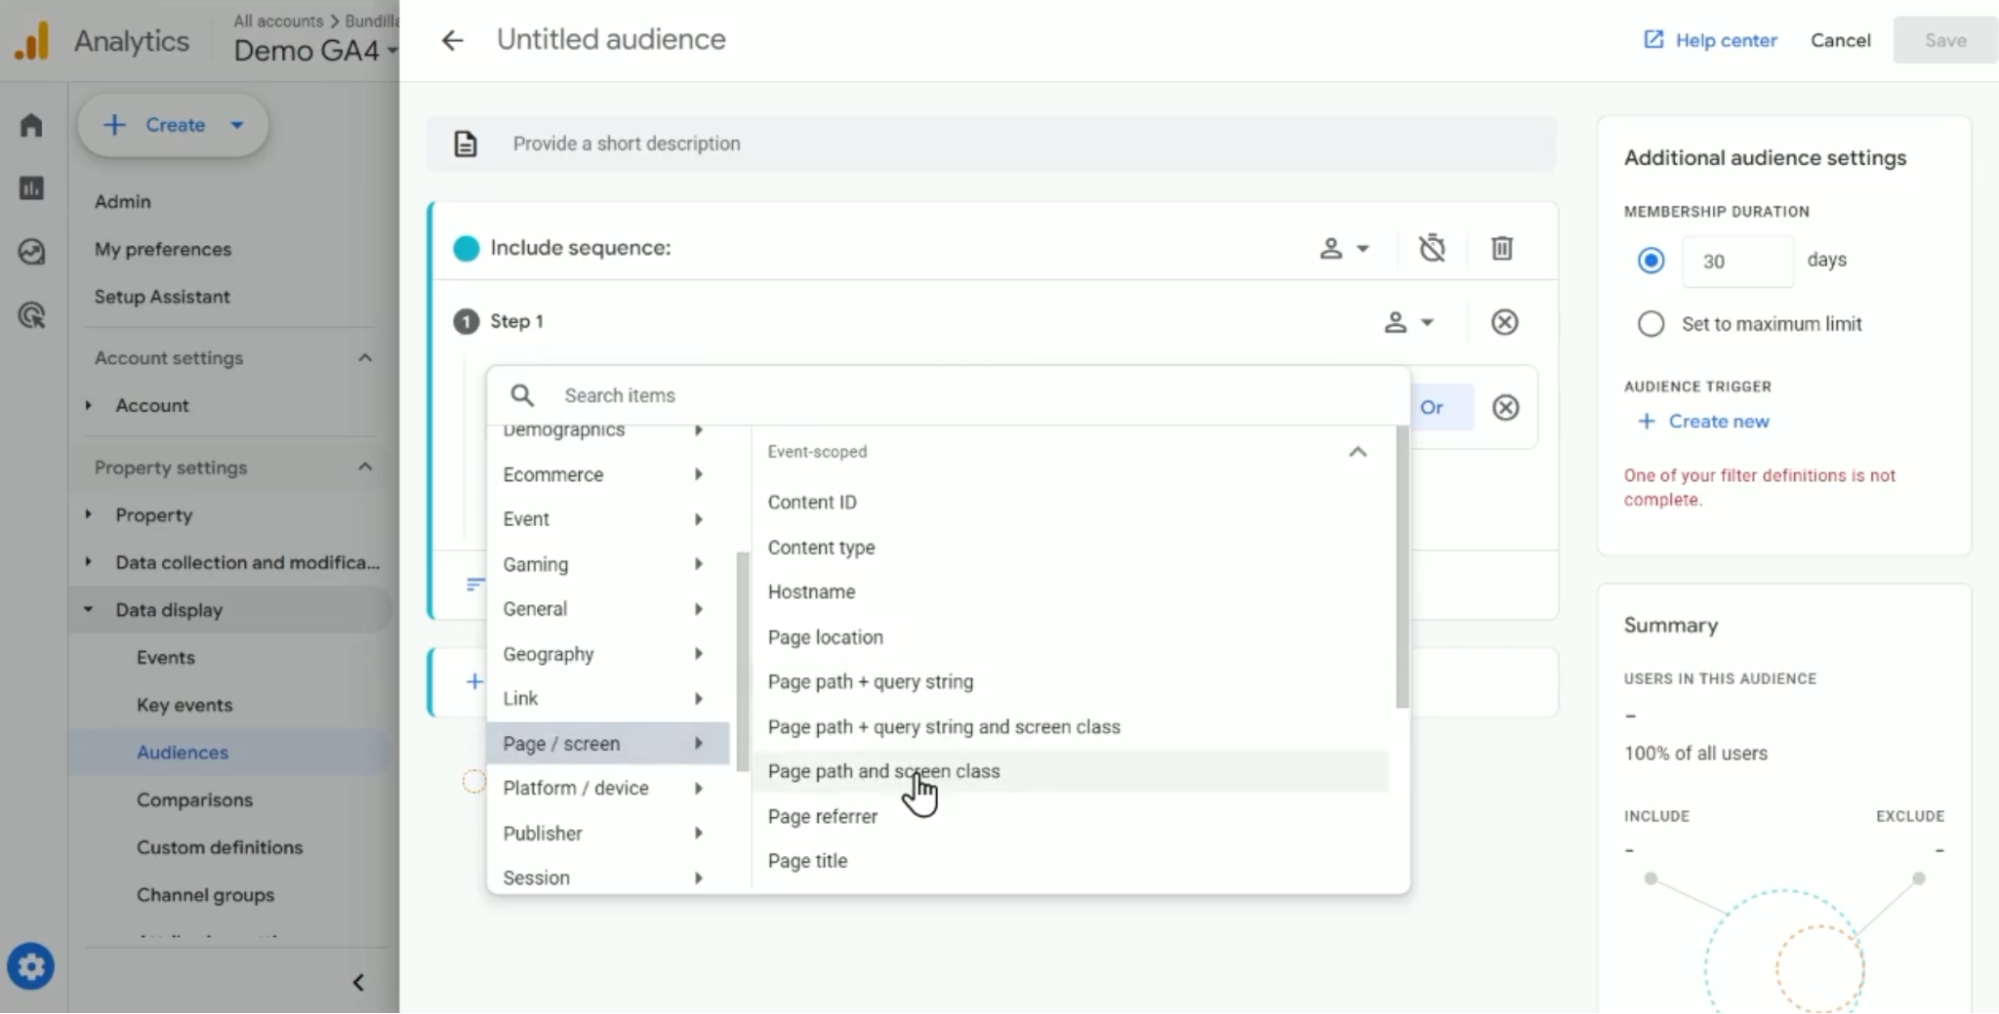
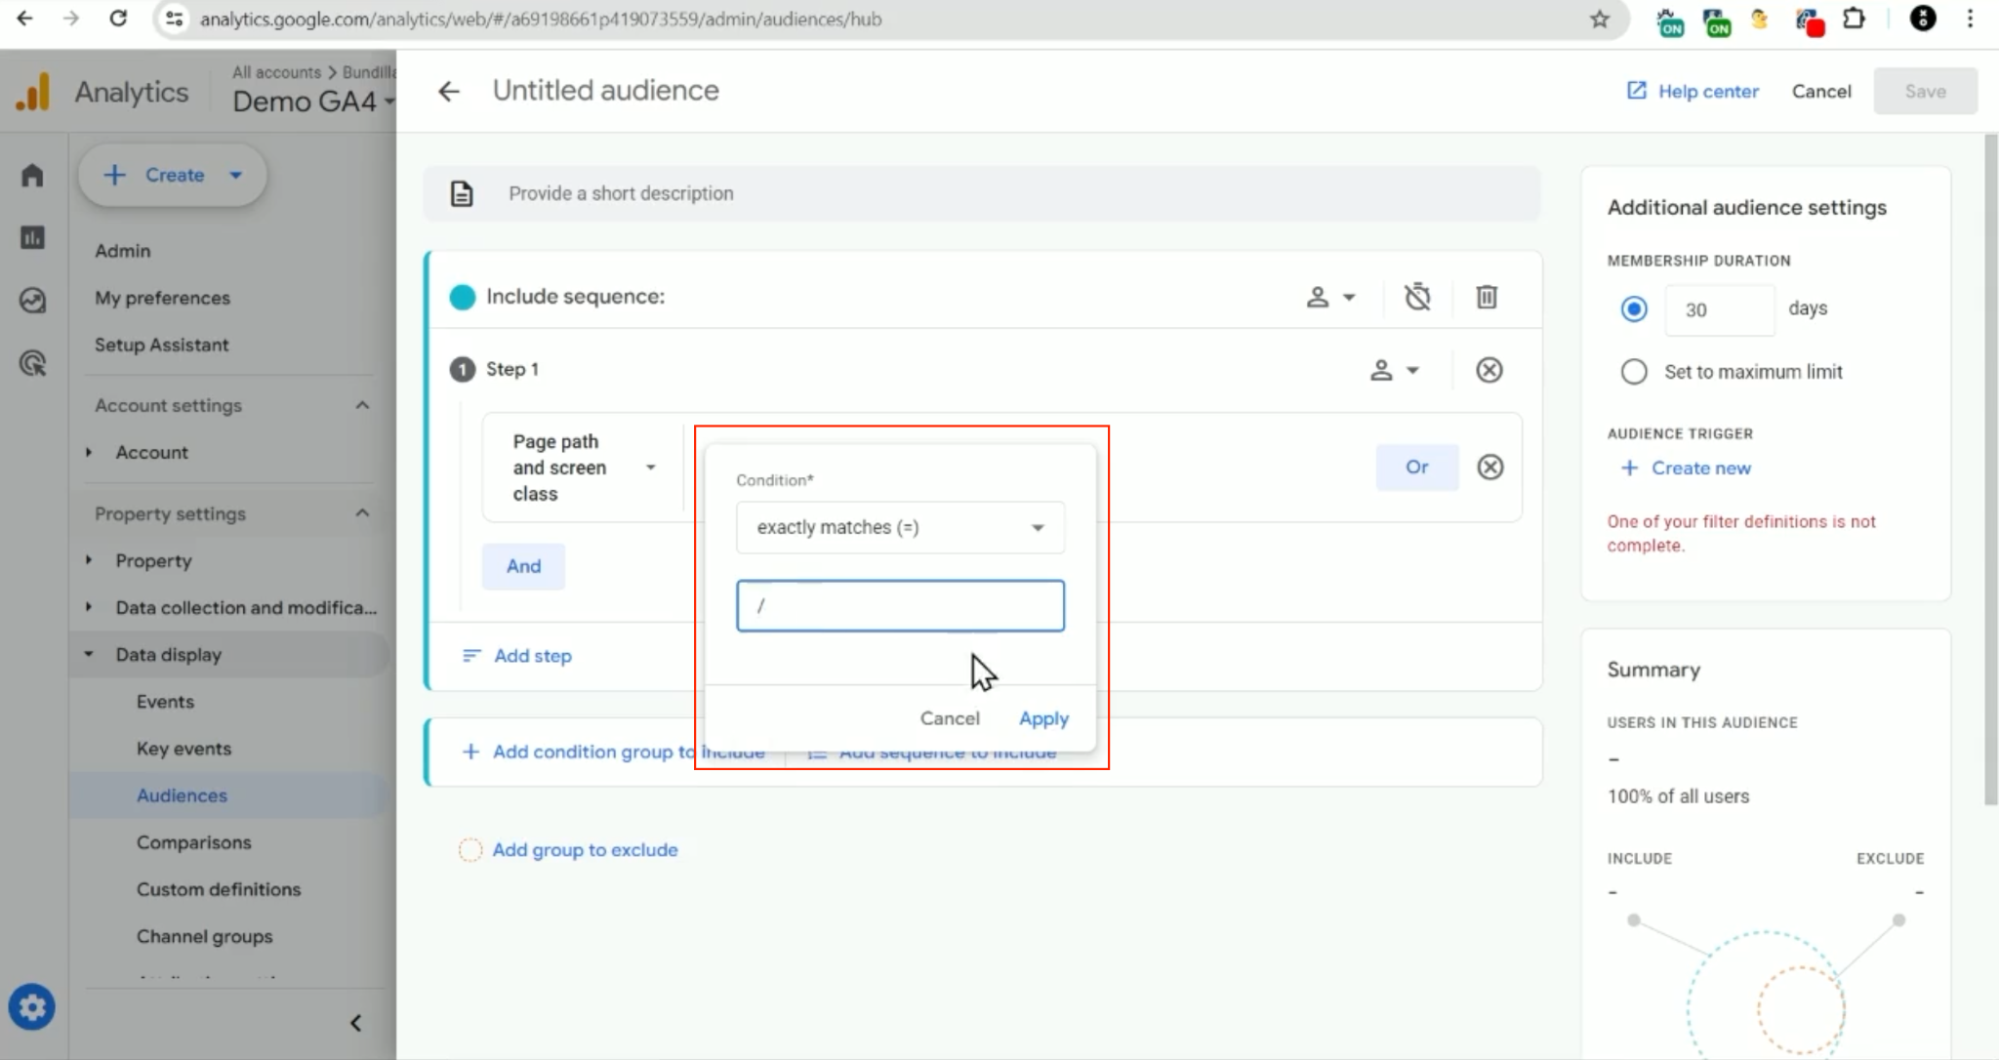
5. Then, you’re going to “Add filter” as a condition of “exactly matches (=)” and then “/” the home page.
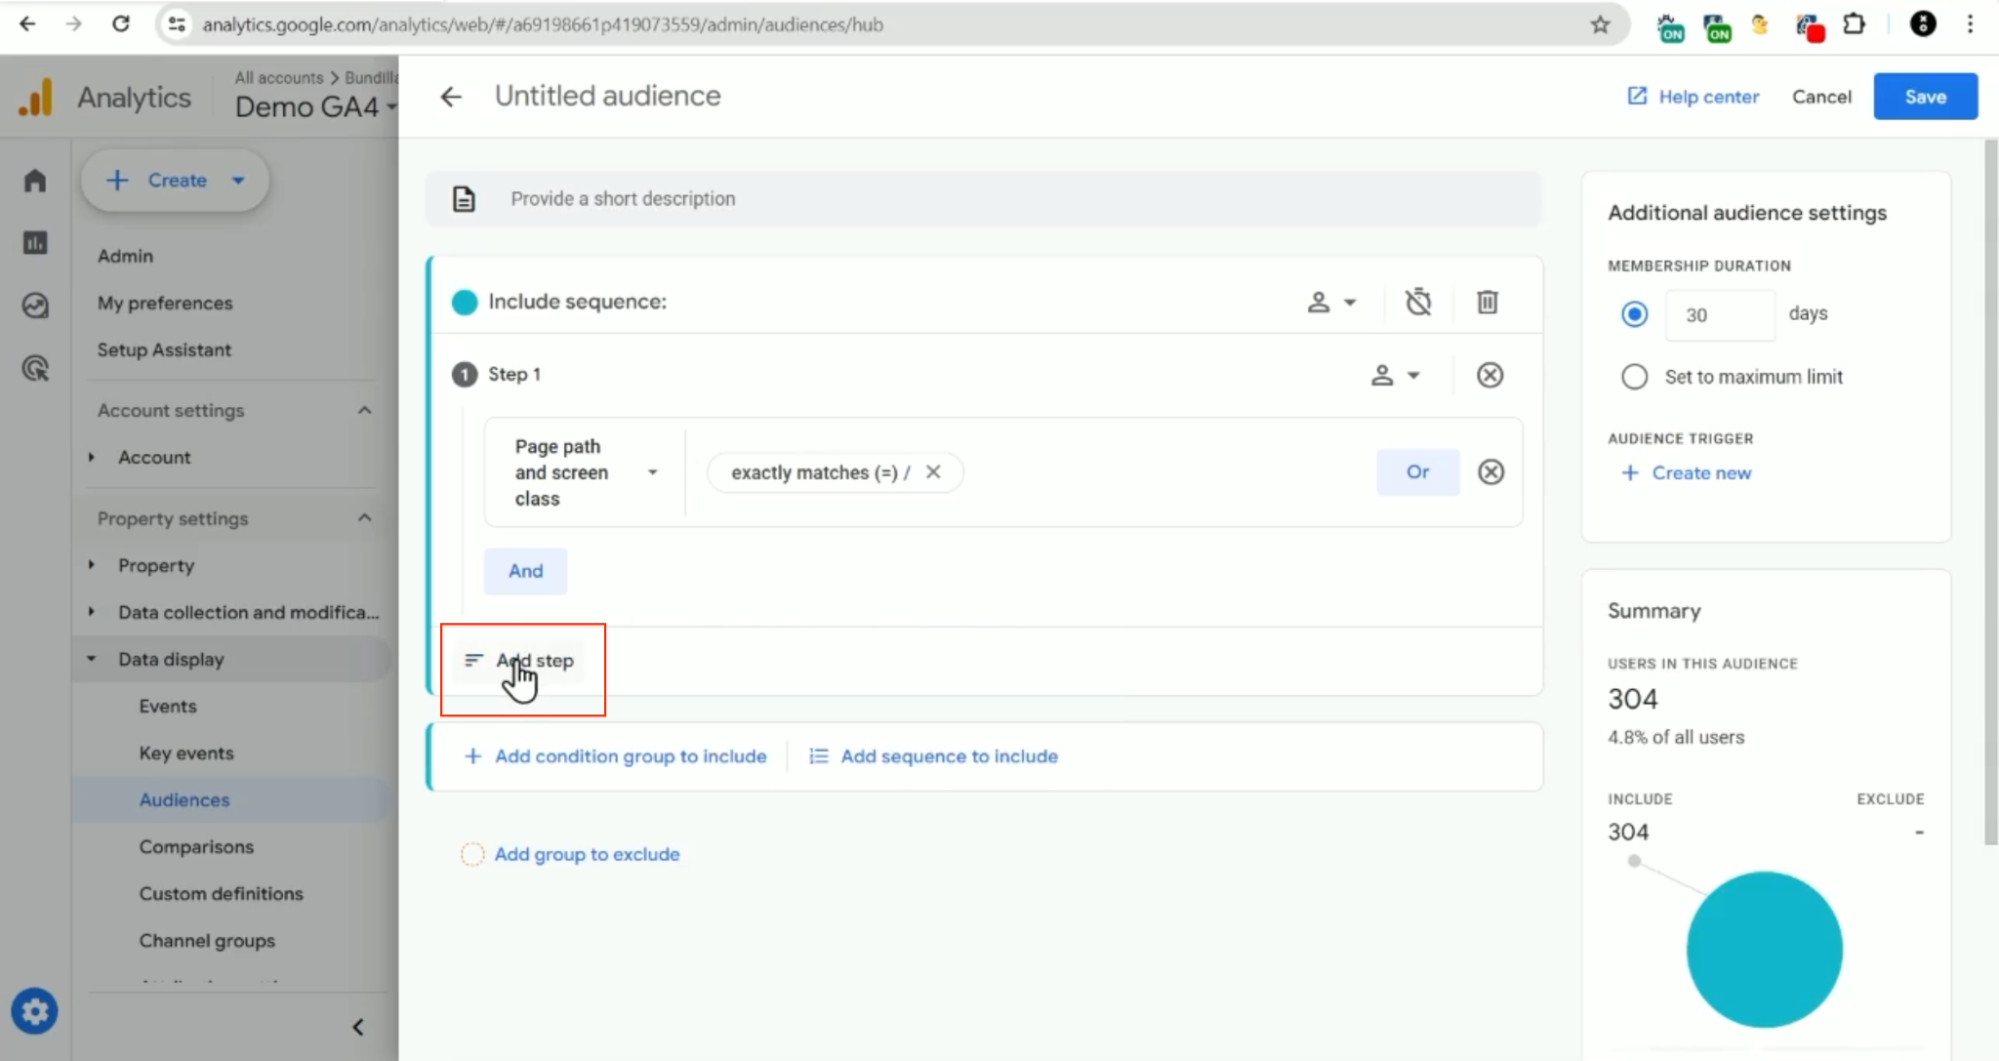
6. Then you’re going to click on “Add step”
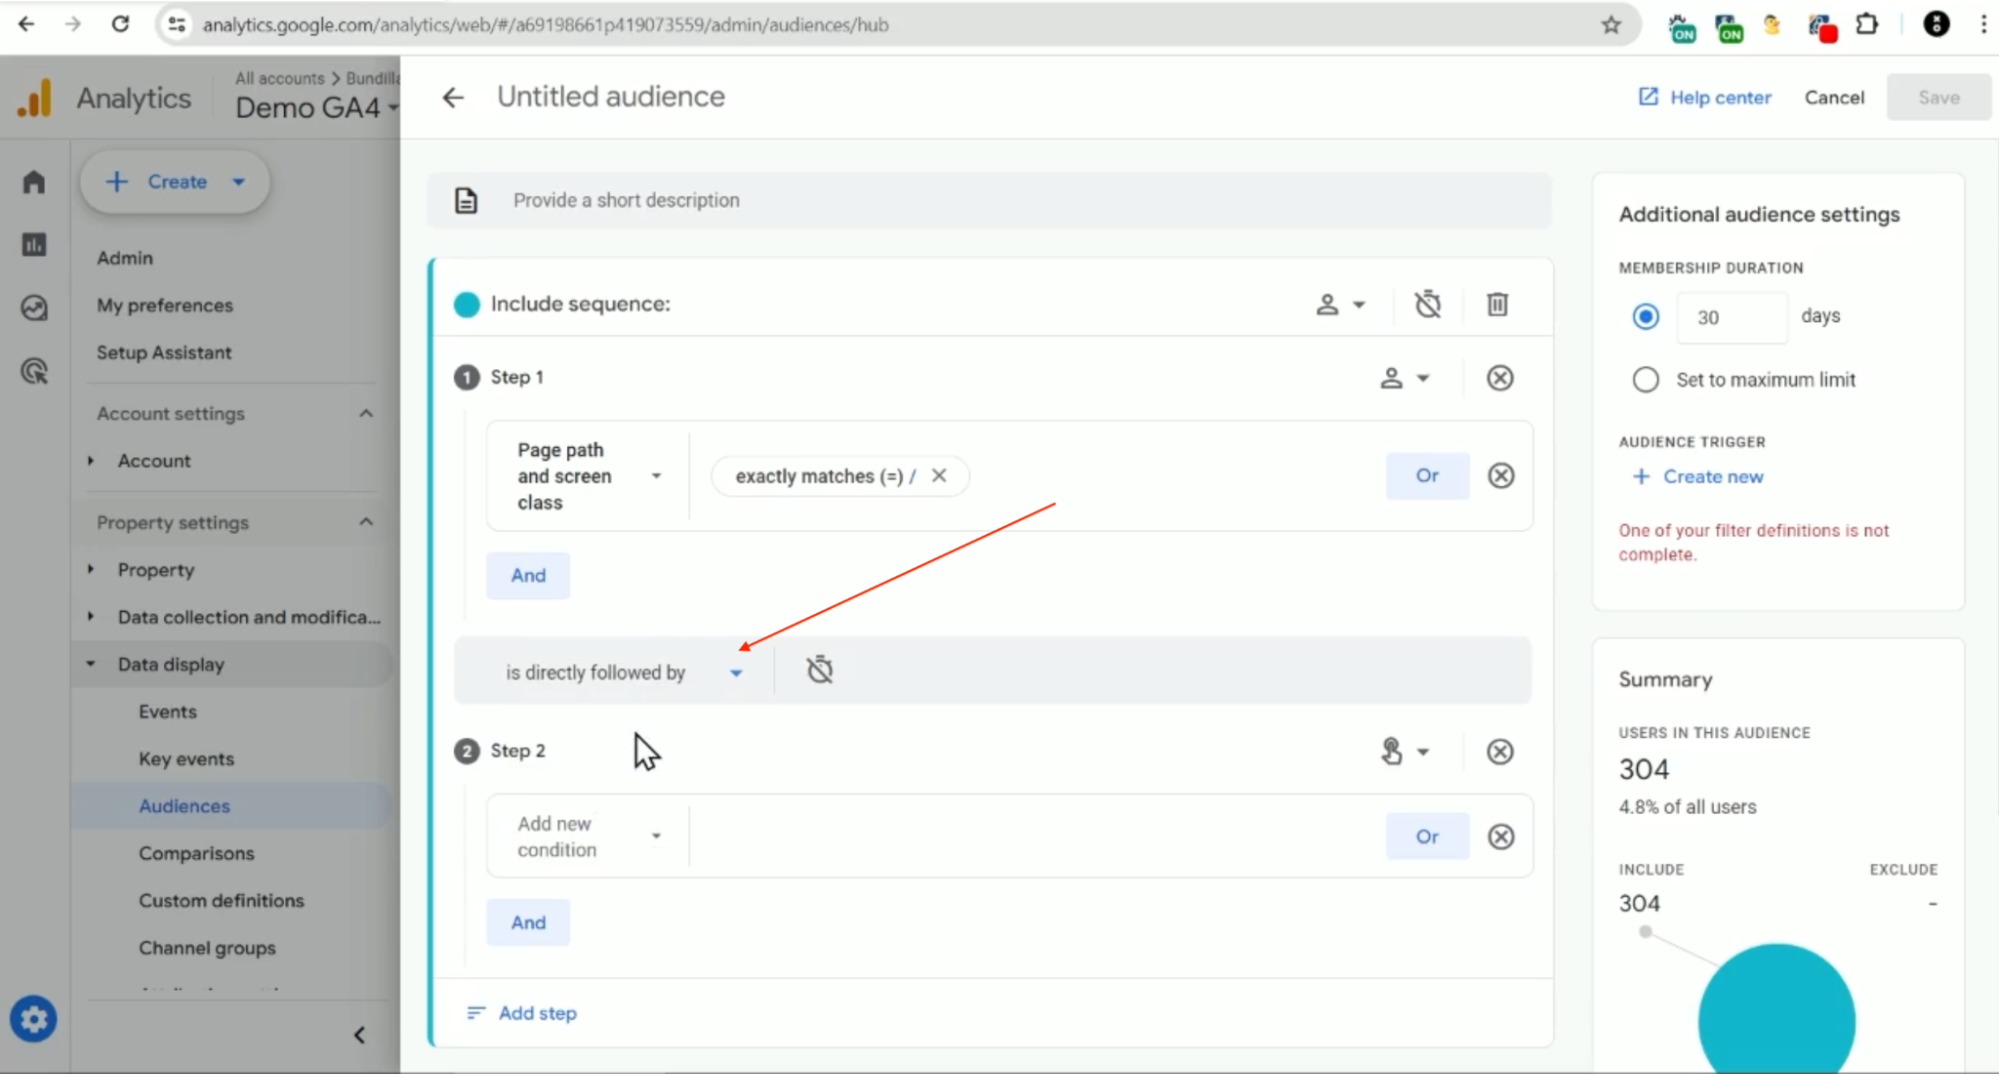
7. Click this drop down and change it to “is directly followed by”
8. Then, you’re going to “Add new condition” and select “Page/screen”, then “Page path and screen class” again, and “exactly matches (=)”.
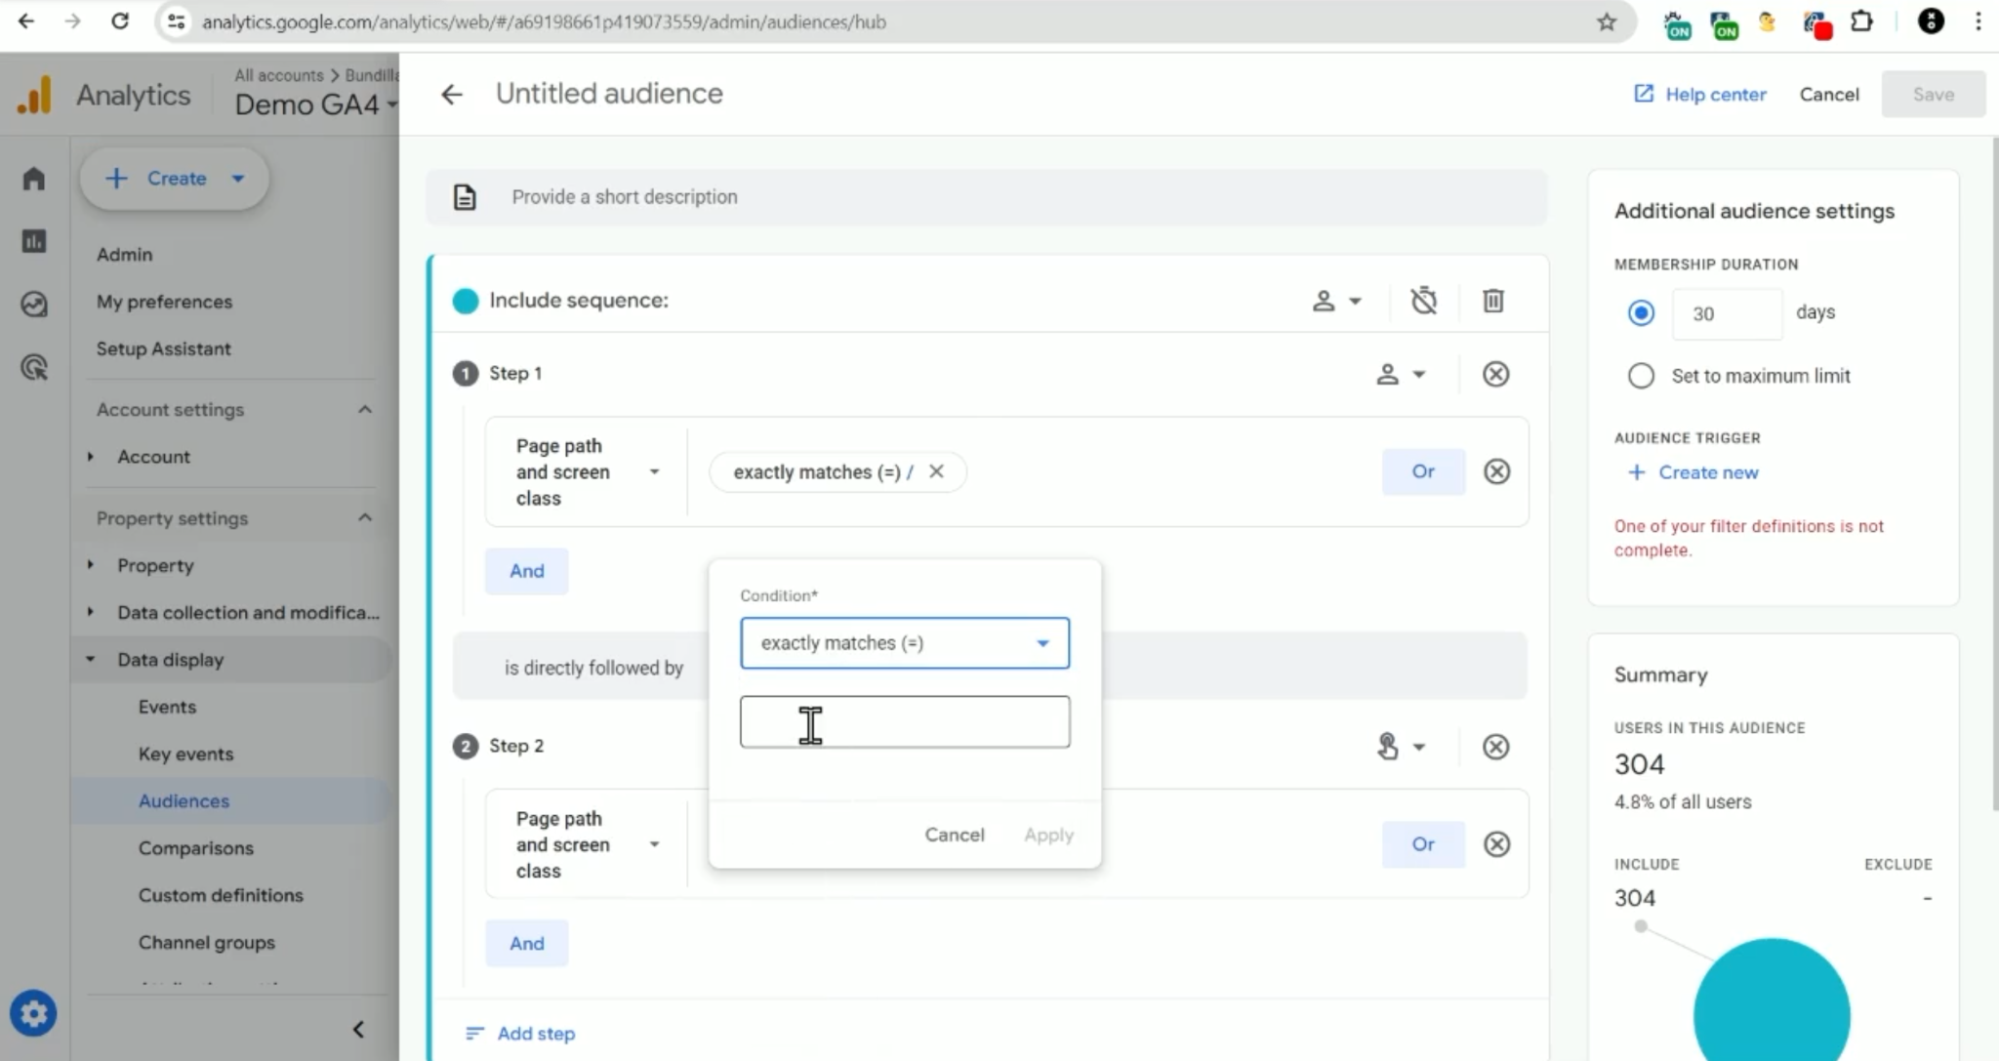
Then you’re going to search for the “/book-an-appointment” page, then you’re going to click “Apply”
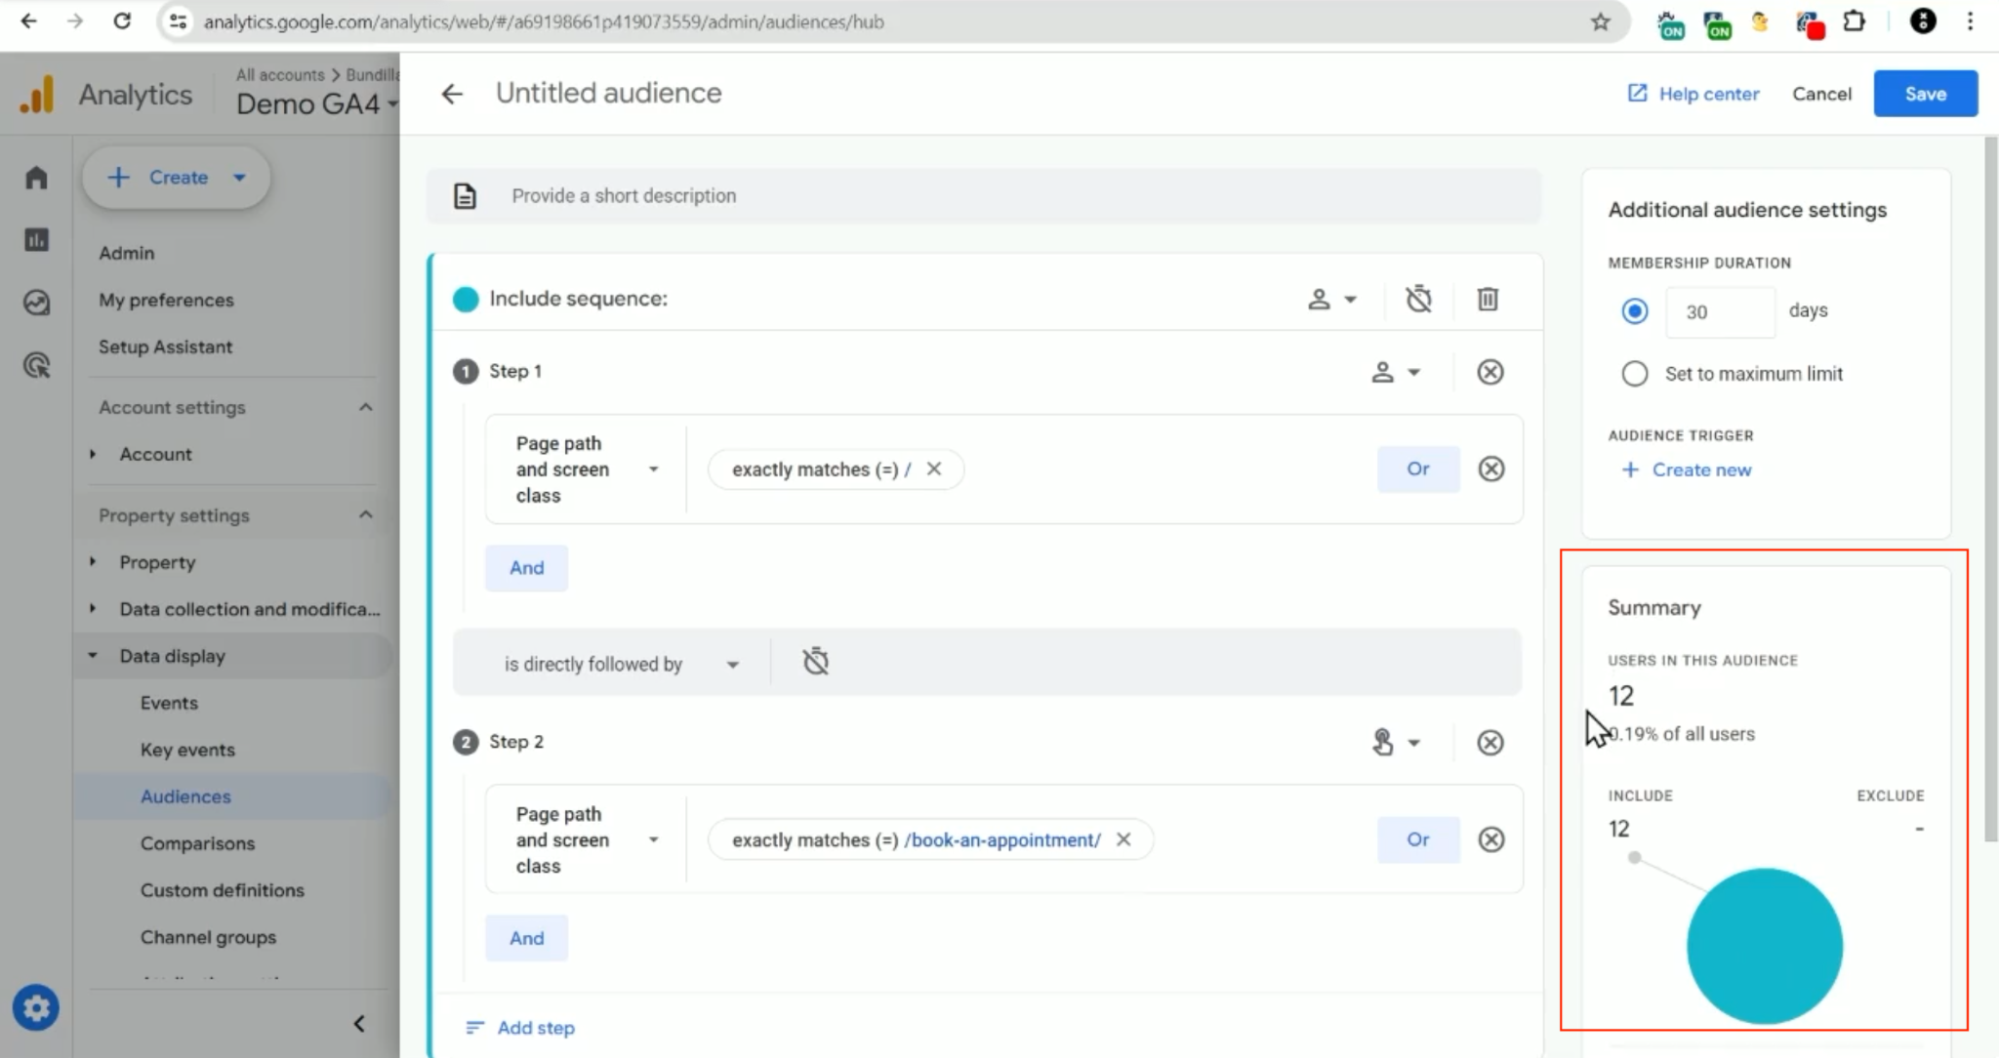
You should be able to see under “Summary” (see screenshot below) that there are users in this audience—so it’s working!
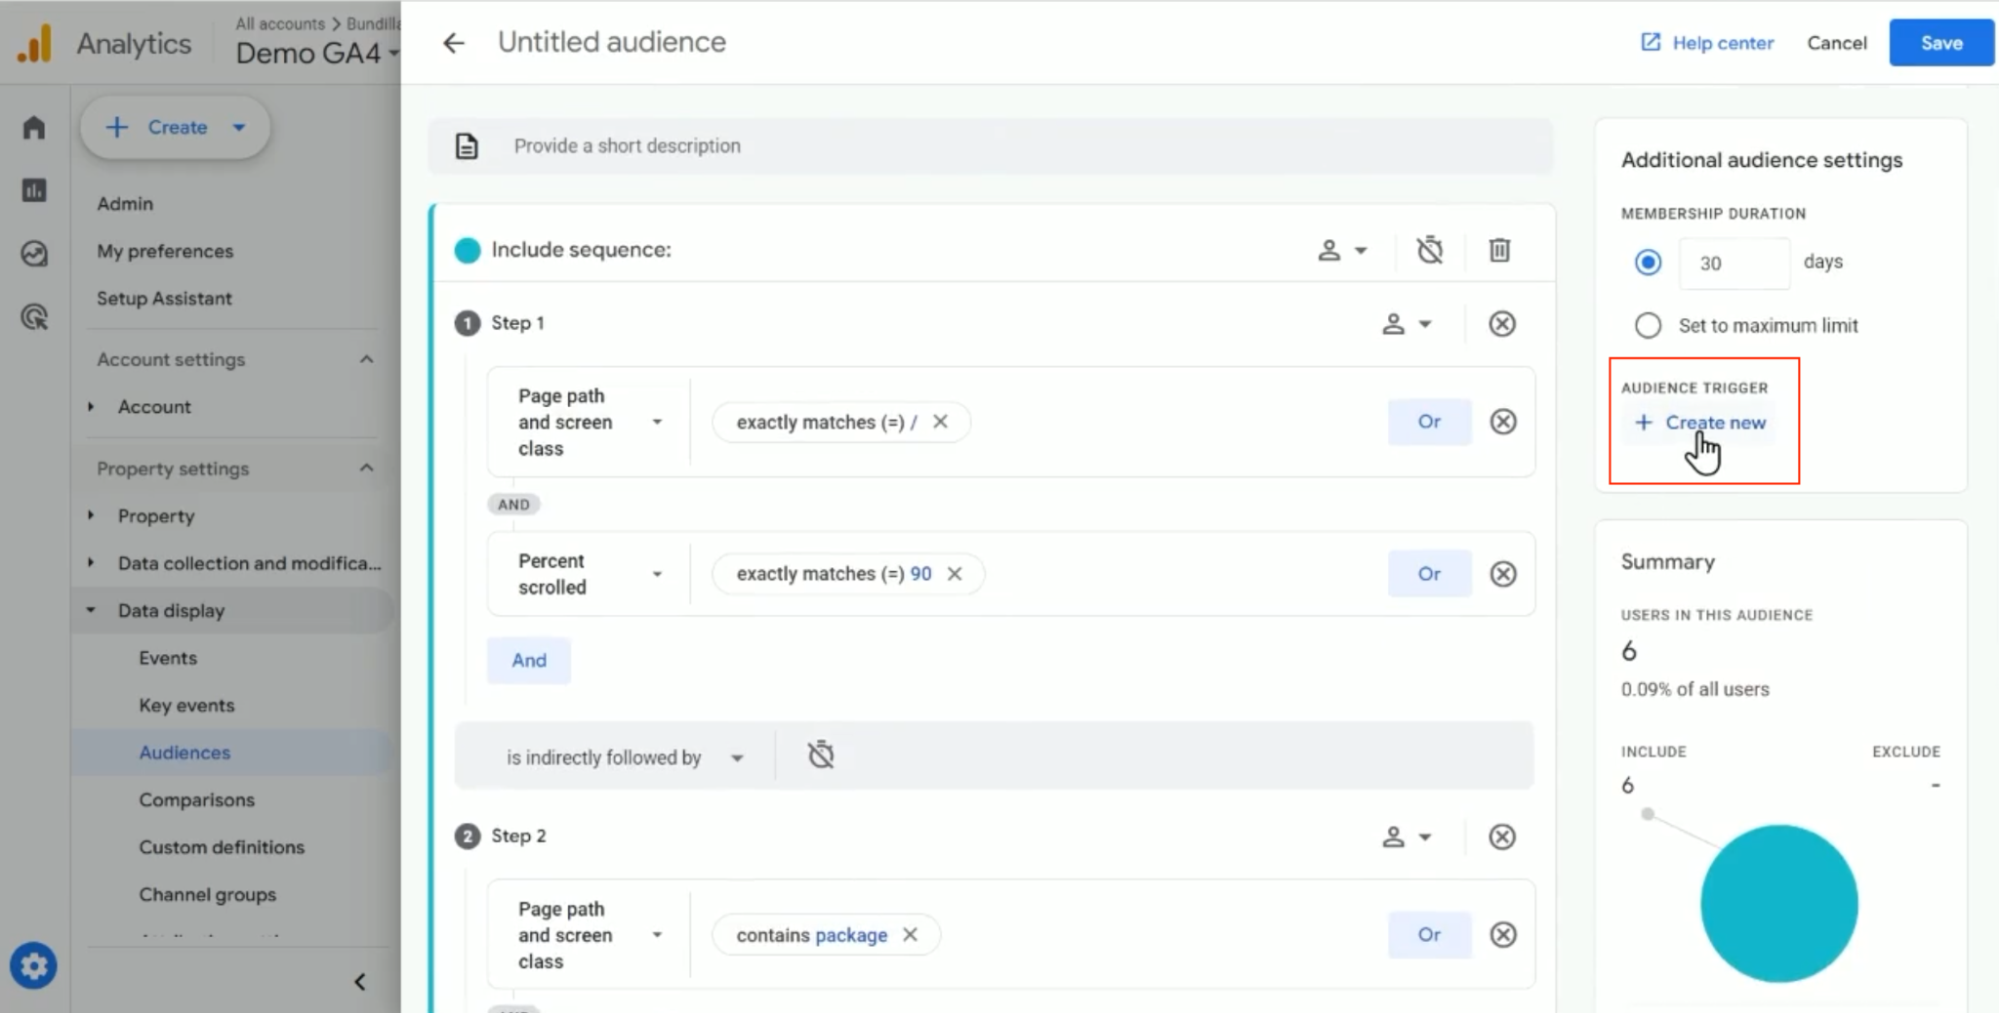
Then, you can create an “AUDIENCE TRIGGER” and record an event any time this sequence of events occurs (see screenshot below).
Learn how to get more insights from GA4
How to track clicks on a certain button
If you wanted to get even more specific and track clicks on a certain button, I would recommend adding in a parameter to the button URL that you’d then see show up in GA4.
🚨 Important Note 🚨 Don’t use UTMs—just make up your own parameter!
For example, let’s say that the “Book An Appointment” button in the menu has this URL:
‘https://www.bundillapestcontrol.com.au/book-an-appointment/‘
Now, let’s add a parameter to that:
‘https://www.bundillapestcontrol.com.au/book-an-appointment/?location=topnav‘
This parameter won’t actually do anything, at least not on this site — make sure that your own site won’t act weird if you use a parameter like that! What does happen is that it gets picked up by GA4 in the “page location” dimension.
Once you have that in the page location dimension, you can create an event based on the page view event! Here’s how:
1. Go into the “Admin Settings” click on “Events”
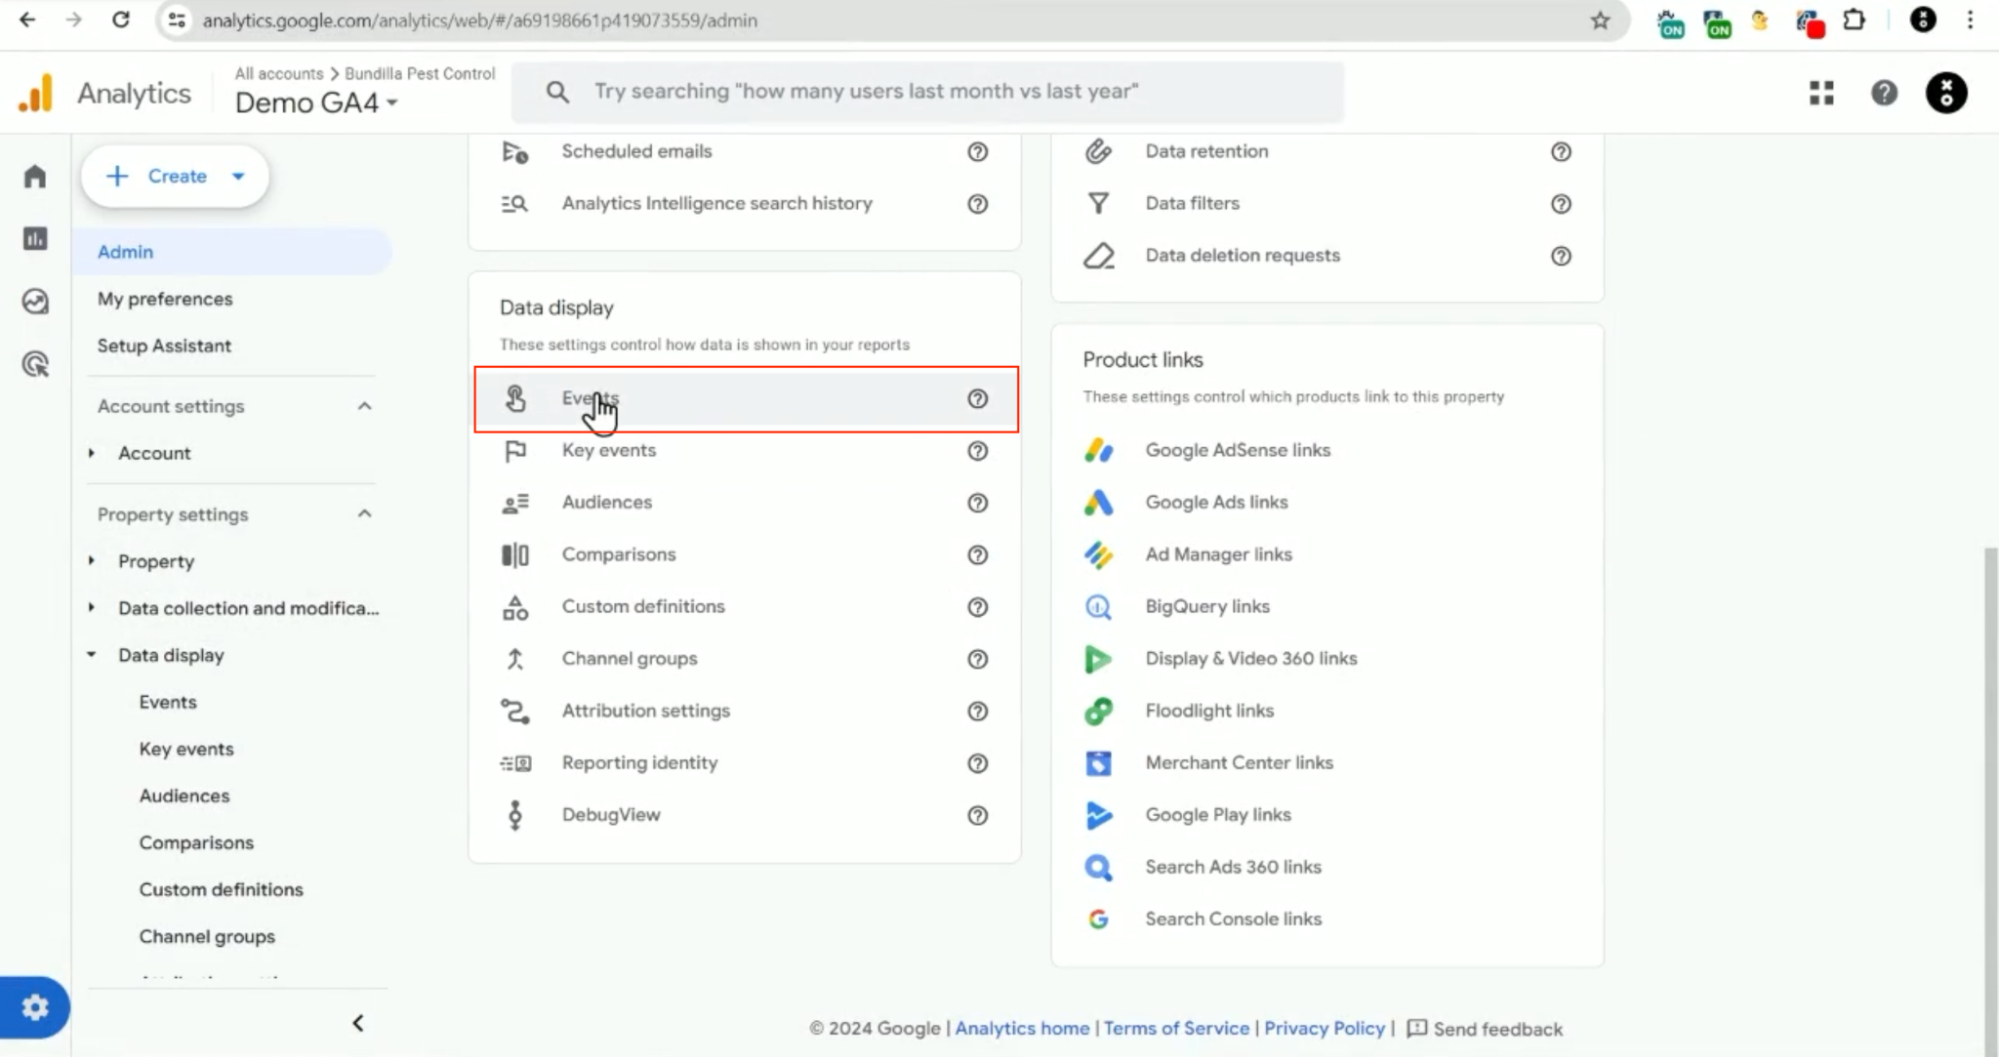
2. Then click on “Create event”
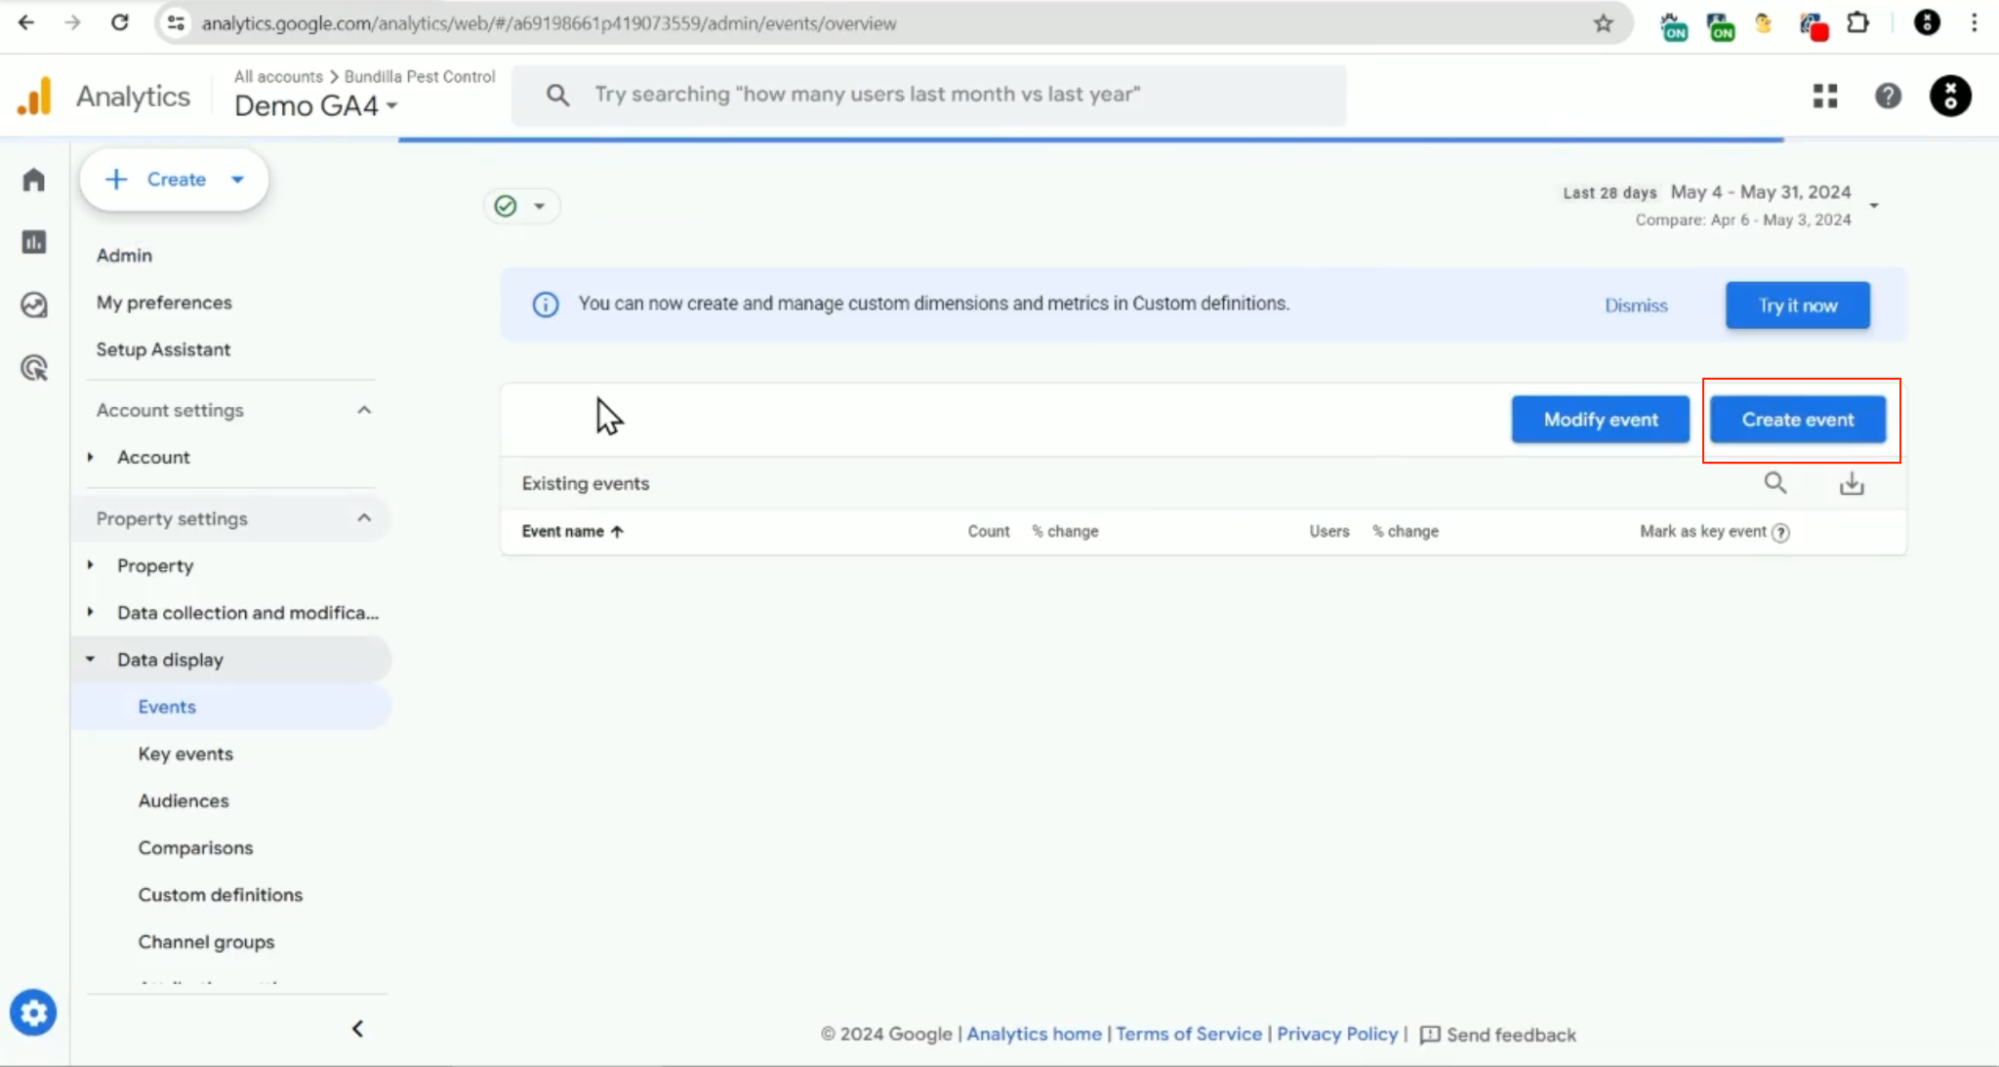
3. Then, you’ll click on “Create”
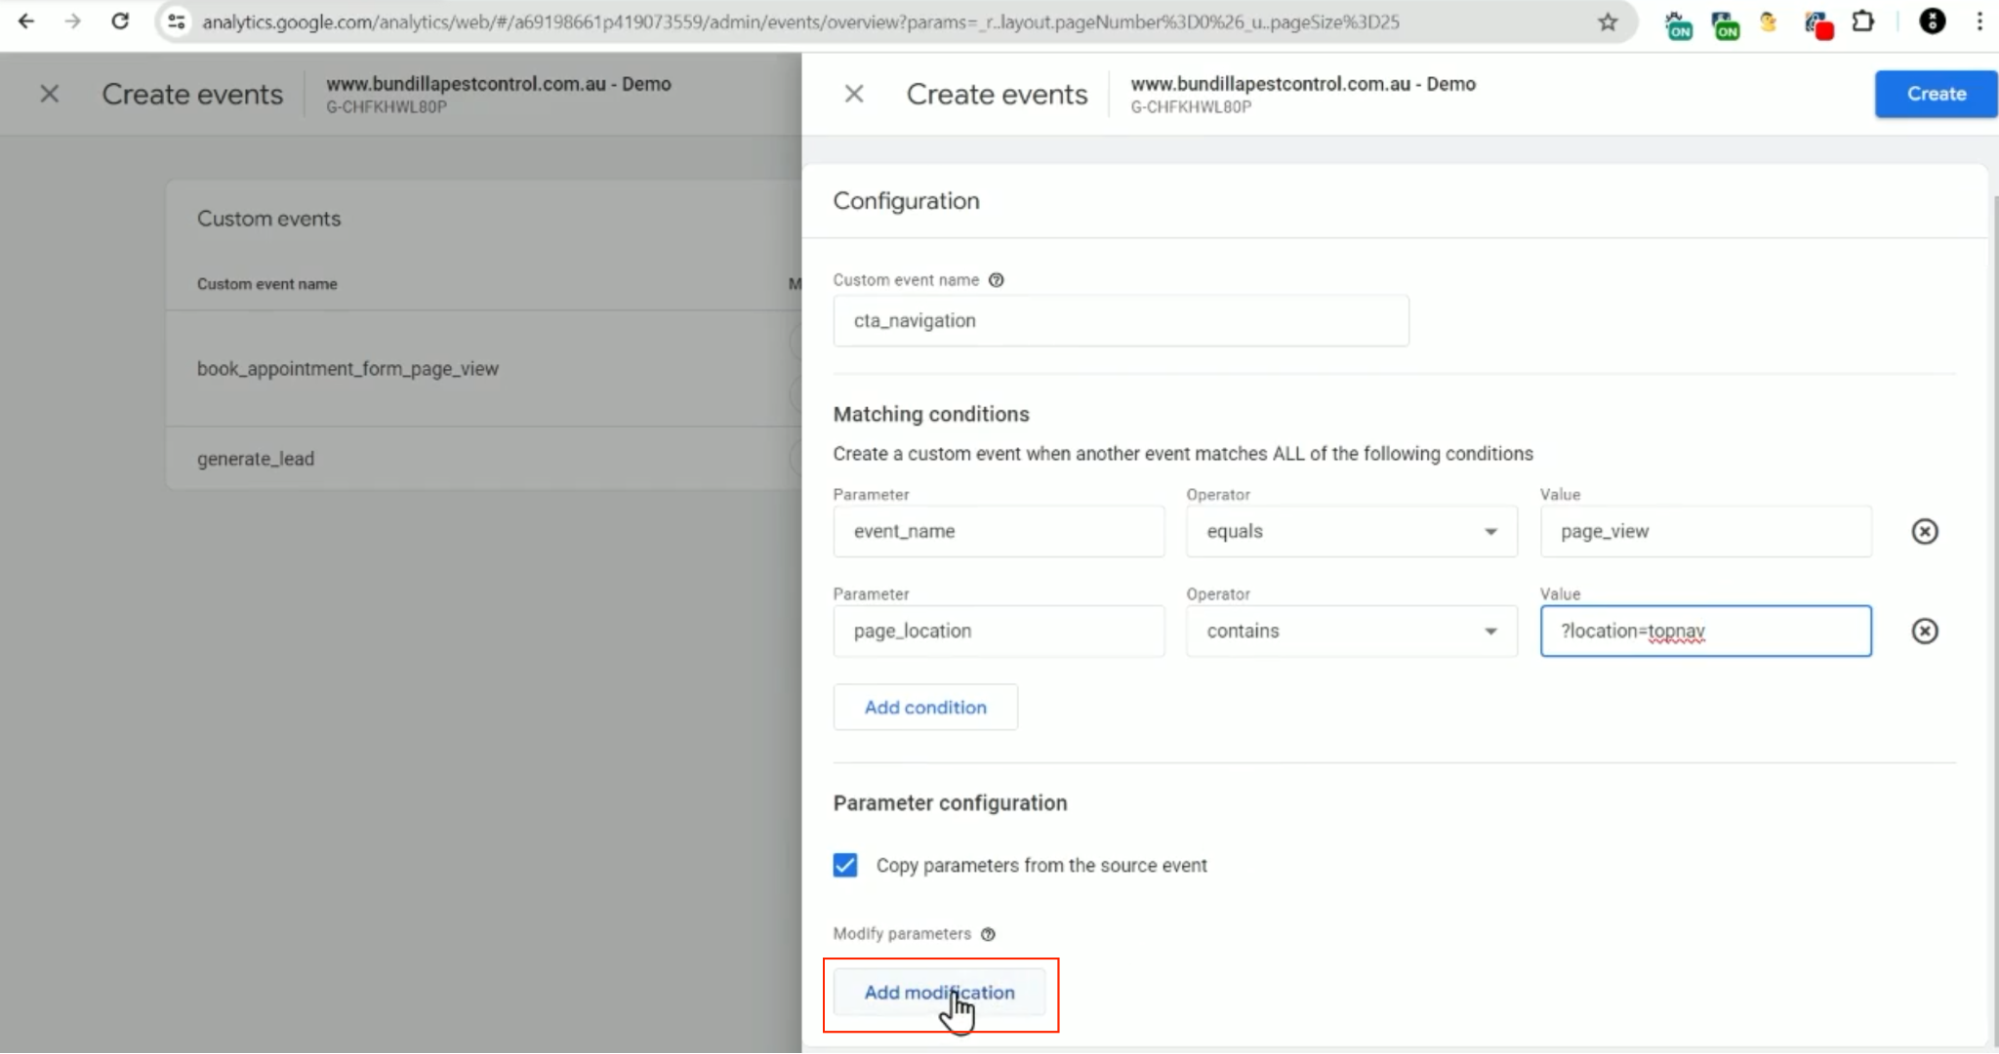
4. Name the event “cta_navigation”, this means that it’s a call to action button that’s in the navigation.
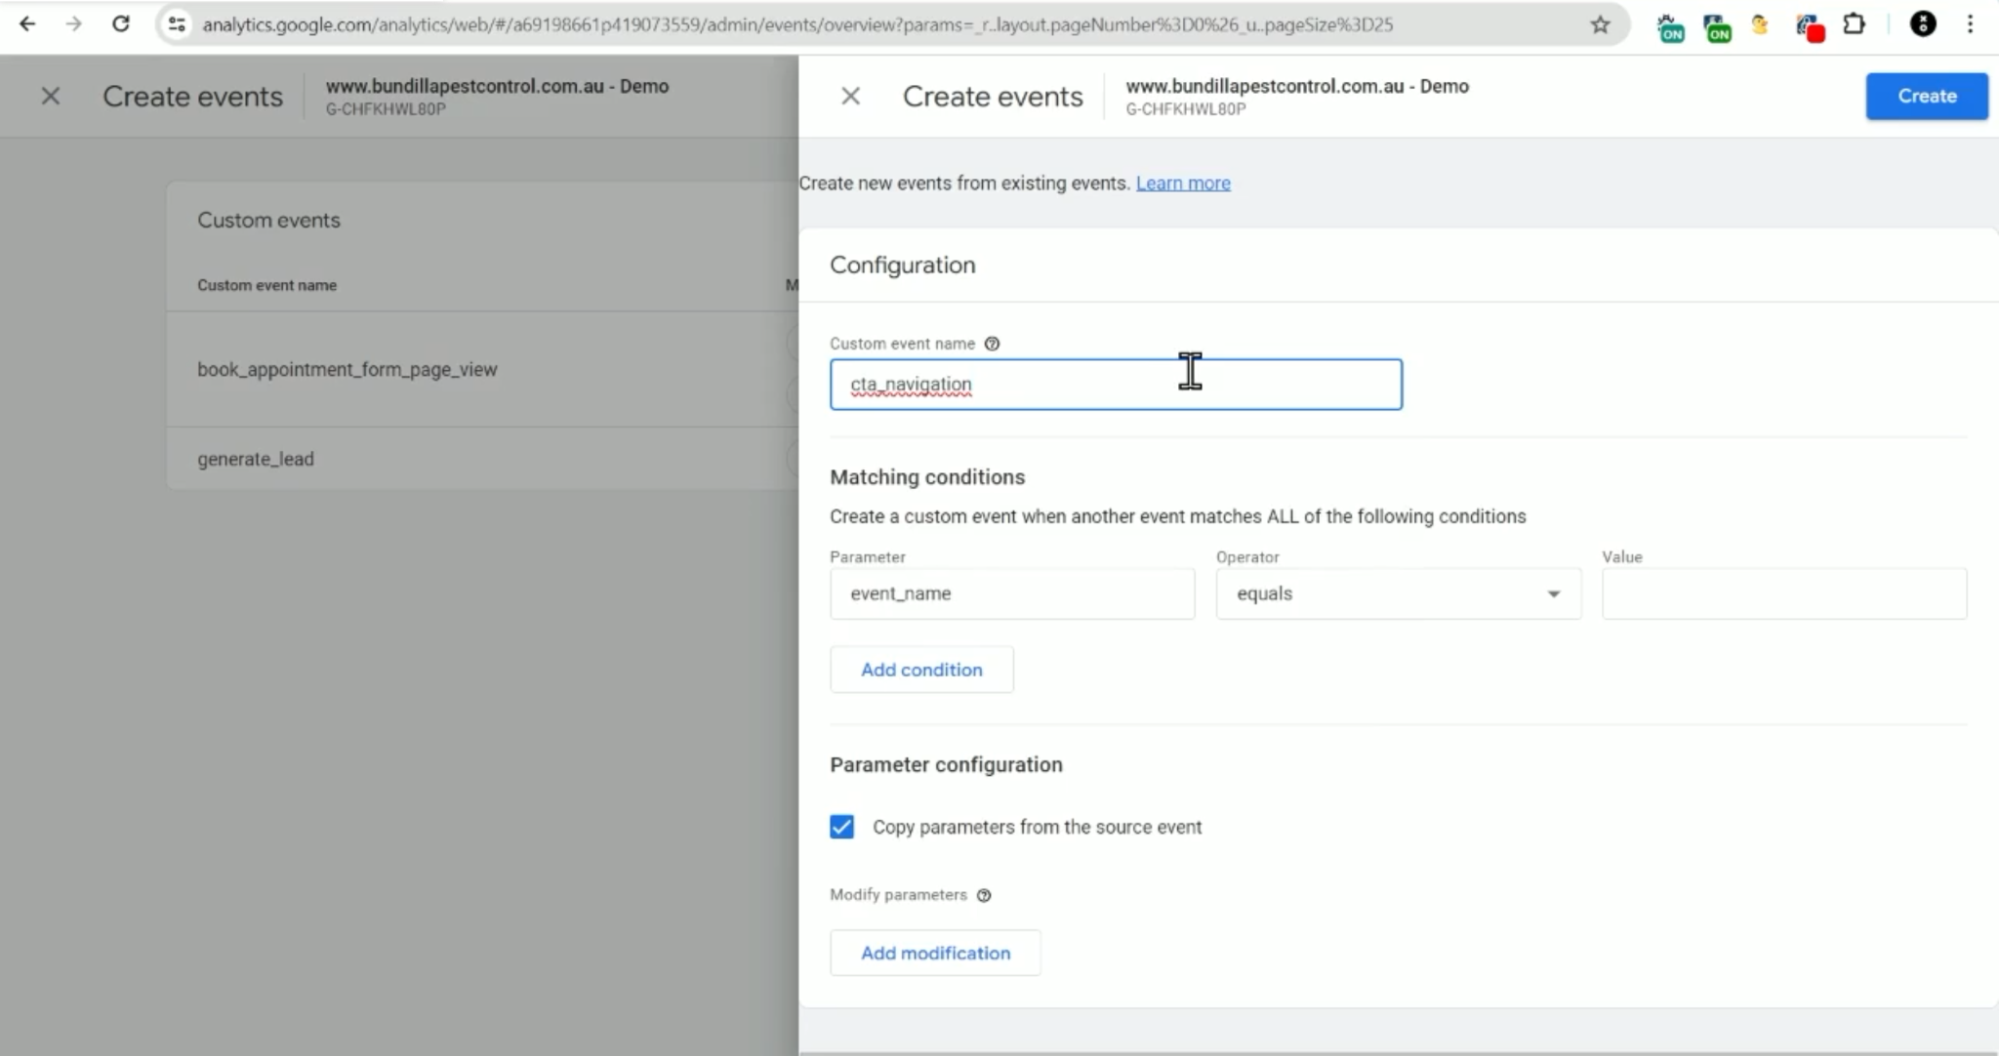
5. Then for the “Matching conditions”, the event name (i.e. value) will be “page_view”, then click “Add condition”
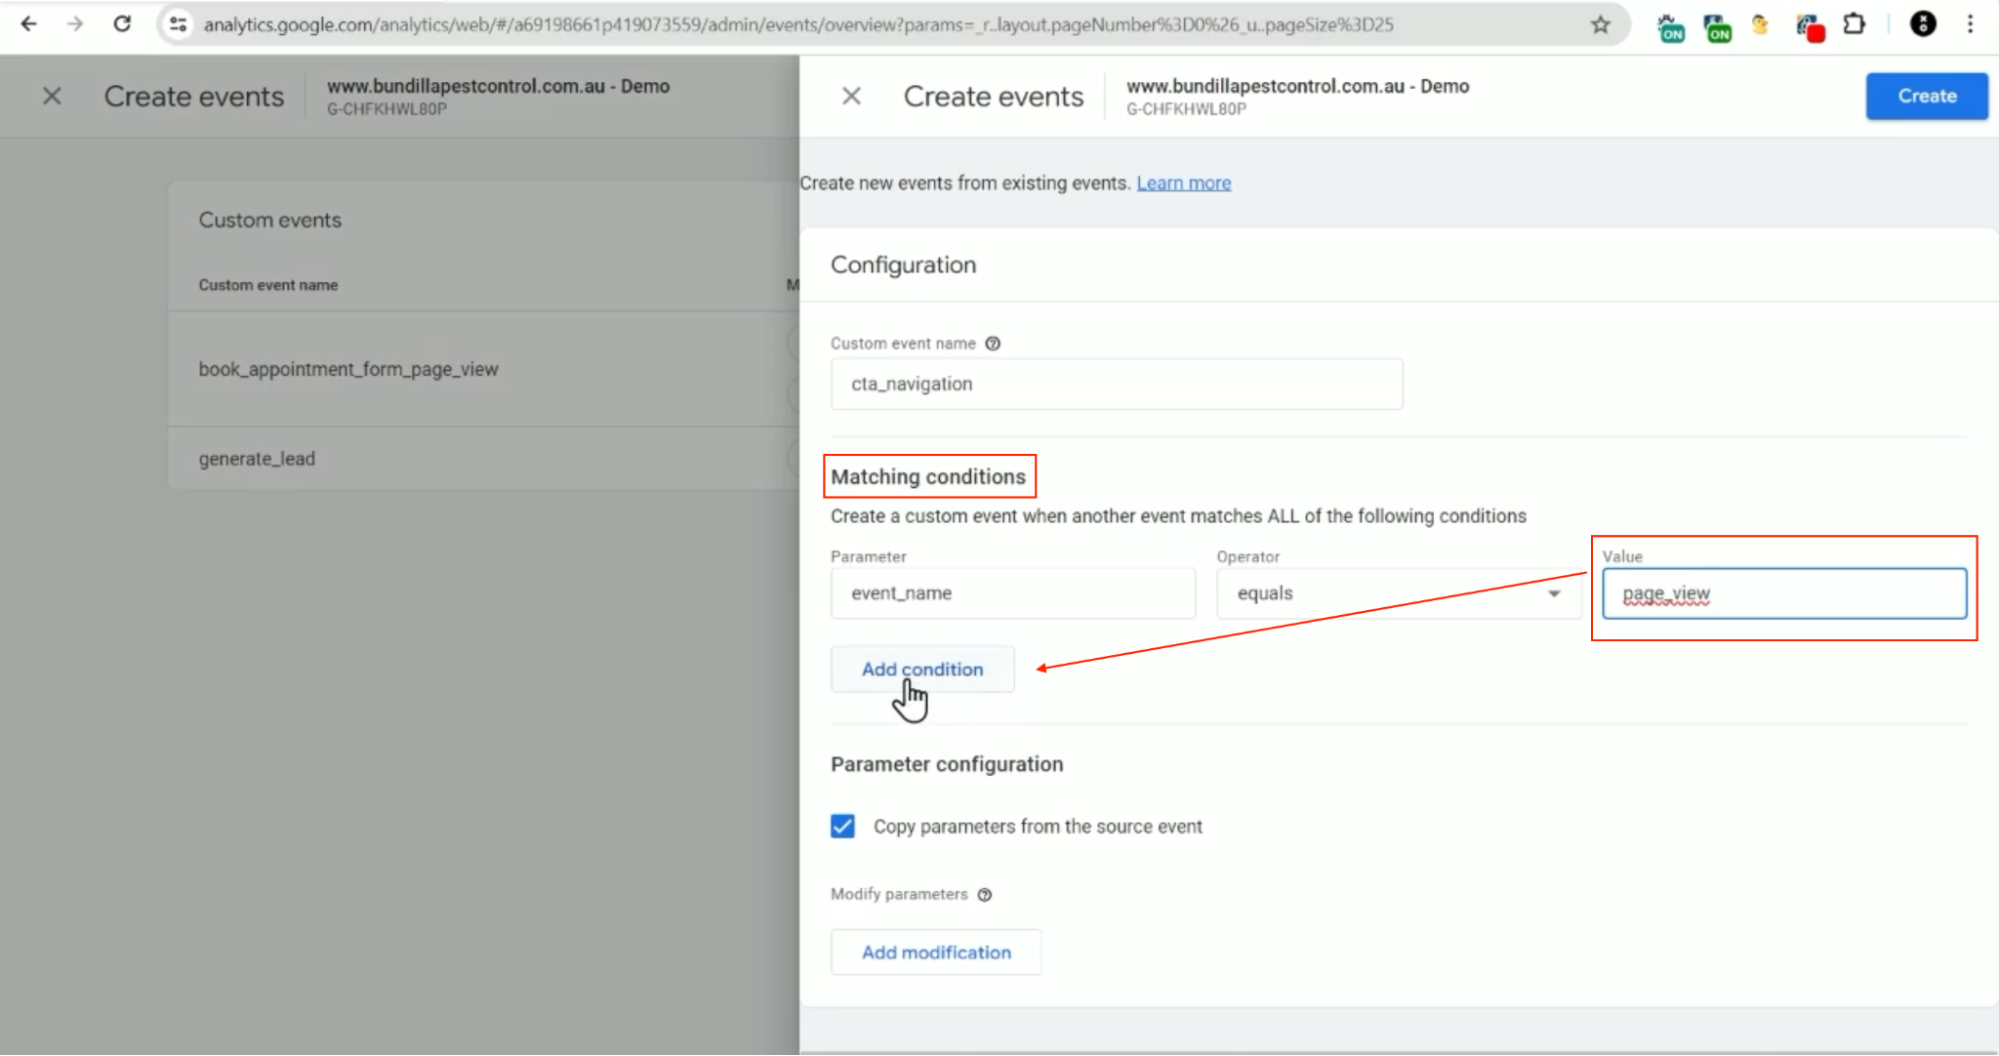
6. Then from the “Parameter” list you’re going to select “page_location” and select “contains”, then for our “Value” you’re going to enter our parameter—?location=topnav
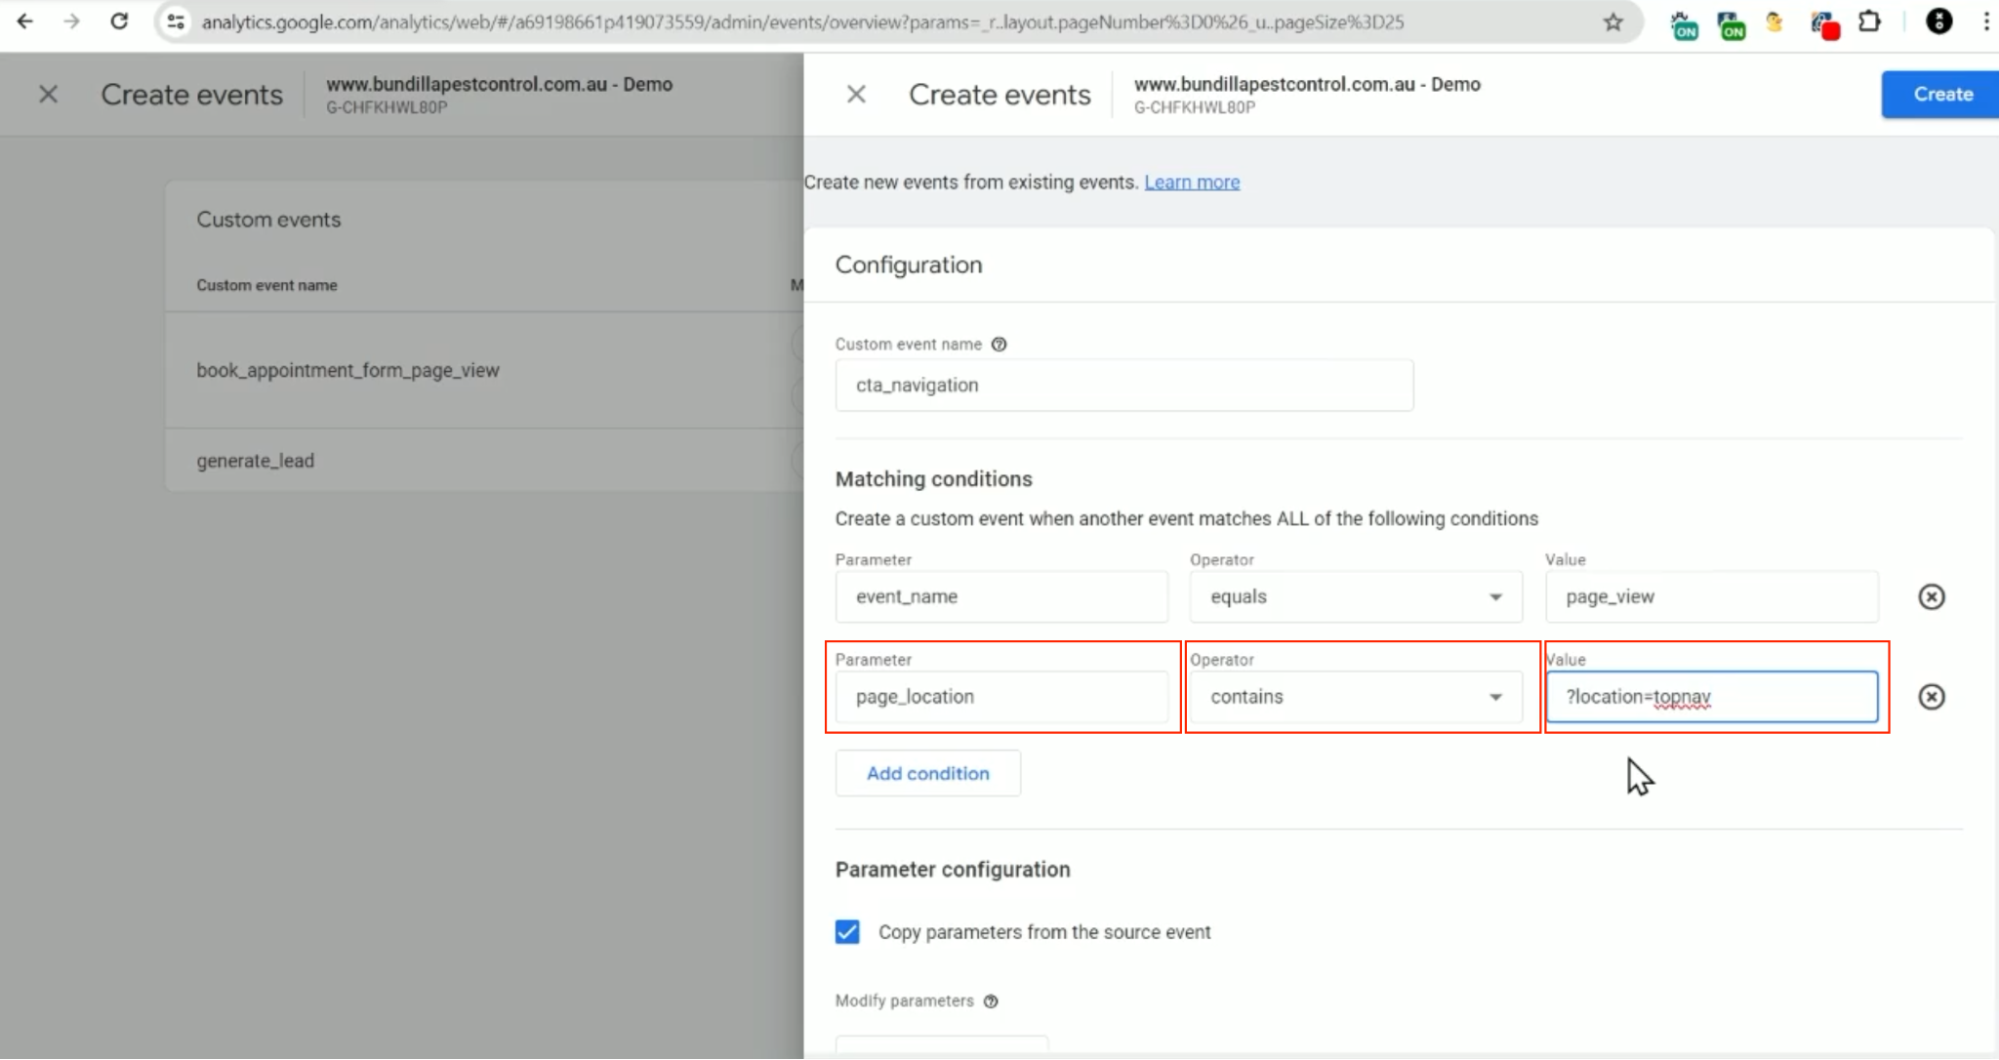
Now we’ll show you a sneaky trick! If you want to create a calculated metric based on how many times this button was clicked divided by sessions, you can do that by:
1. Clicking “Add modification” here under the parameter configuration.
Then you’re going to add a parameter name of “cta_navigation_count”, and its “Value” is going to be “1”
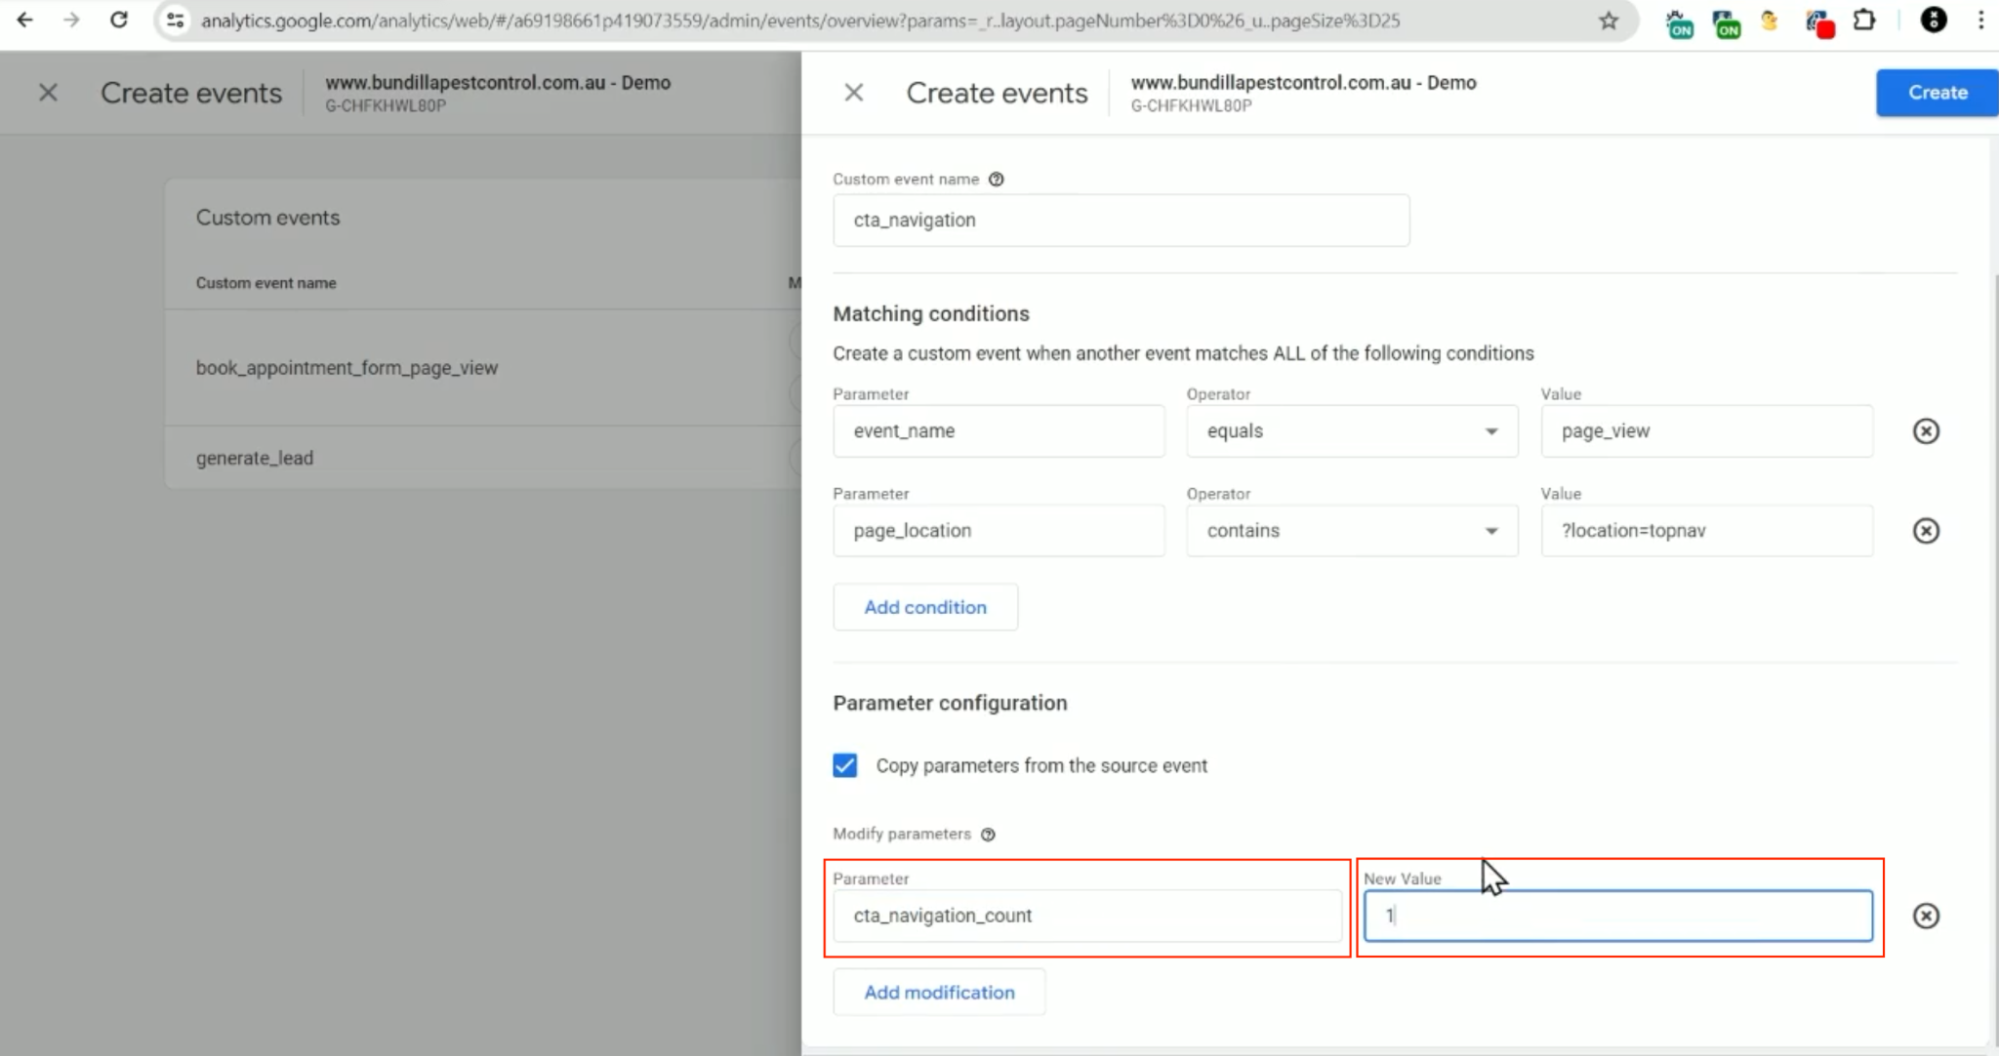
3. You’ll then save this by clicking on “Create” in the top right-hand corner.
4. Then you’re going to go into the “Custom definitions” part of the admin.
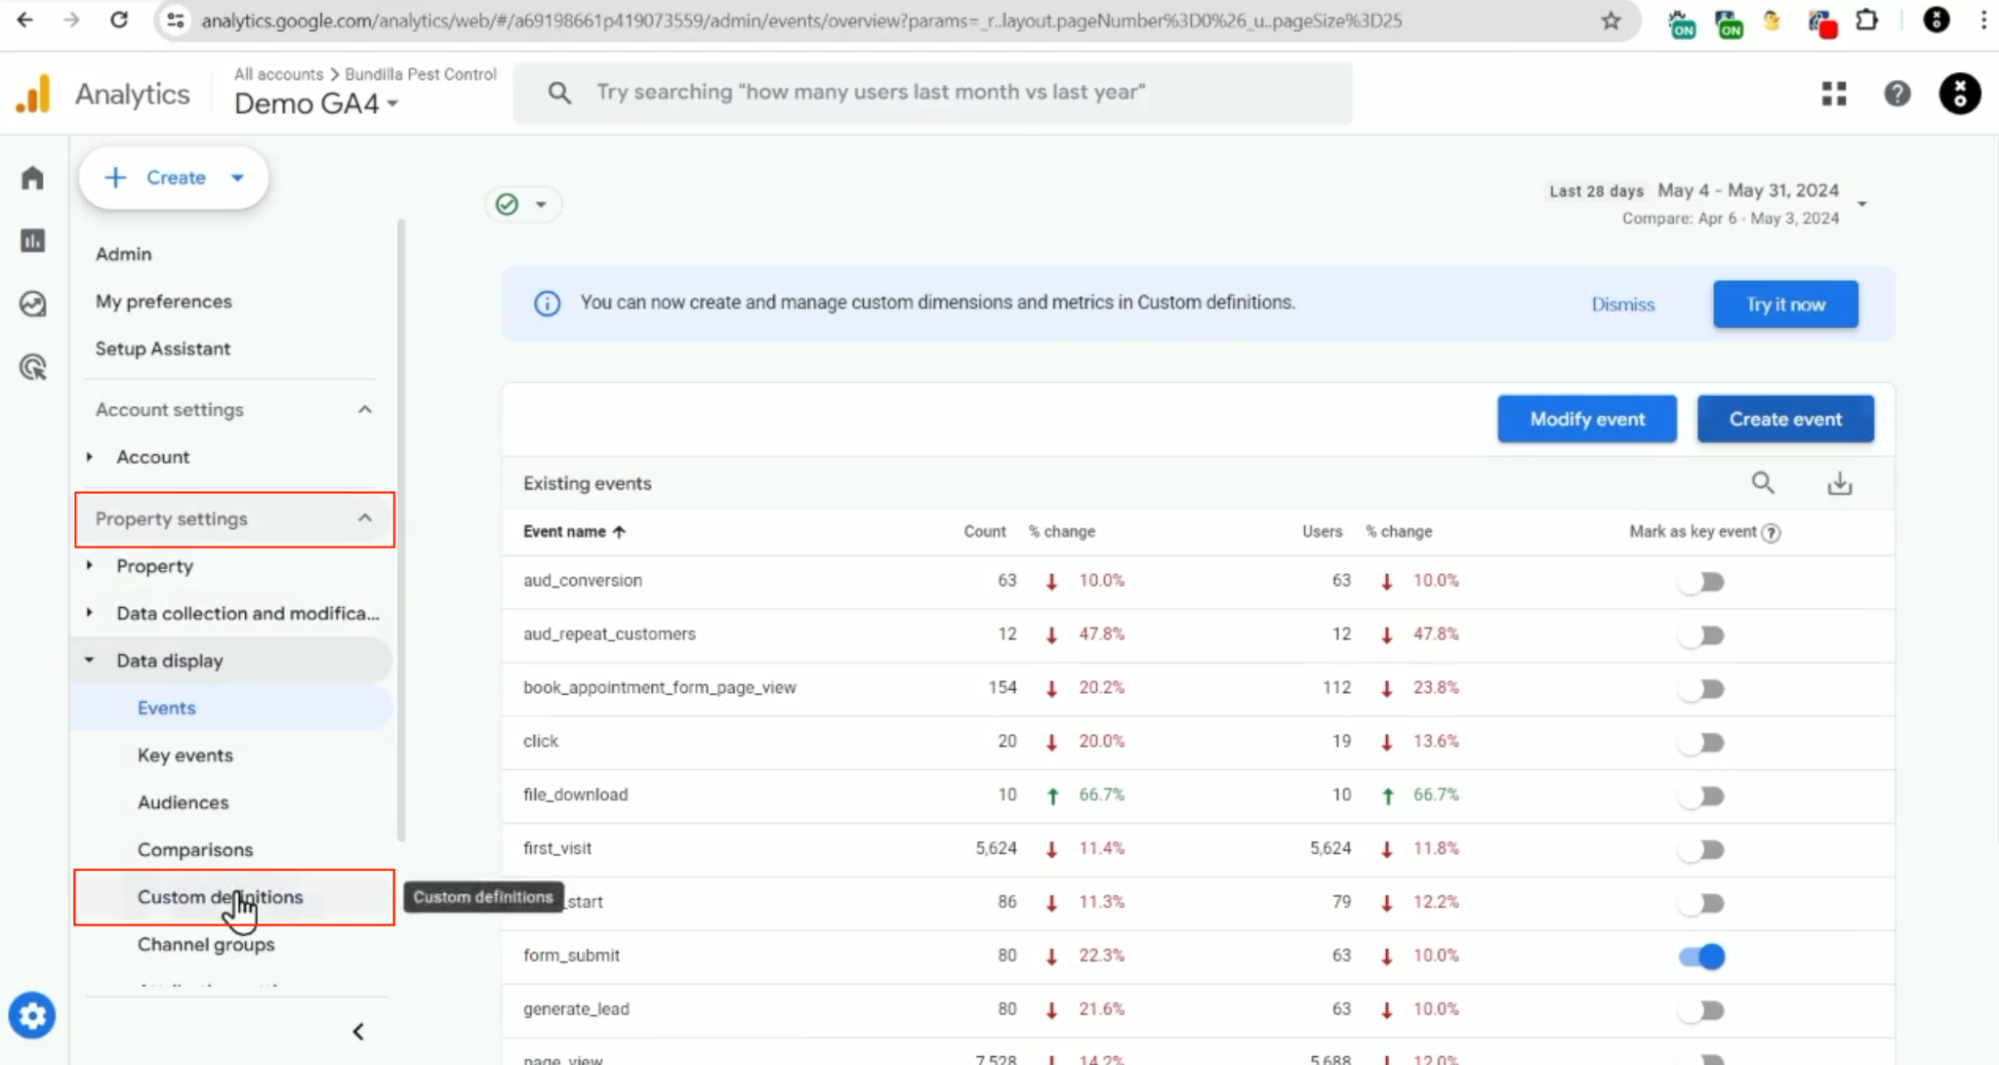
5. Then you’re going to go into “Custom metrics” and add a “Custom metric” with the parameter “cta_navigation_count”, but your metric name could be any name you want, just make sure it’s recognizable for you.
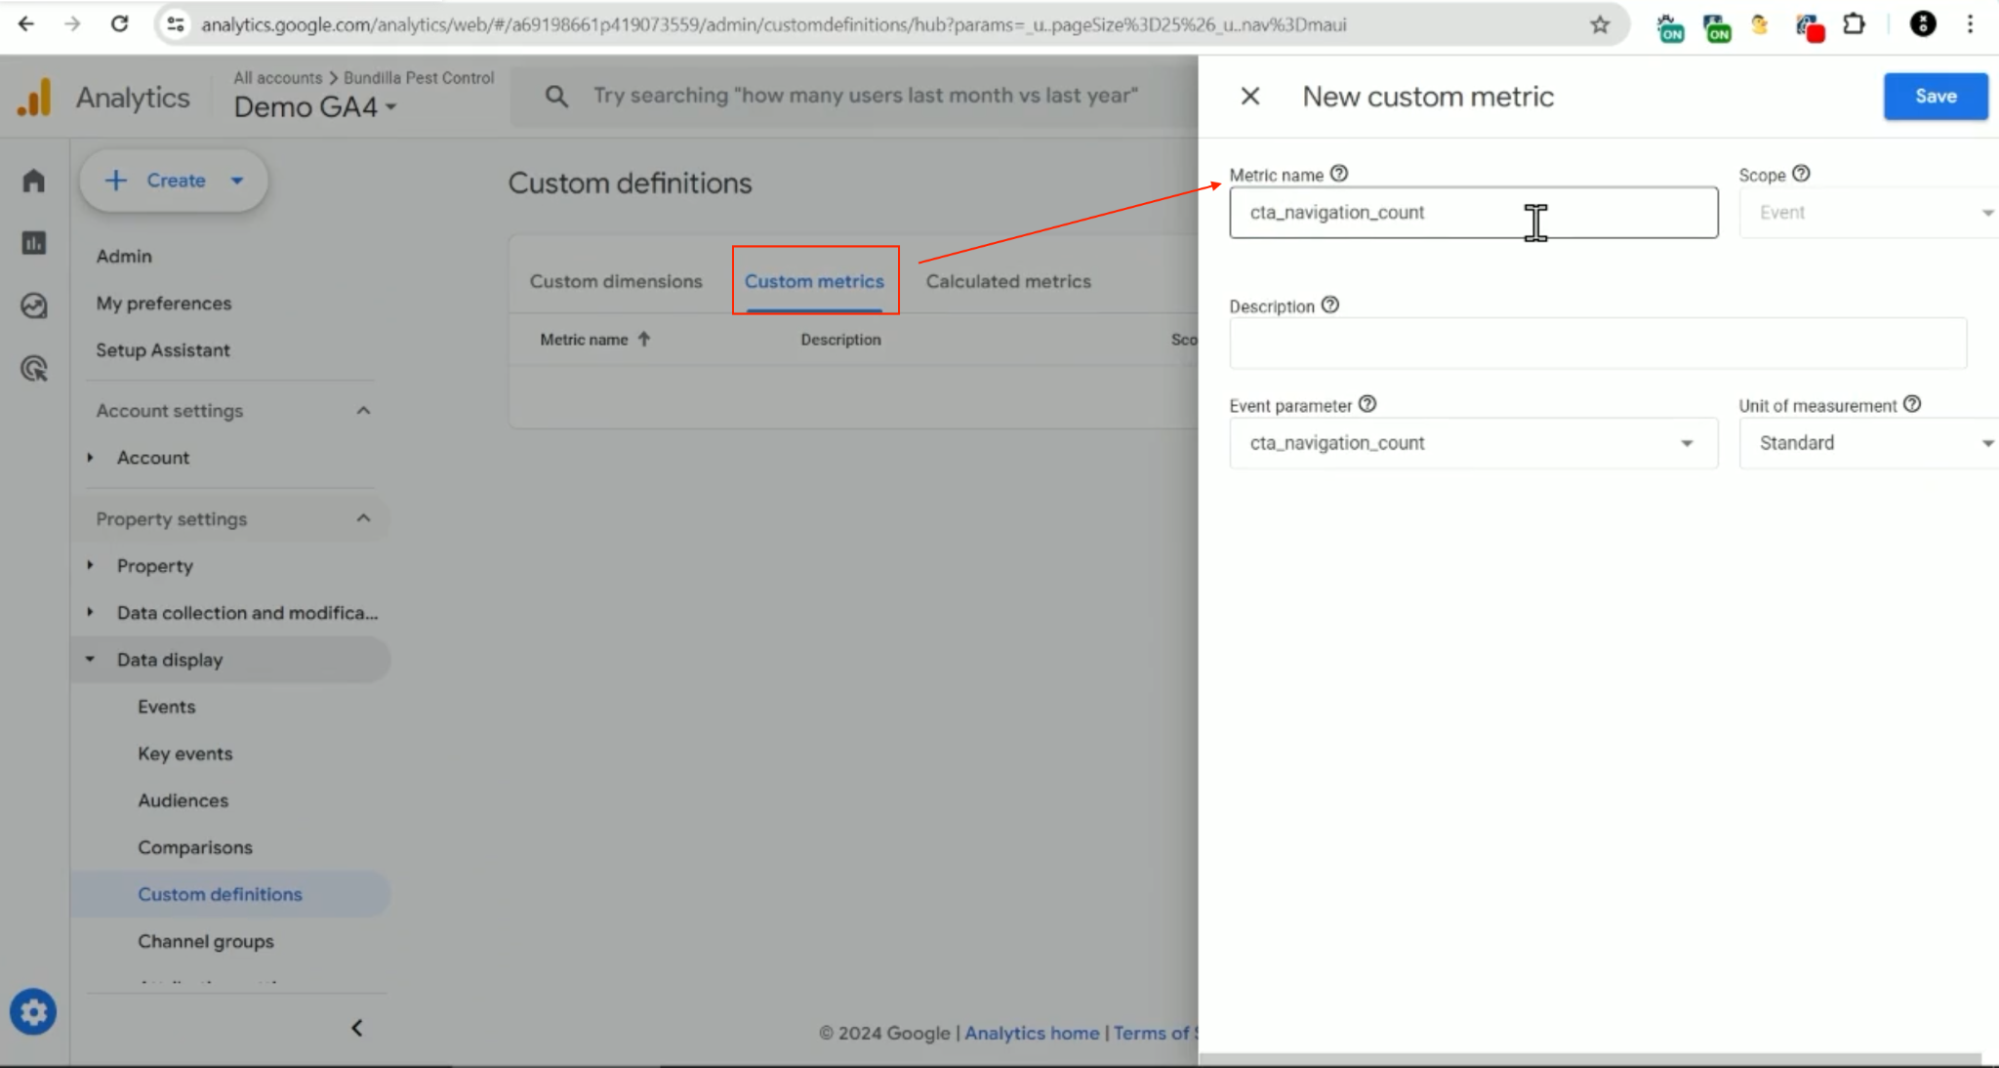
6. Then you’ll choose your “Unit of measurement” to remain as “Standard” because it doesn’t have a unit of measurement like time, for example, then click “Save”.
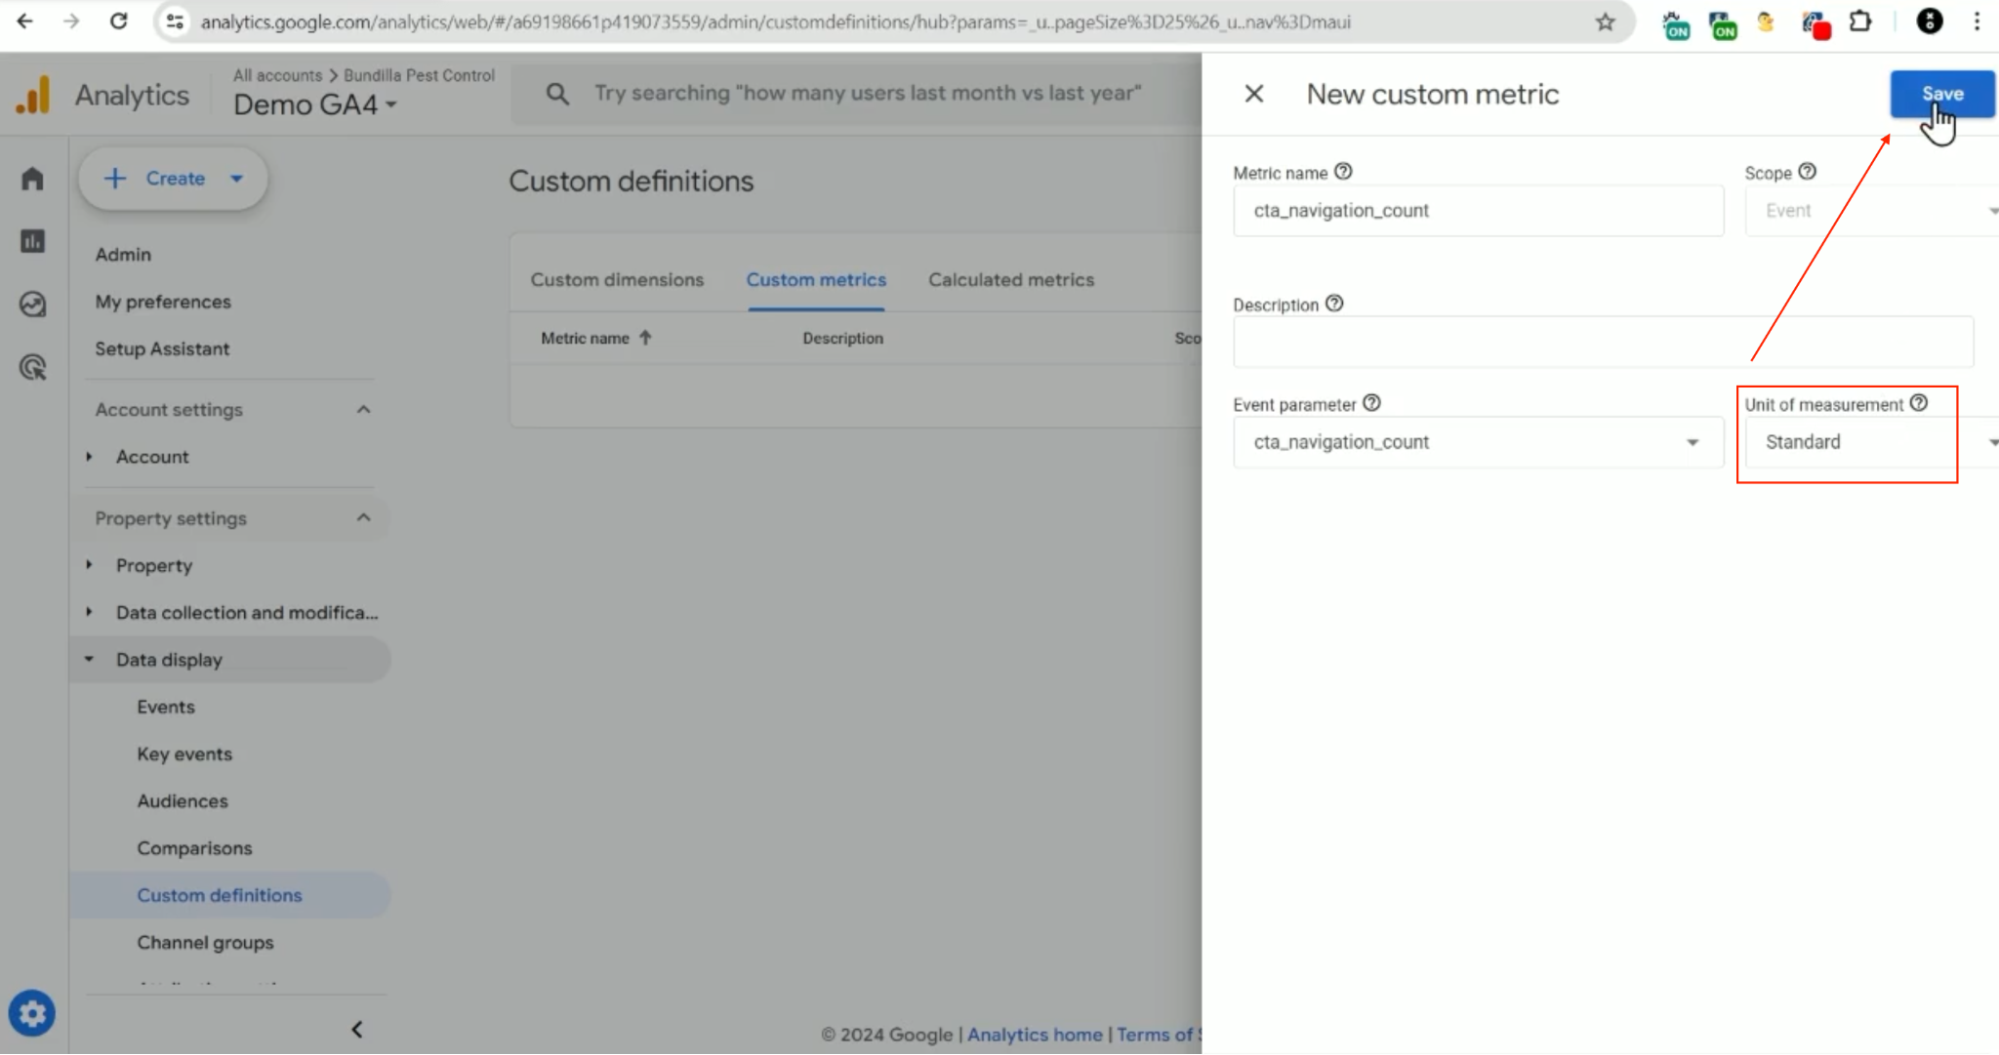
7. Then, you’ll go to the “Calculated metrics” tab and create a new calculated metric.
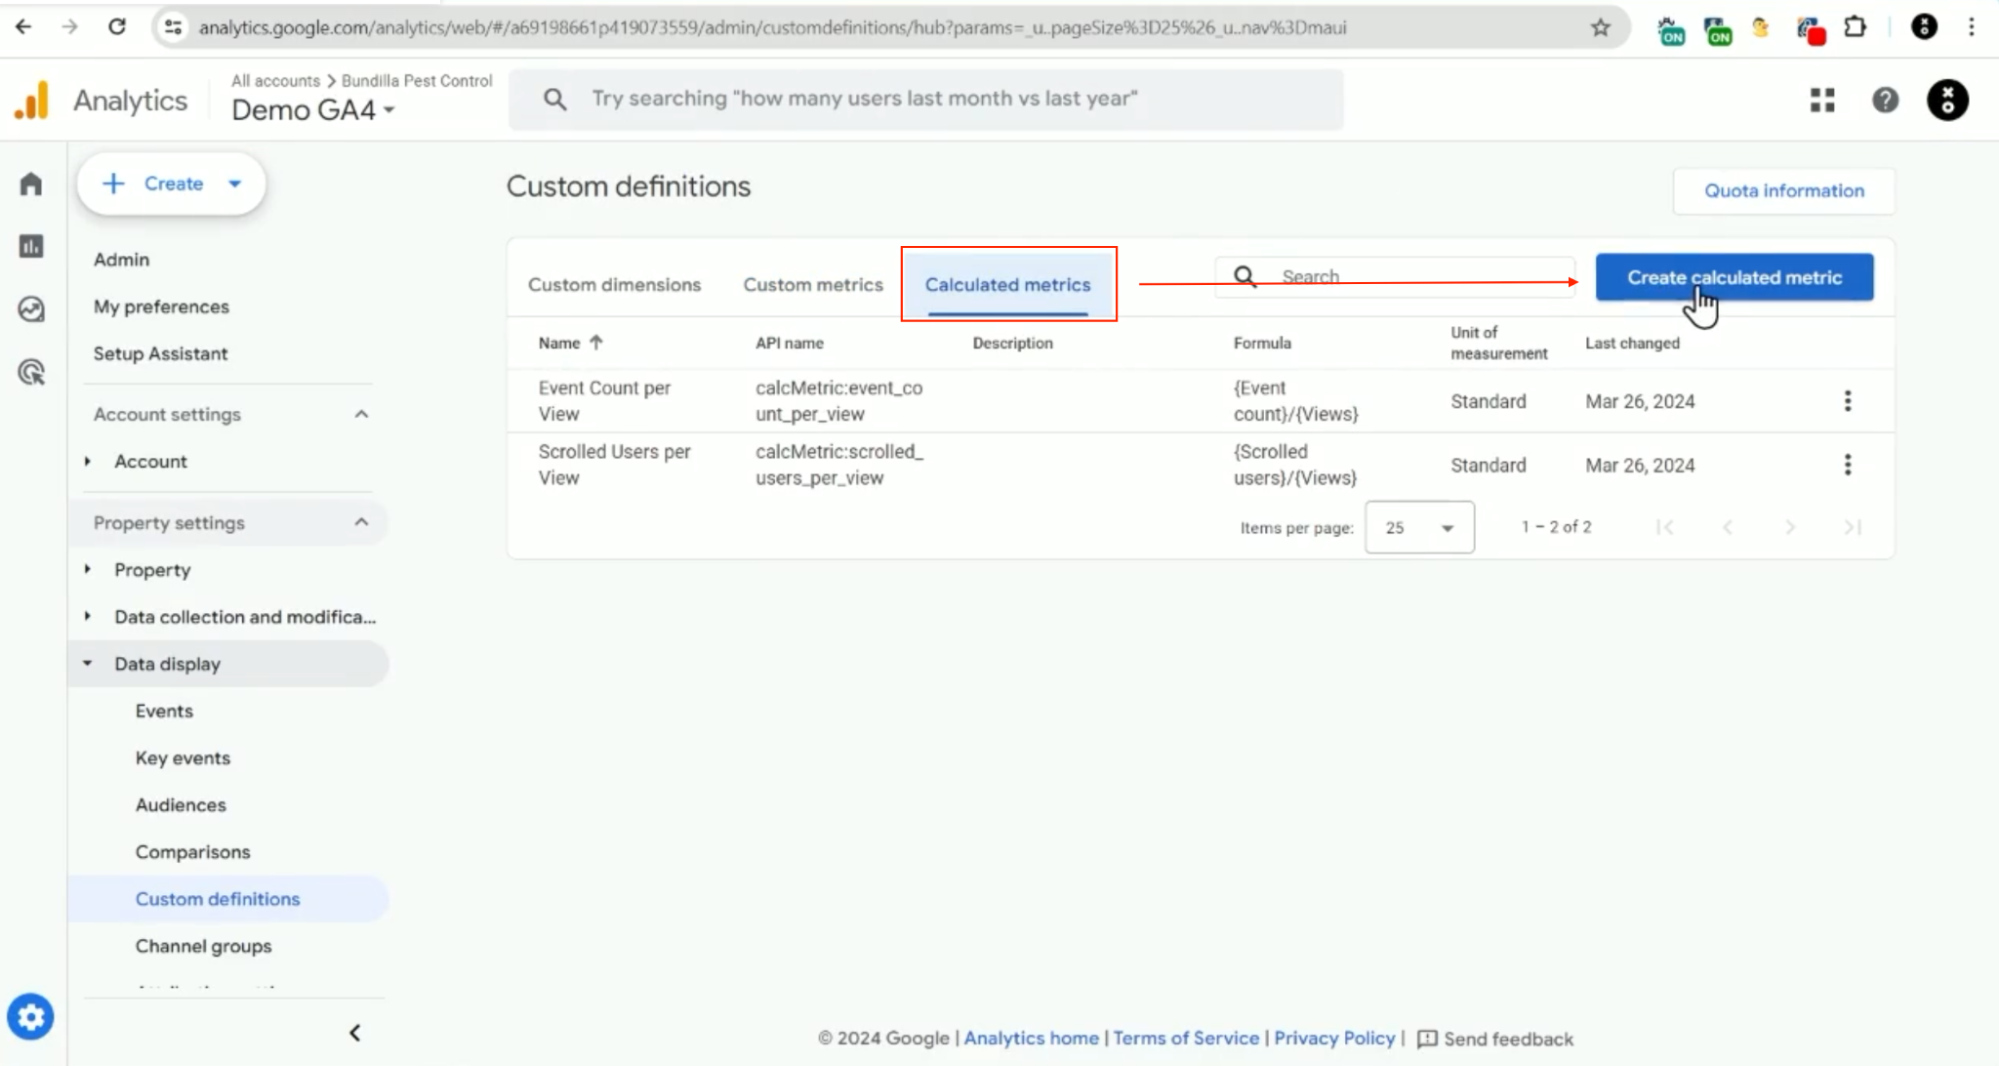
8. You’ll call this new calculated metric called “Nav CTA Rate”
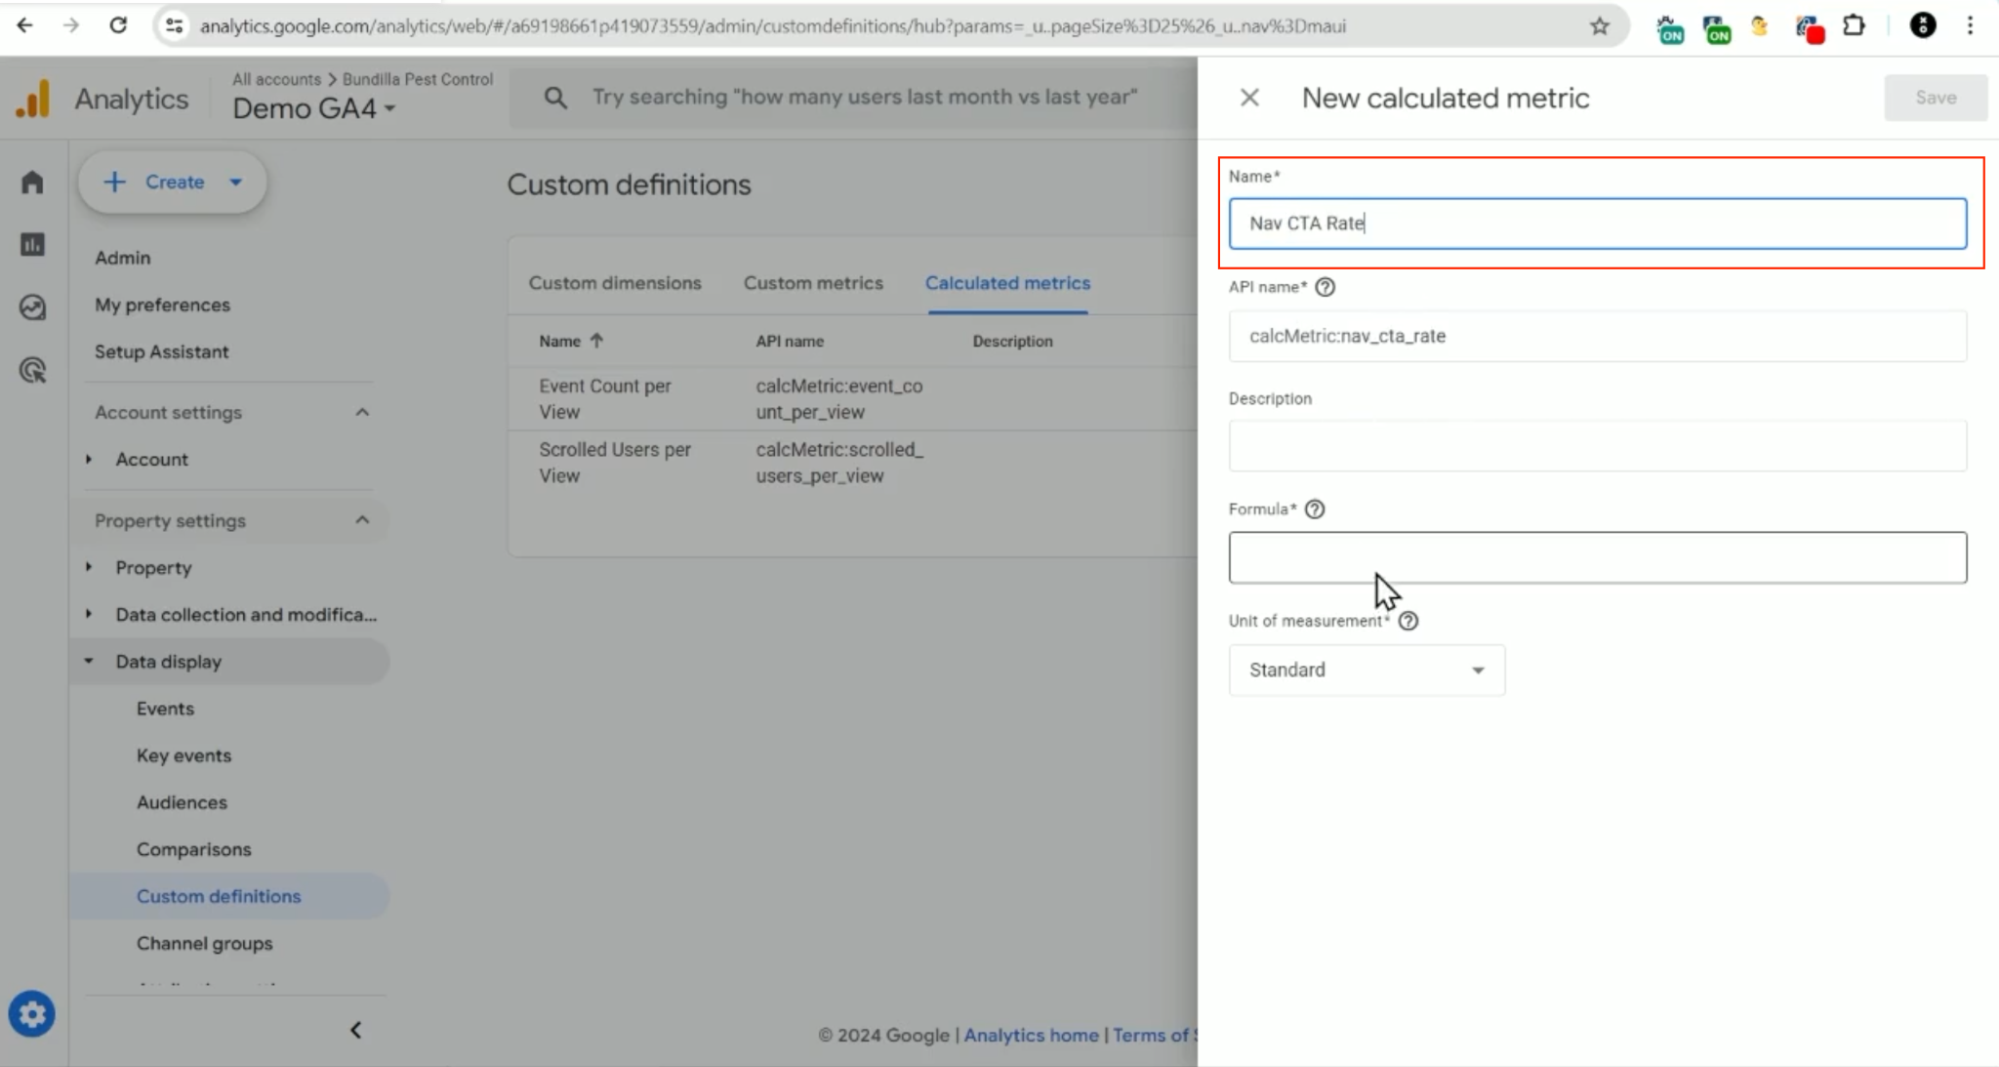
9. Then for the “Formula” you’re going to find our metric you just added “cta_navigation_count” then divide that by “Sessions” and click “Save”.
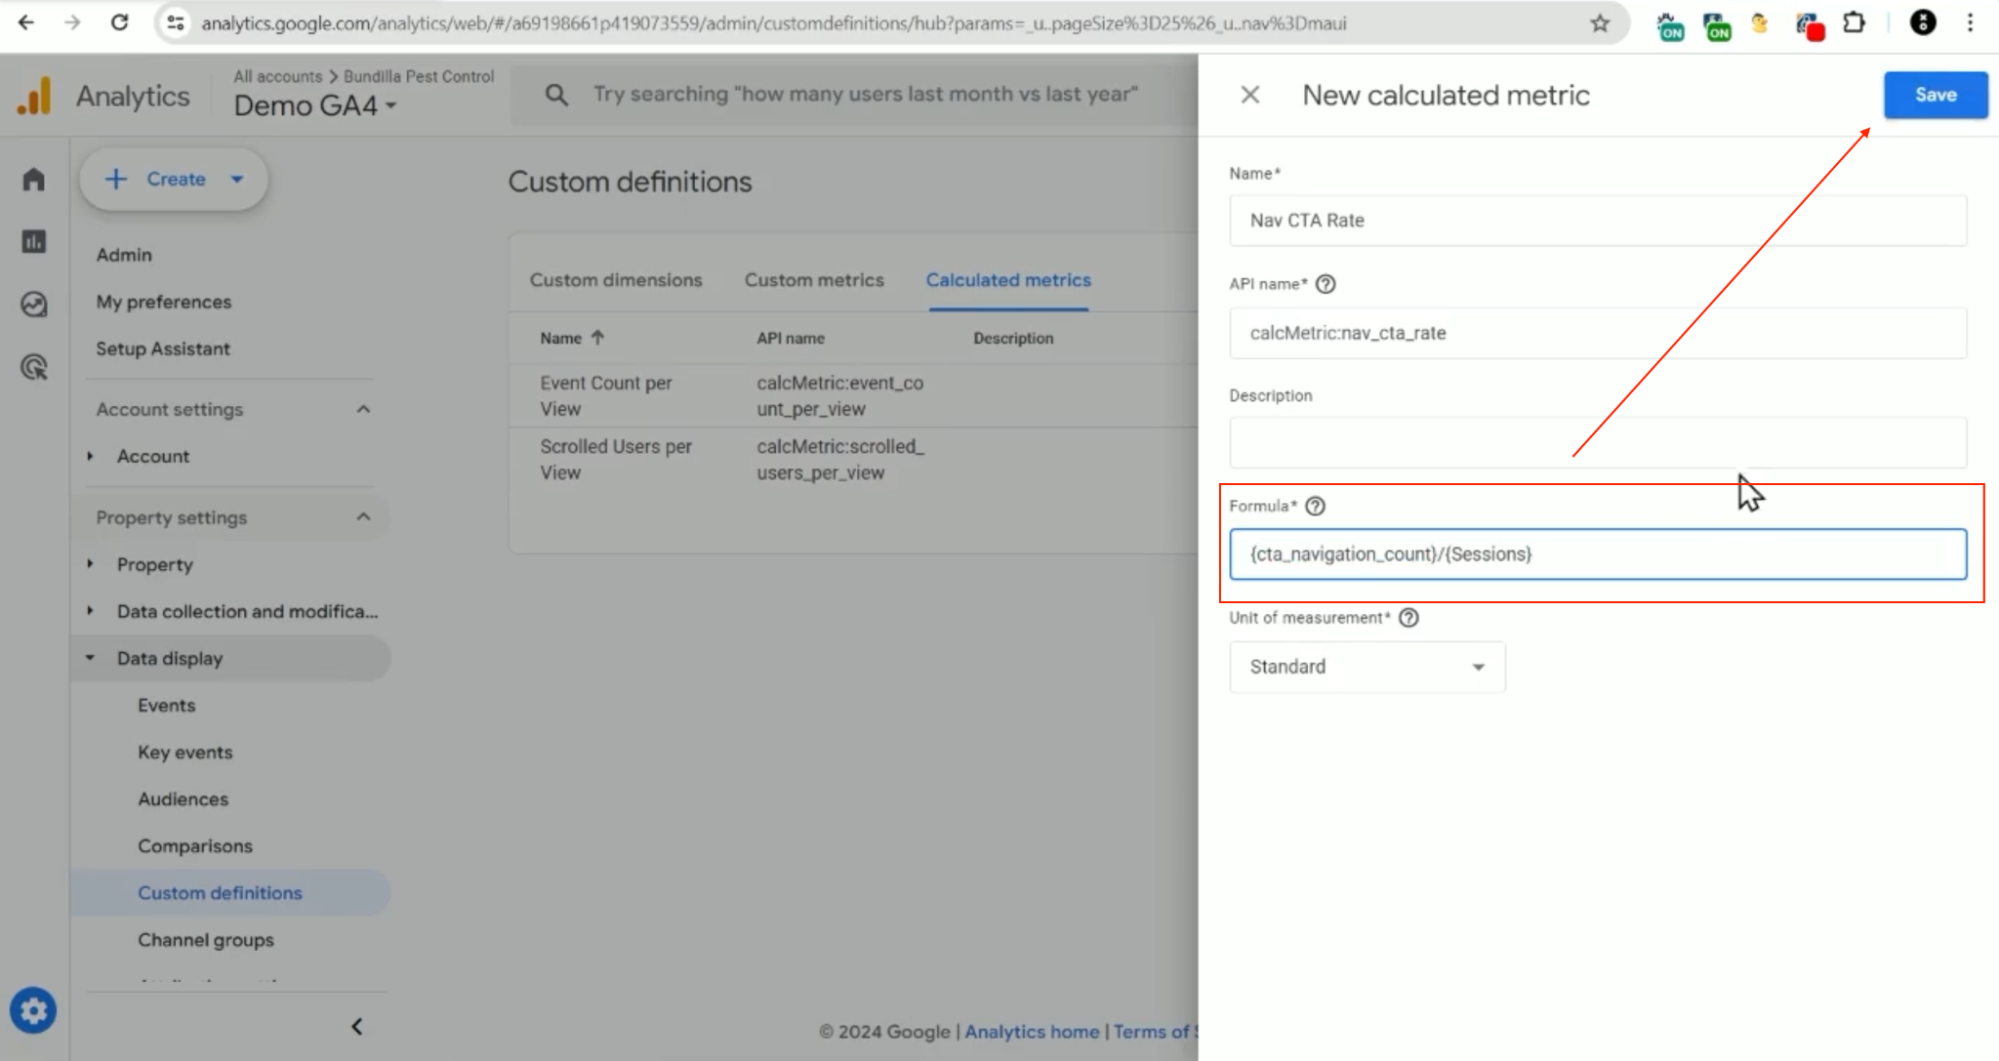
Now, you’re able to take the number of times that particular event occurs and divide it by the number of sessions on the site. Then, you can add this metric in your reports of how often that particular button is clicked!
Ready to upskill your GA4 knowledge?
How to know when specific videos are watched—even partially!
Next, let’s consider how to track engagement with things other than clicking links on a website. If you can’t use GTM, you are a bit limited since you have to rely on what GA4 gives you. So, let’s look at how to narrow down engagement with a specific video, for example.
There are three dimensions that come with any video event:
- Video provider—the source of the video (e.g. YouTube)
- Video title—the title of the video
- Video URL—the URL of the video
In GA4, you can add these dimensions to any report! For example, you can revise the Events Report (by clicking the pencil icon) to add the dimension of “Video title” and click “Apply”.
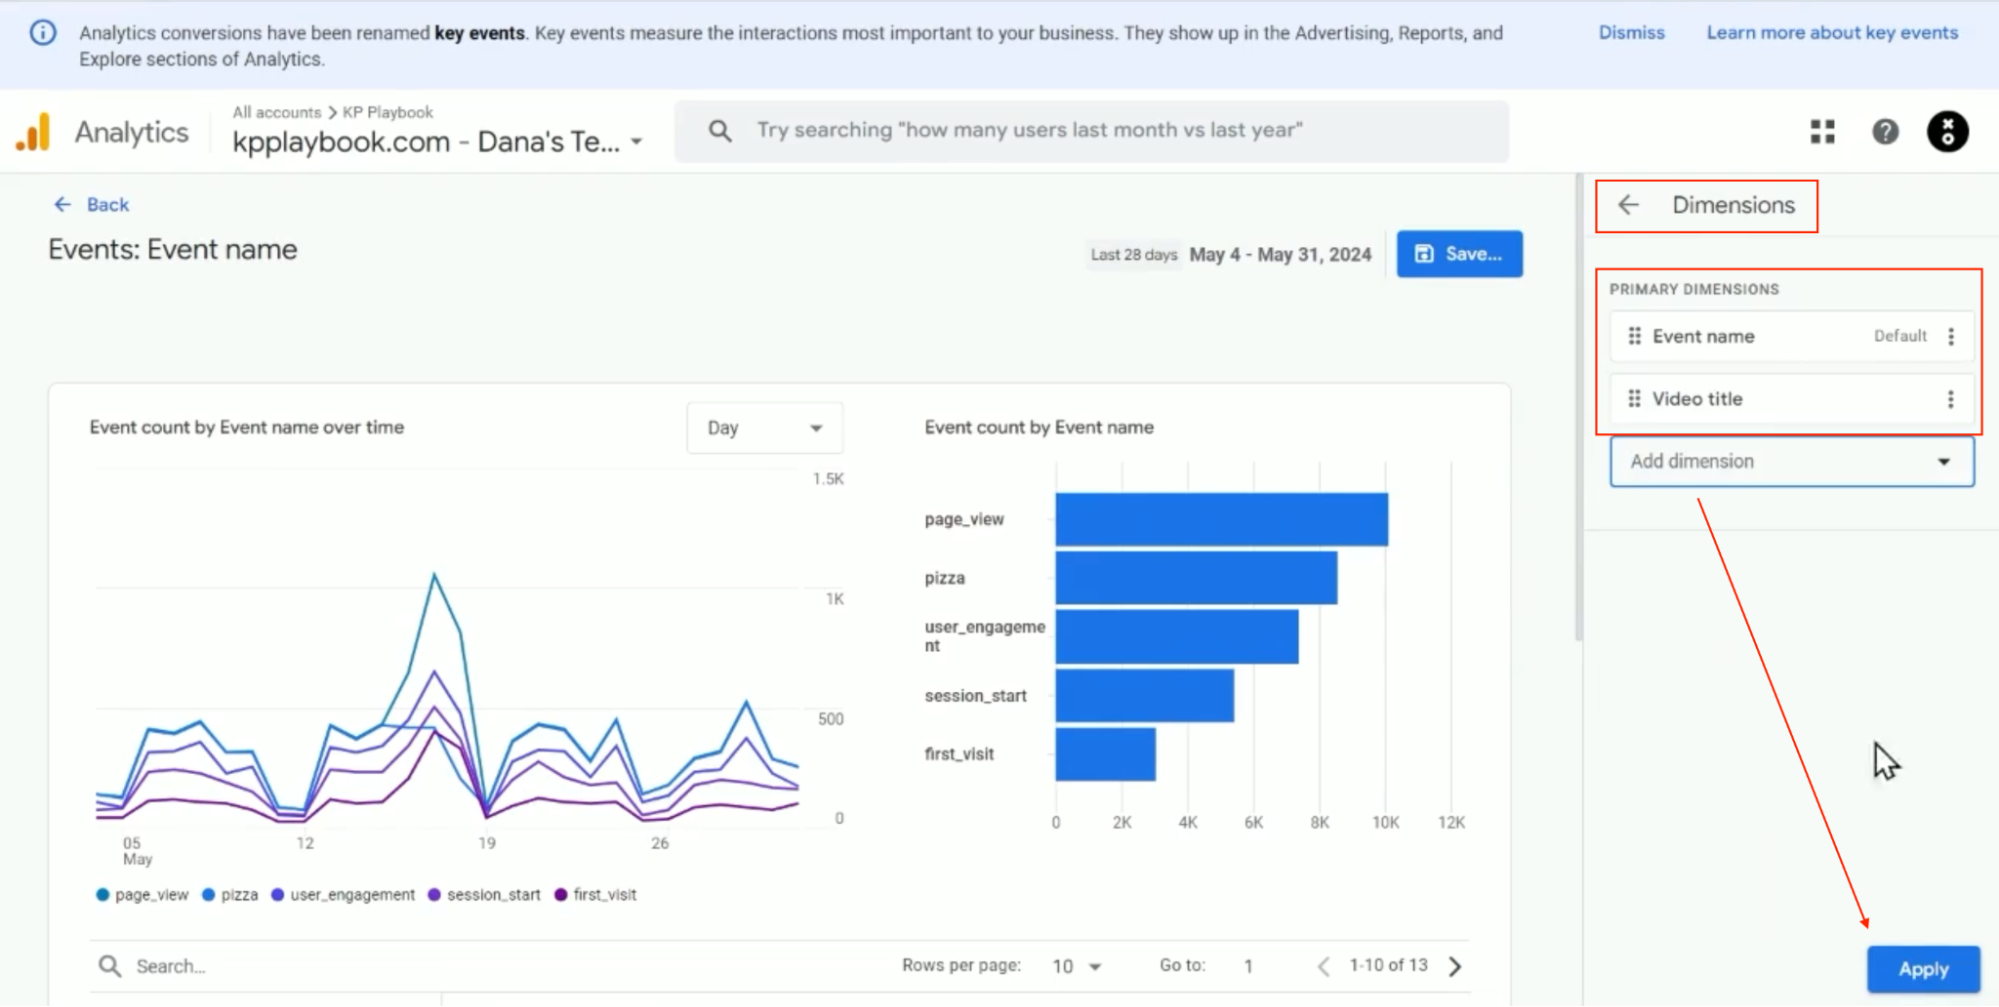
Now, if you go back to your report, you can see “Video title” showing up in this list!
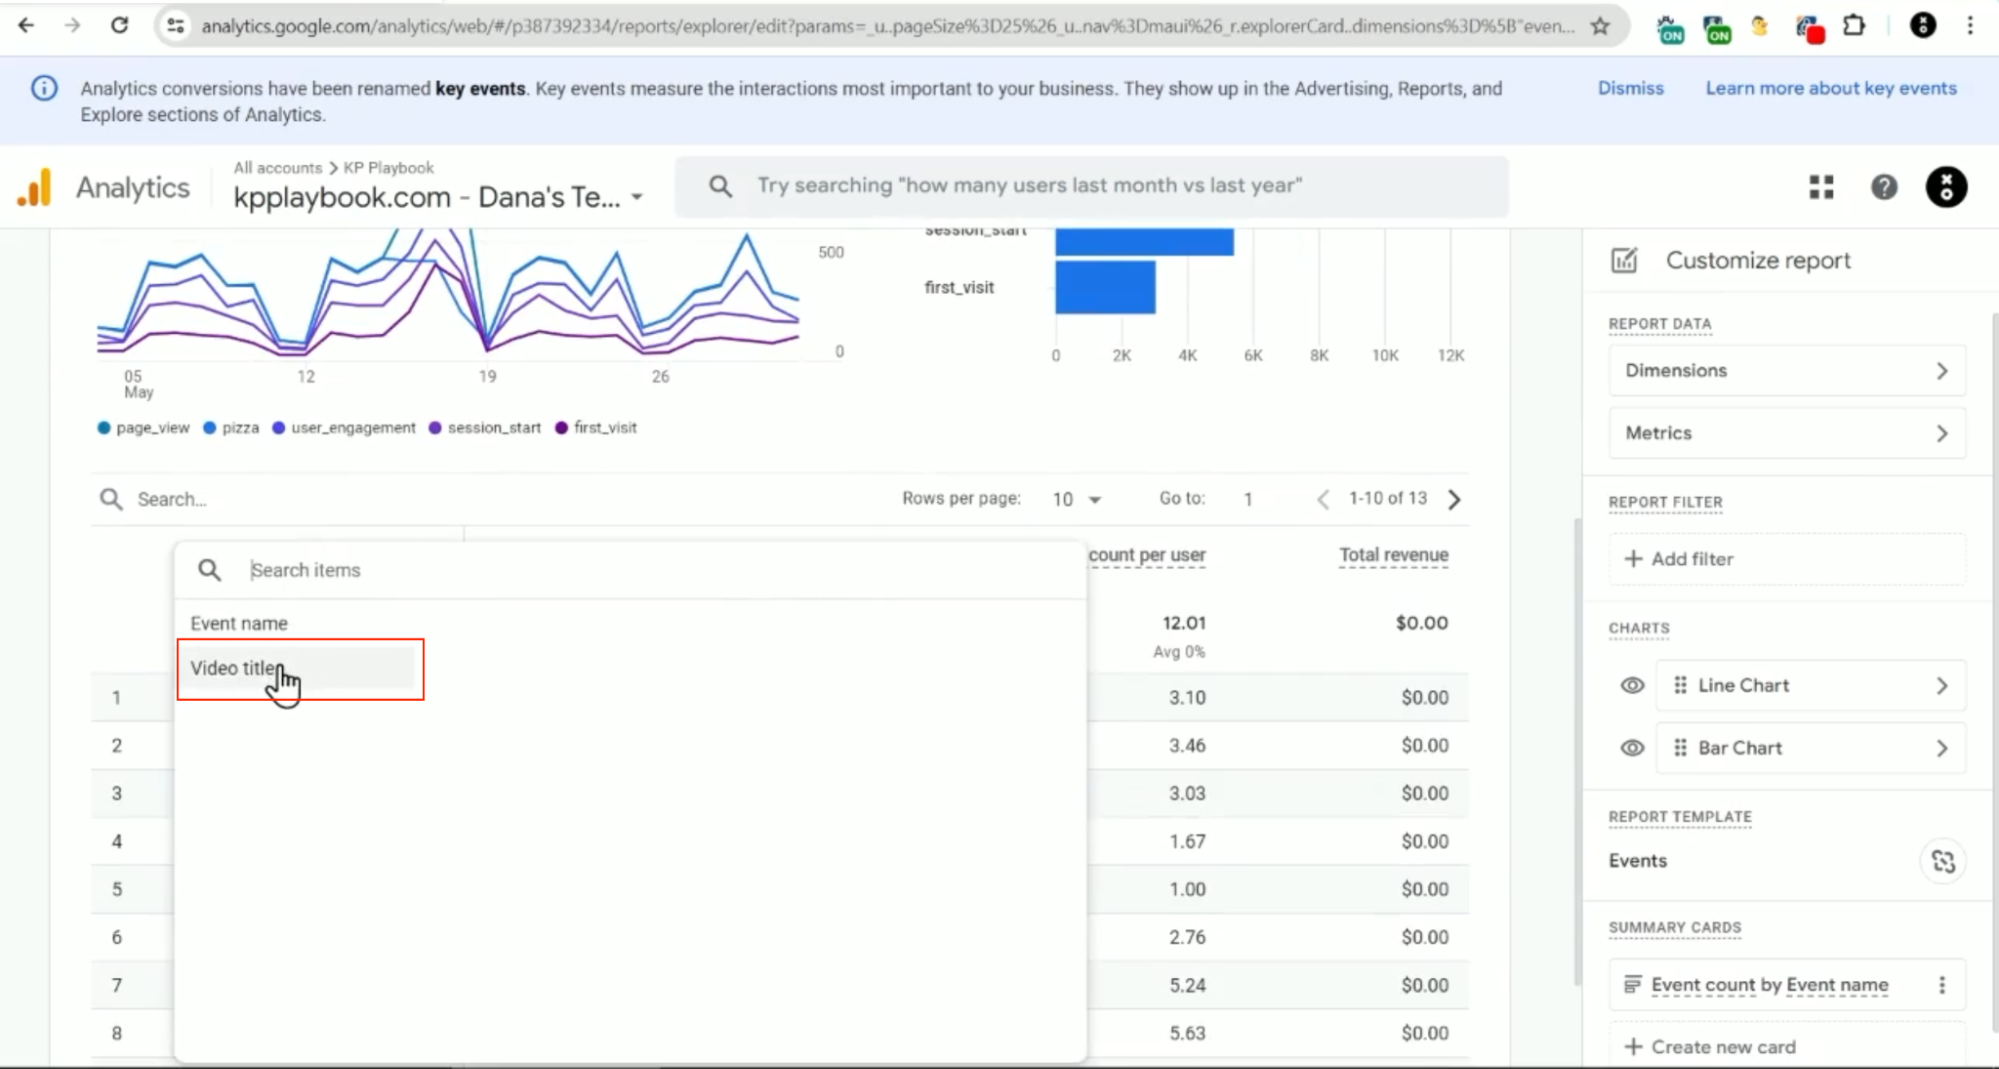
When you click “Video titles” from that list you can see the list of titles in the list of events.
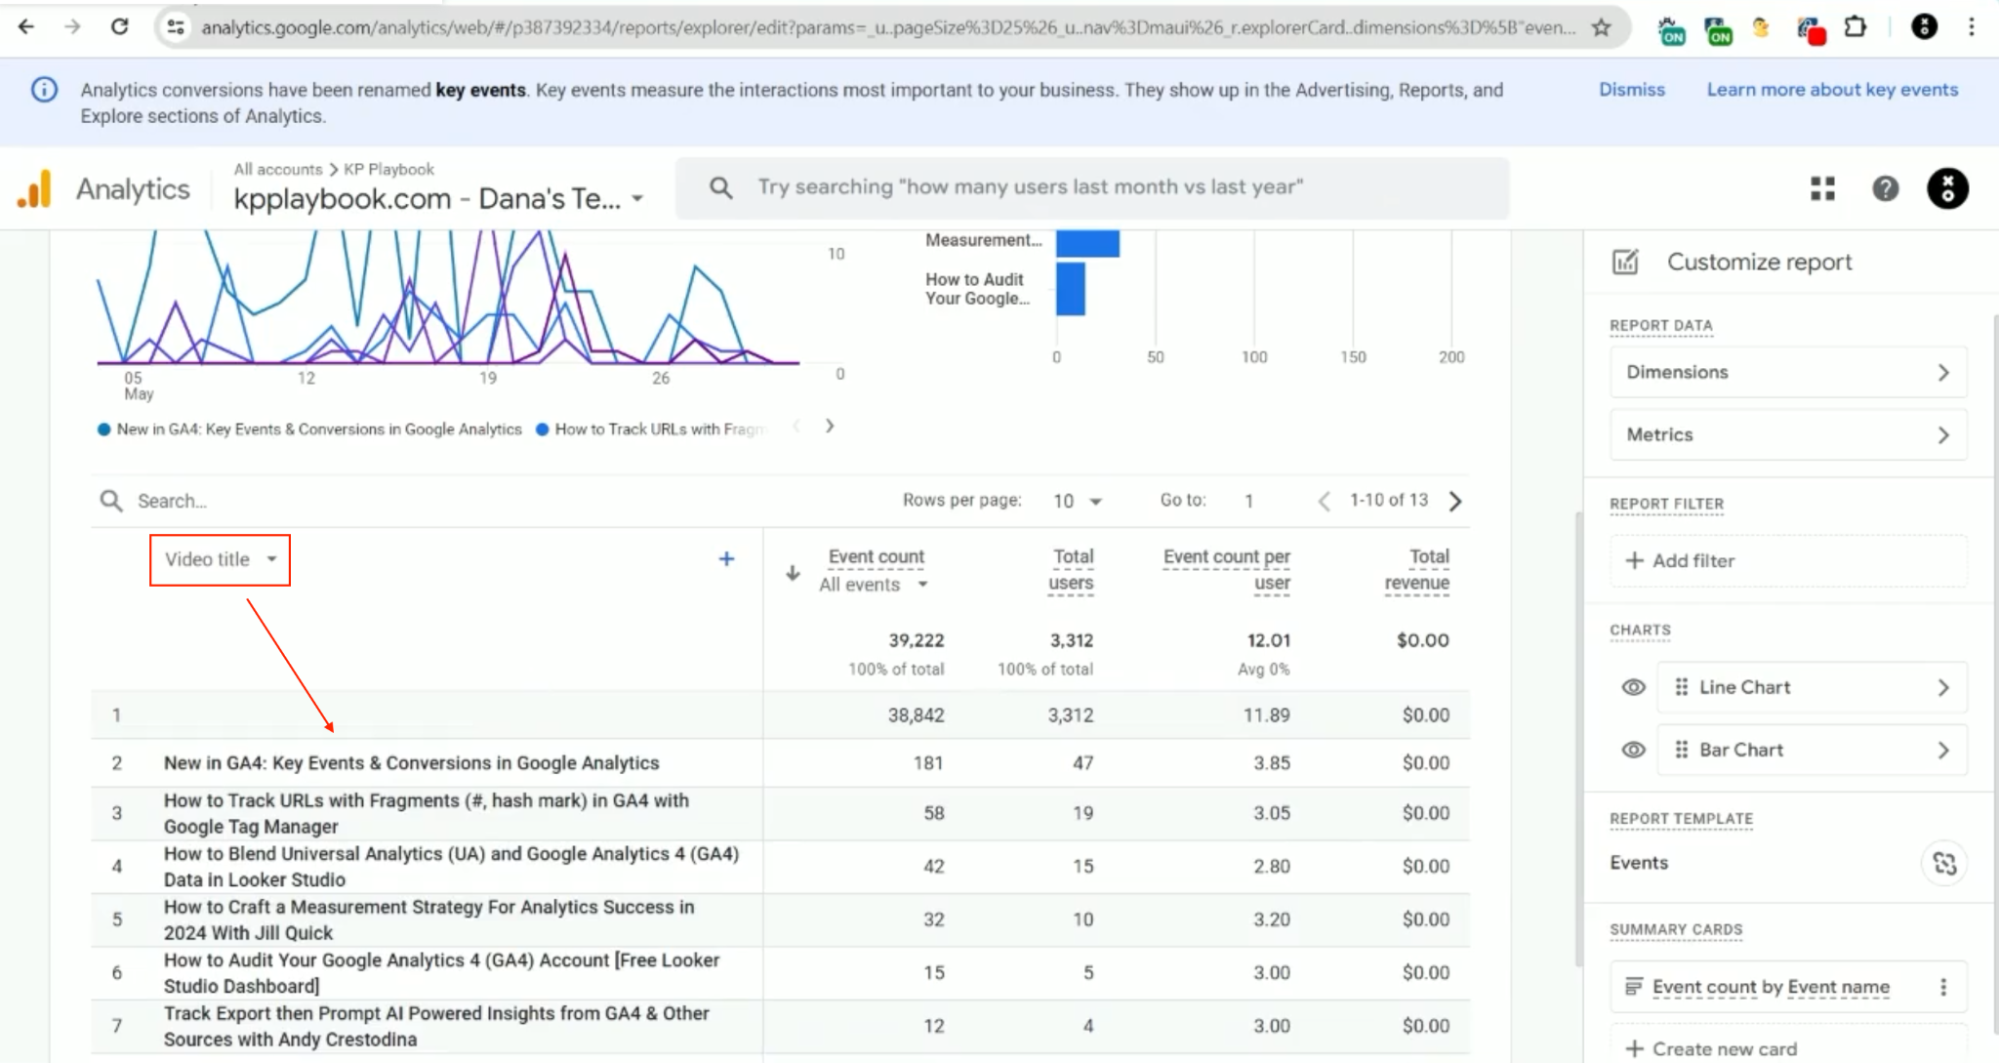
Unfortunately what isn’t added by default are the metrics for videos, those are:
- video_current_time — “seconds” as the unit of measurement
- video_duration — “seconds” as the unit of measurement
- video_percent — “standard” as the unit of measurement
We recommend adding those as custom metrics! The unit of measurement for current time and duration is seconds, and for percent, it is standard. Once you’ve added in these metrics you can also use them in your reports.
If you want to create events when specific videos are watched or certain amounts of videos are watched, you unfortunately can’t use the same method we just used for tracking clicks—as custom metrics aren’t available when you’re creating a new event based on an existing event. Instead, you’ll need to create an audience.
Creating an audience in GA4 for video consumption
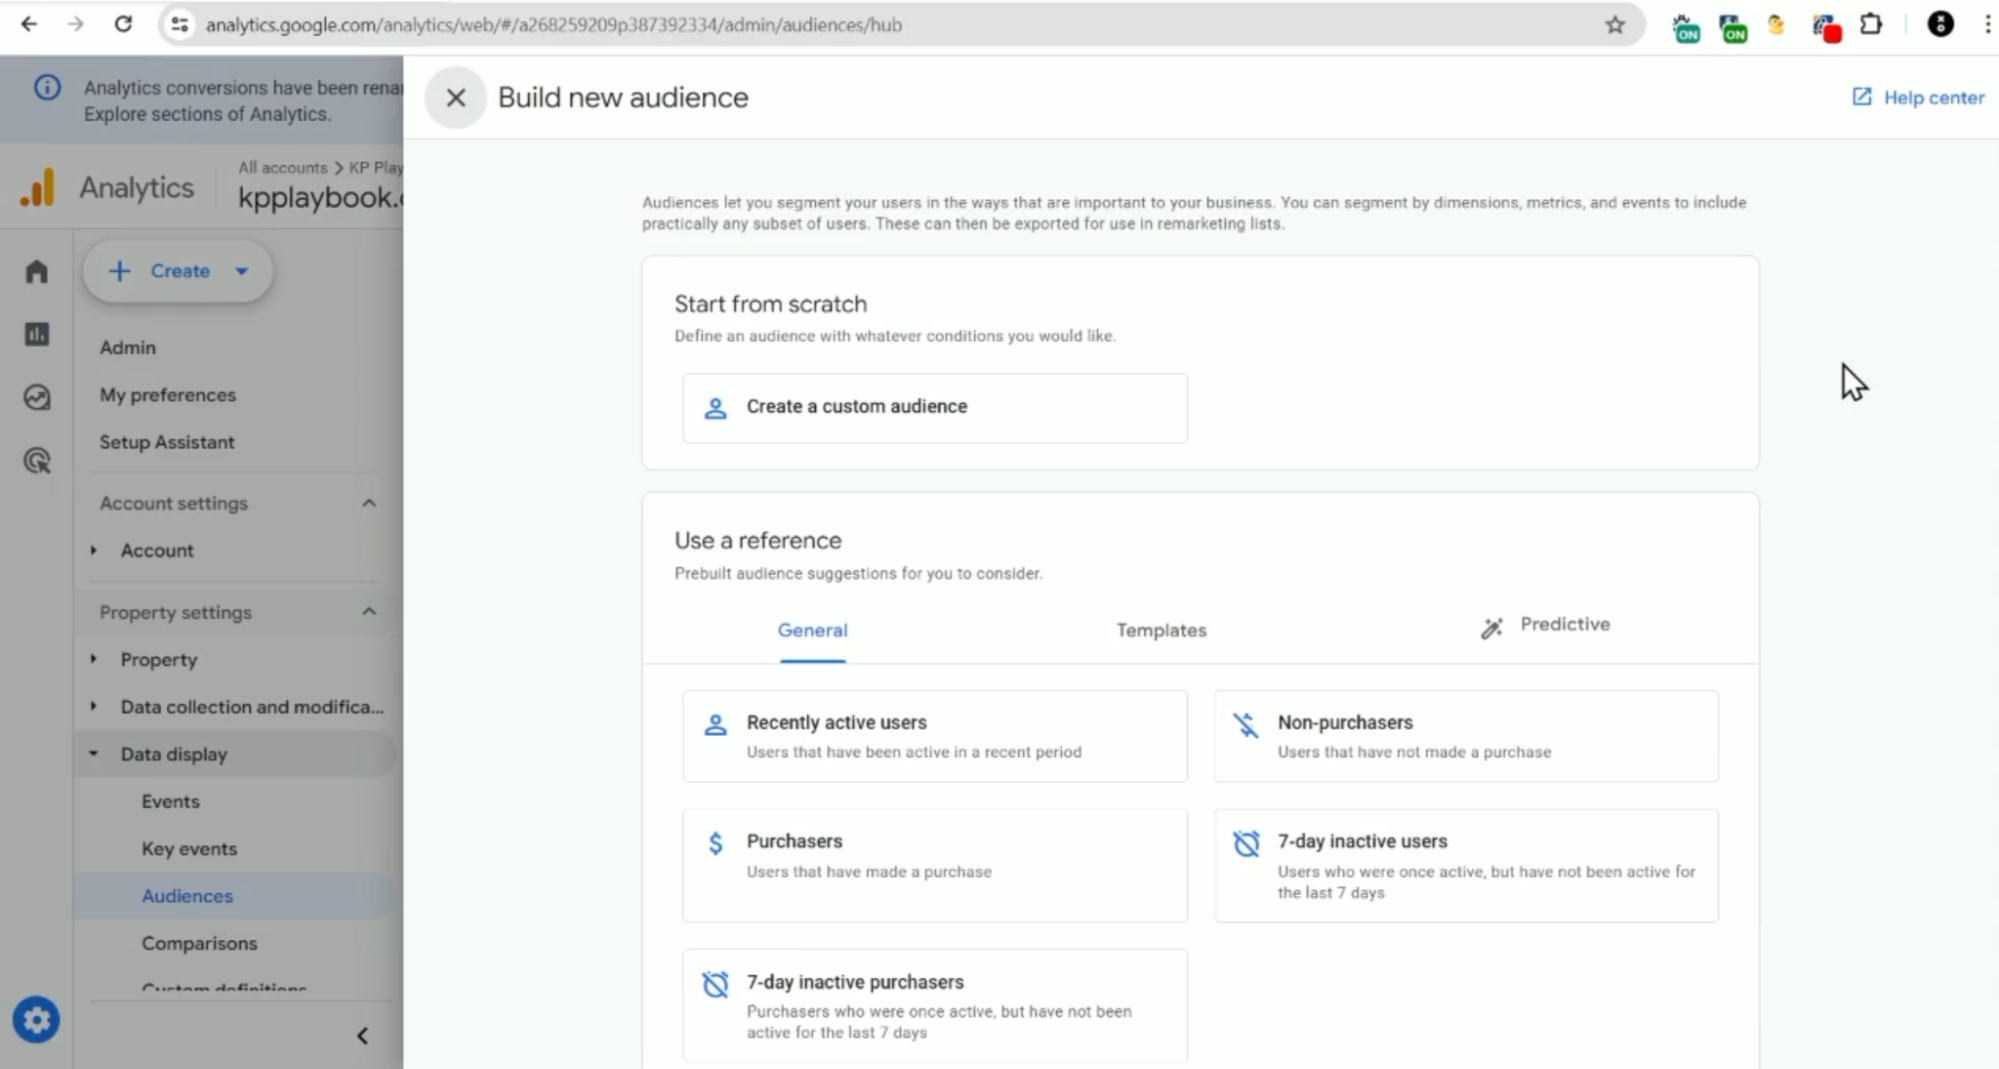
1. If you click “Add new condition” and scroll down to the “Video” section, you’ll see that you do have options such as “Video title”. You can go ahead and click on “Video title” and add a filter that “exactly matches (=)” a specific video and click “Apply”.
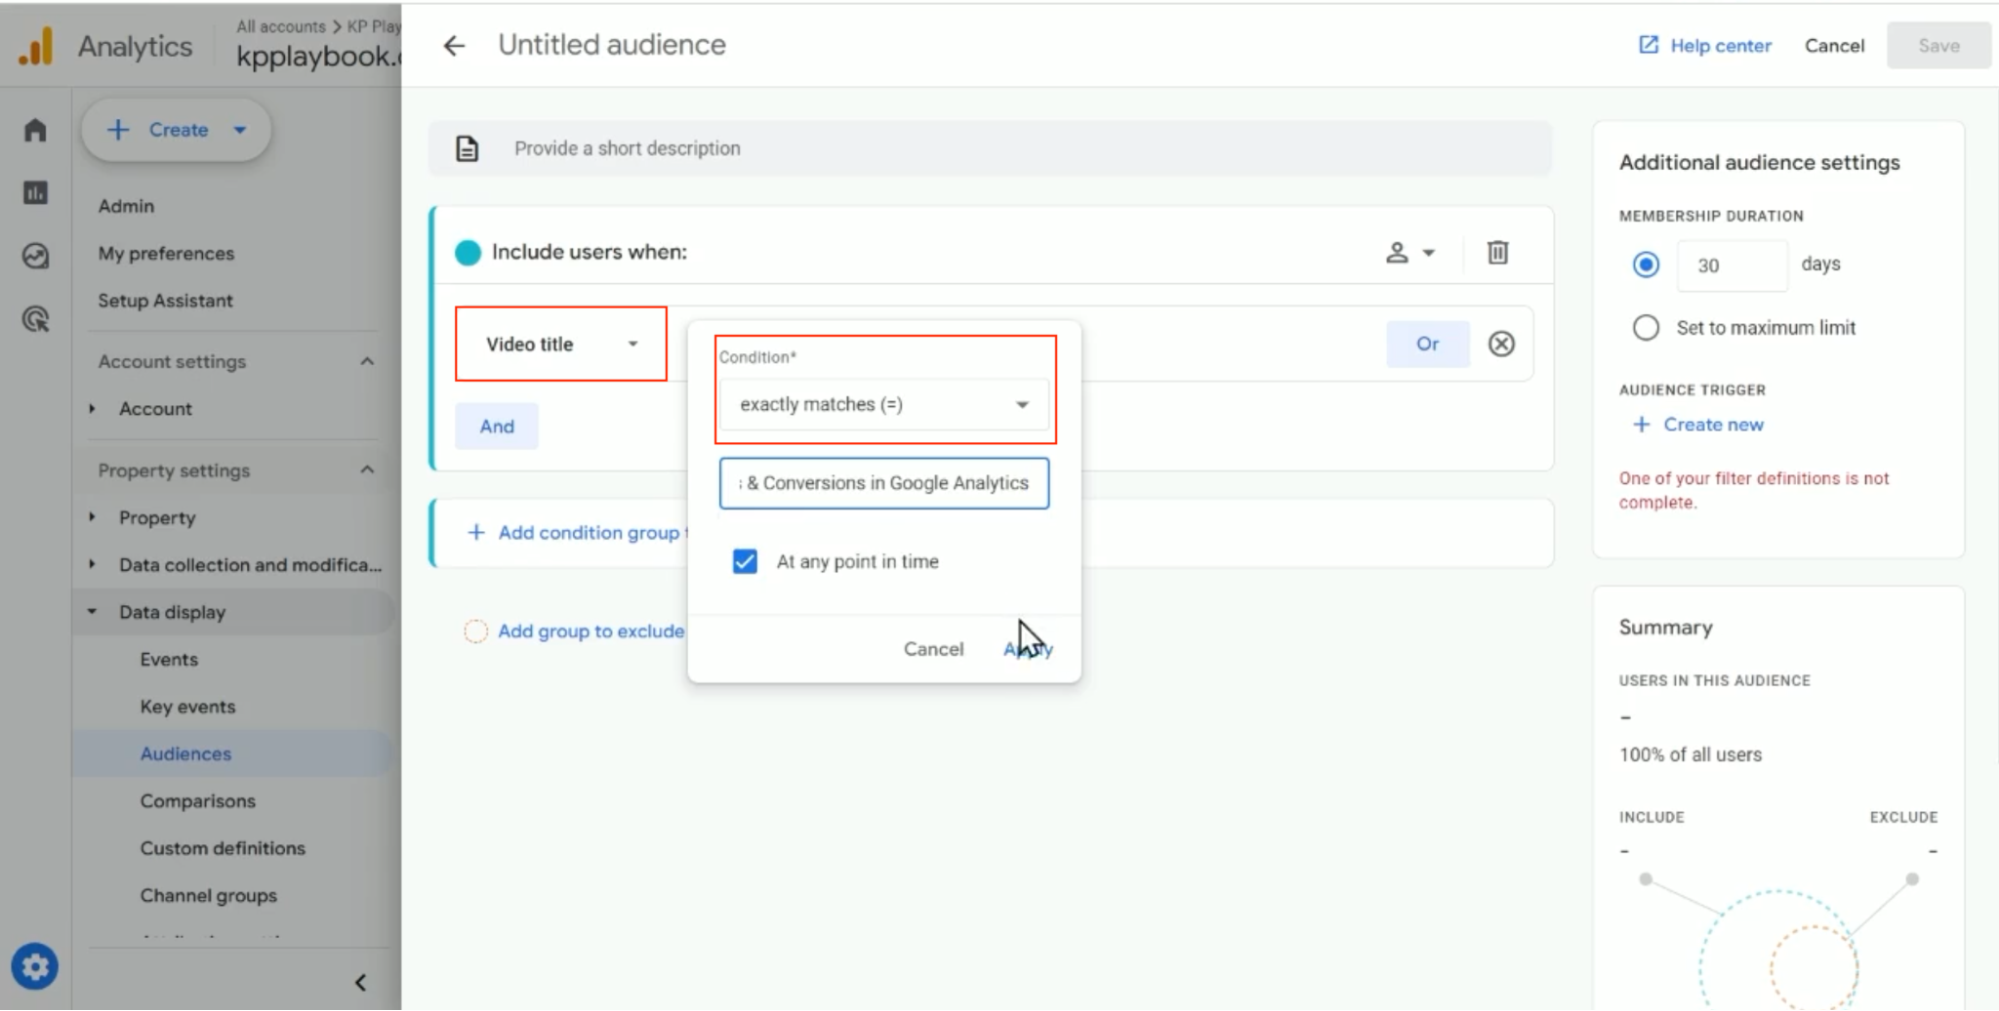
2. If you also want to see people who have only reached 50% of the video? You’re going to click “And” and specify a new condition.
3. 🚨 Important Note 🚨 Under conditions, you’ll see “Video 50 Percent Played” (see screenshot), but it doesn’t always work.
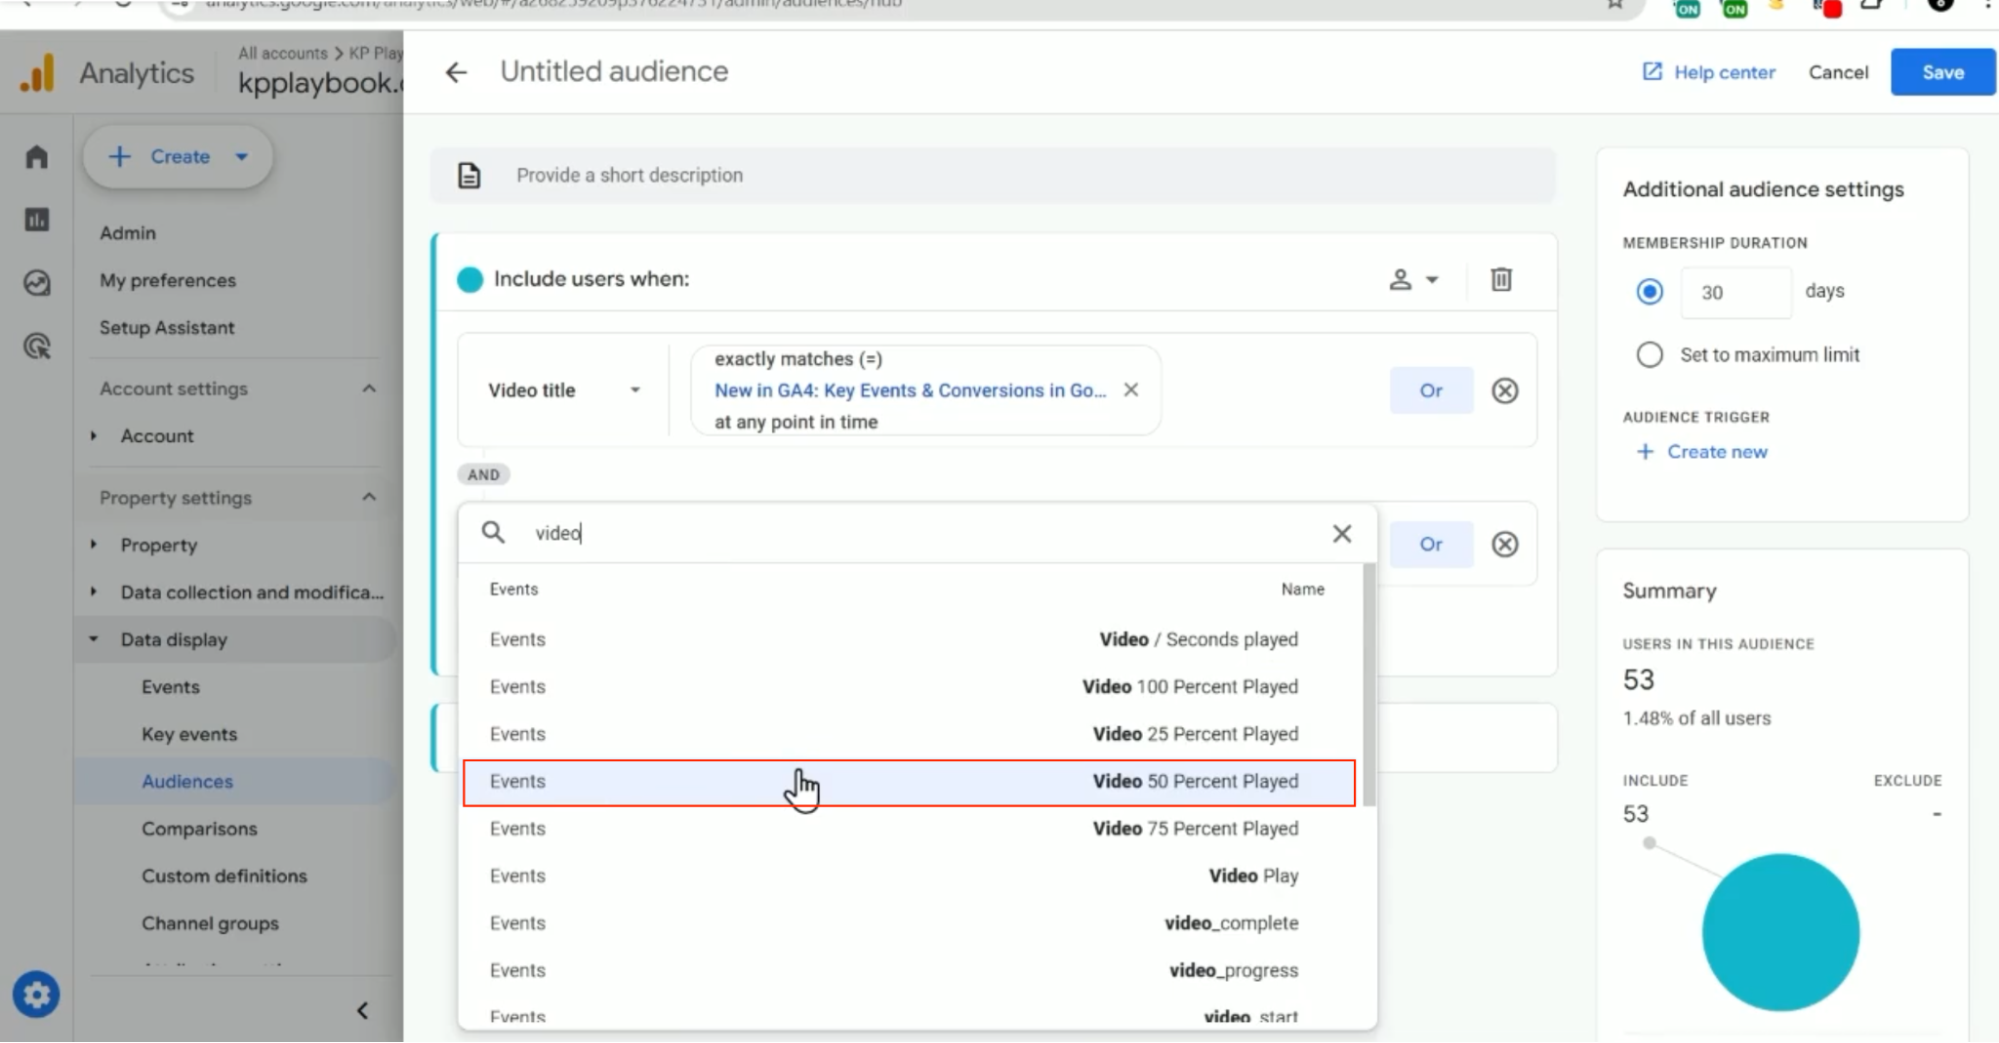
Instead, choose “video_progress” as the condition with a parameter of “video_percent” with a condition that equals 50—remember to have added “video_percent” as a custom metric first!
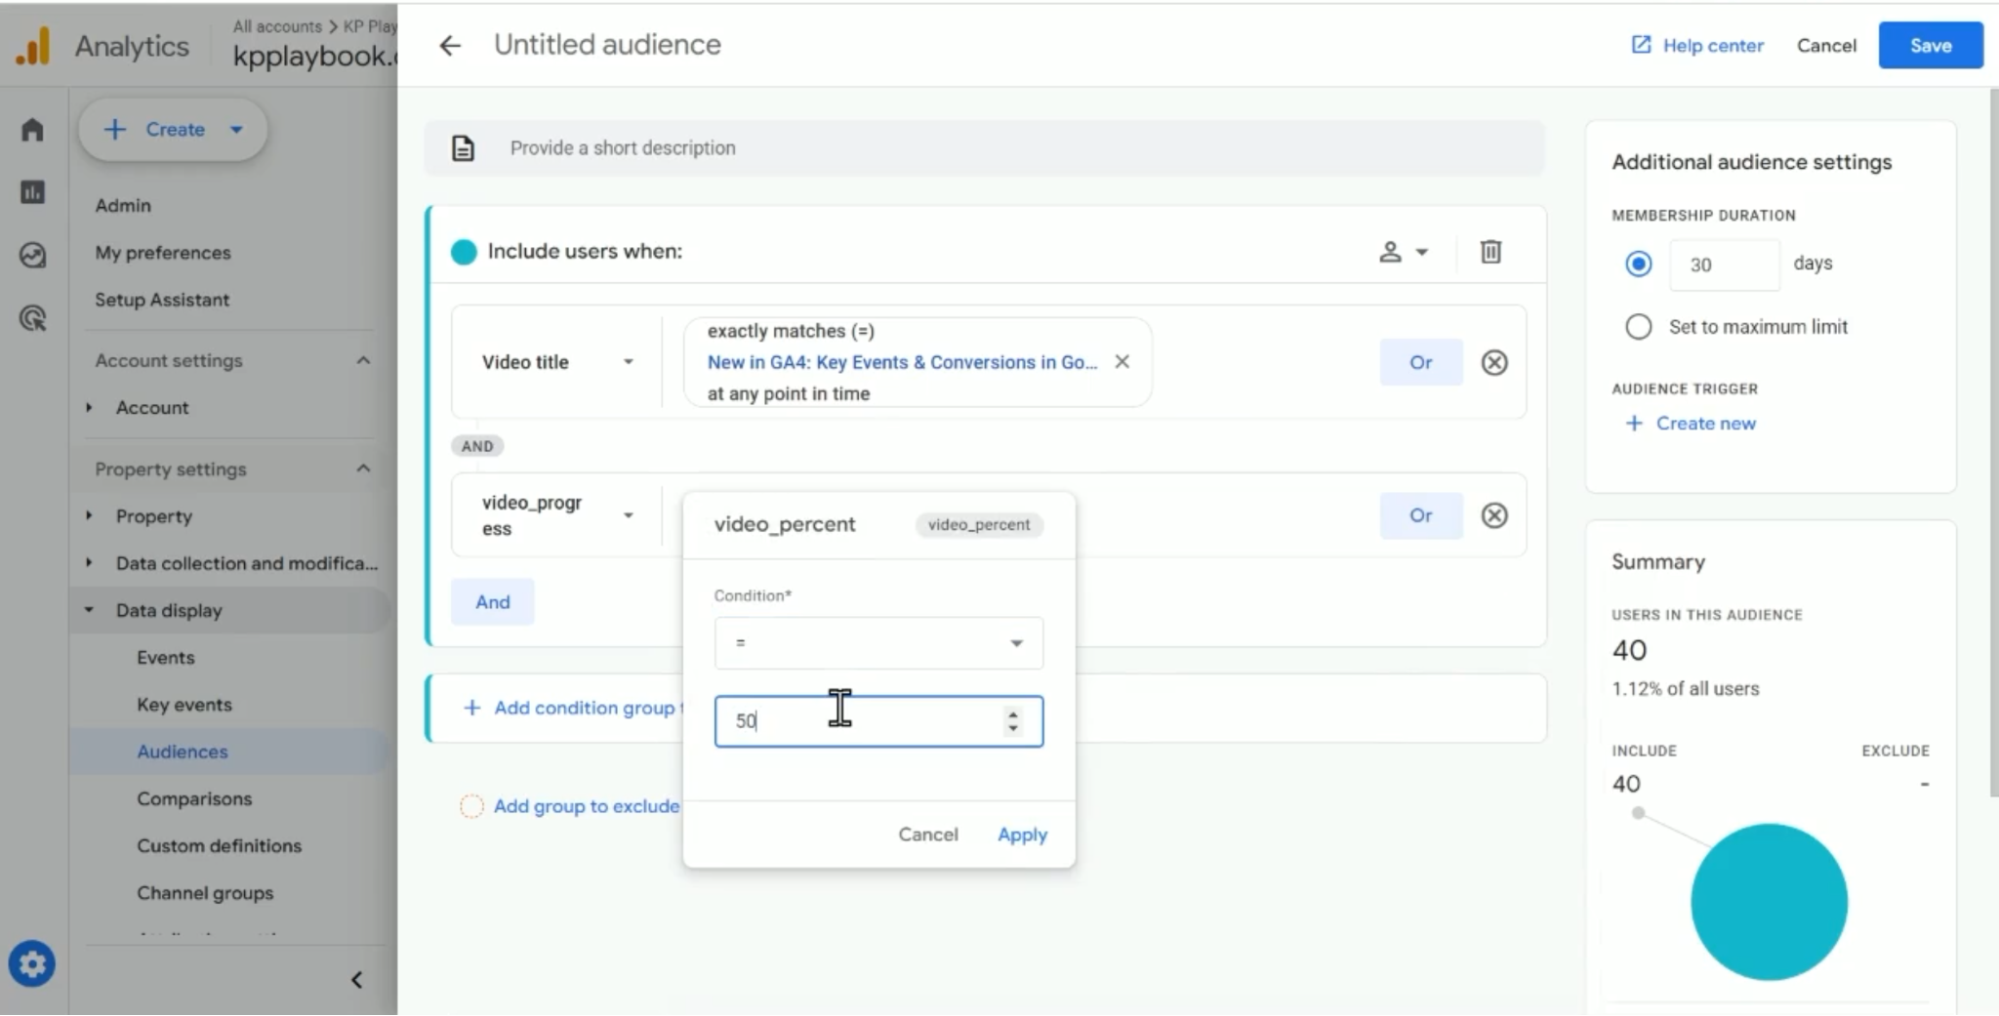
5. You should also check your “Summary” to make sure there are users in the audience to make sure it’s working!
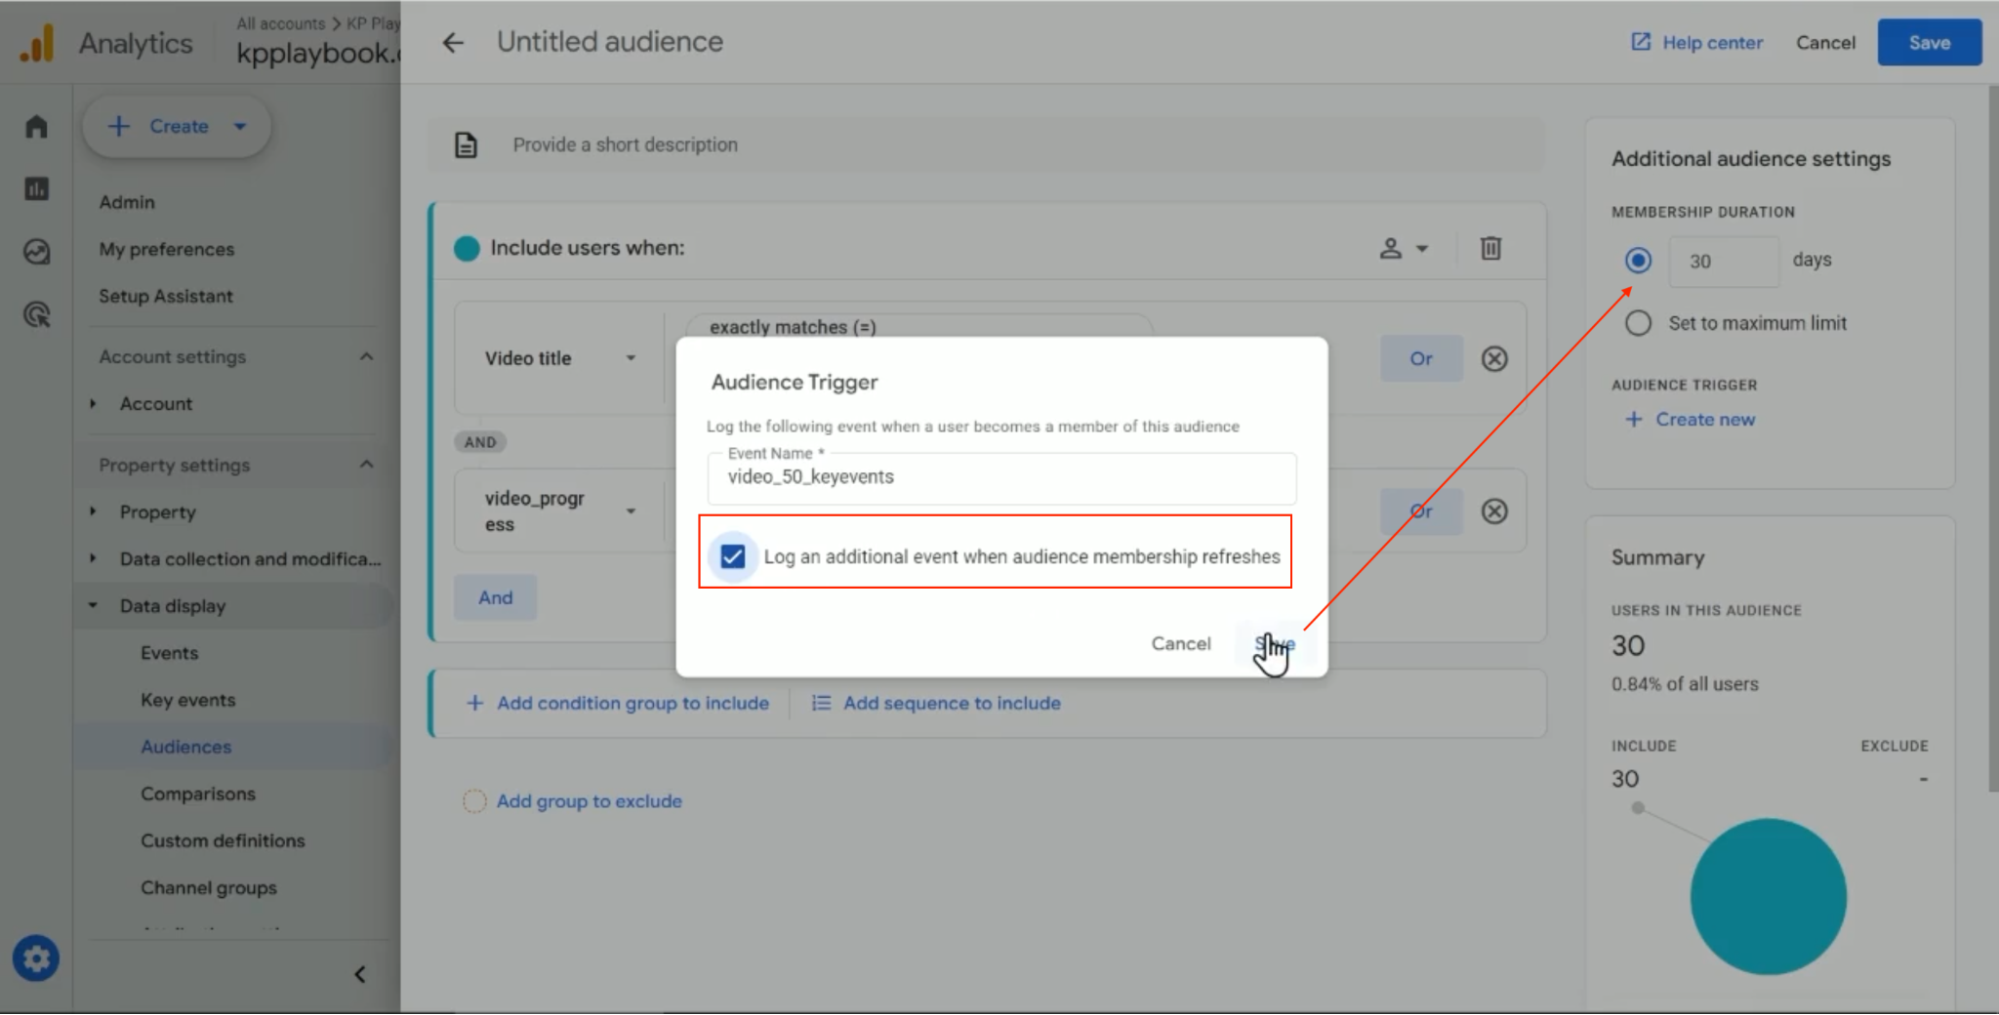
6. Now you can create your audience trigger (see screenshot below). You’ll name the event “video_50_keyevents”, and you can decide if you want to trigger this event multiple times if someone watches the video more than once, or not.
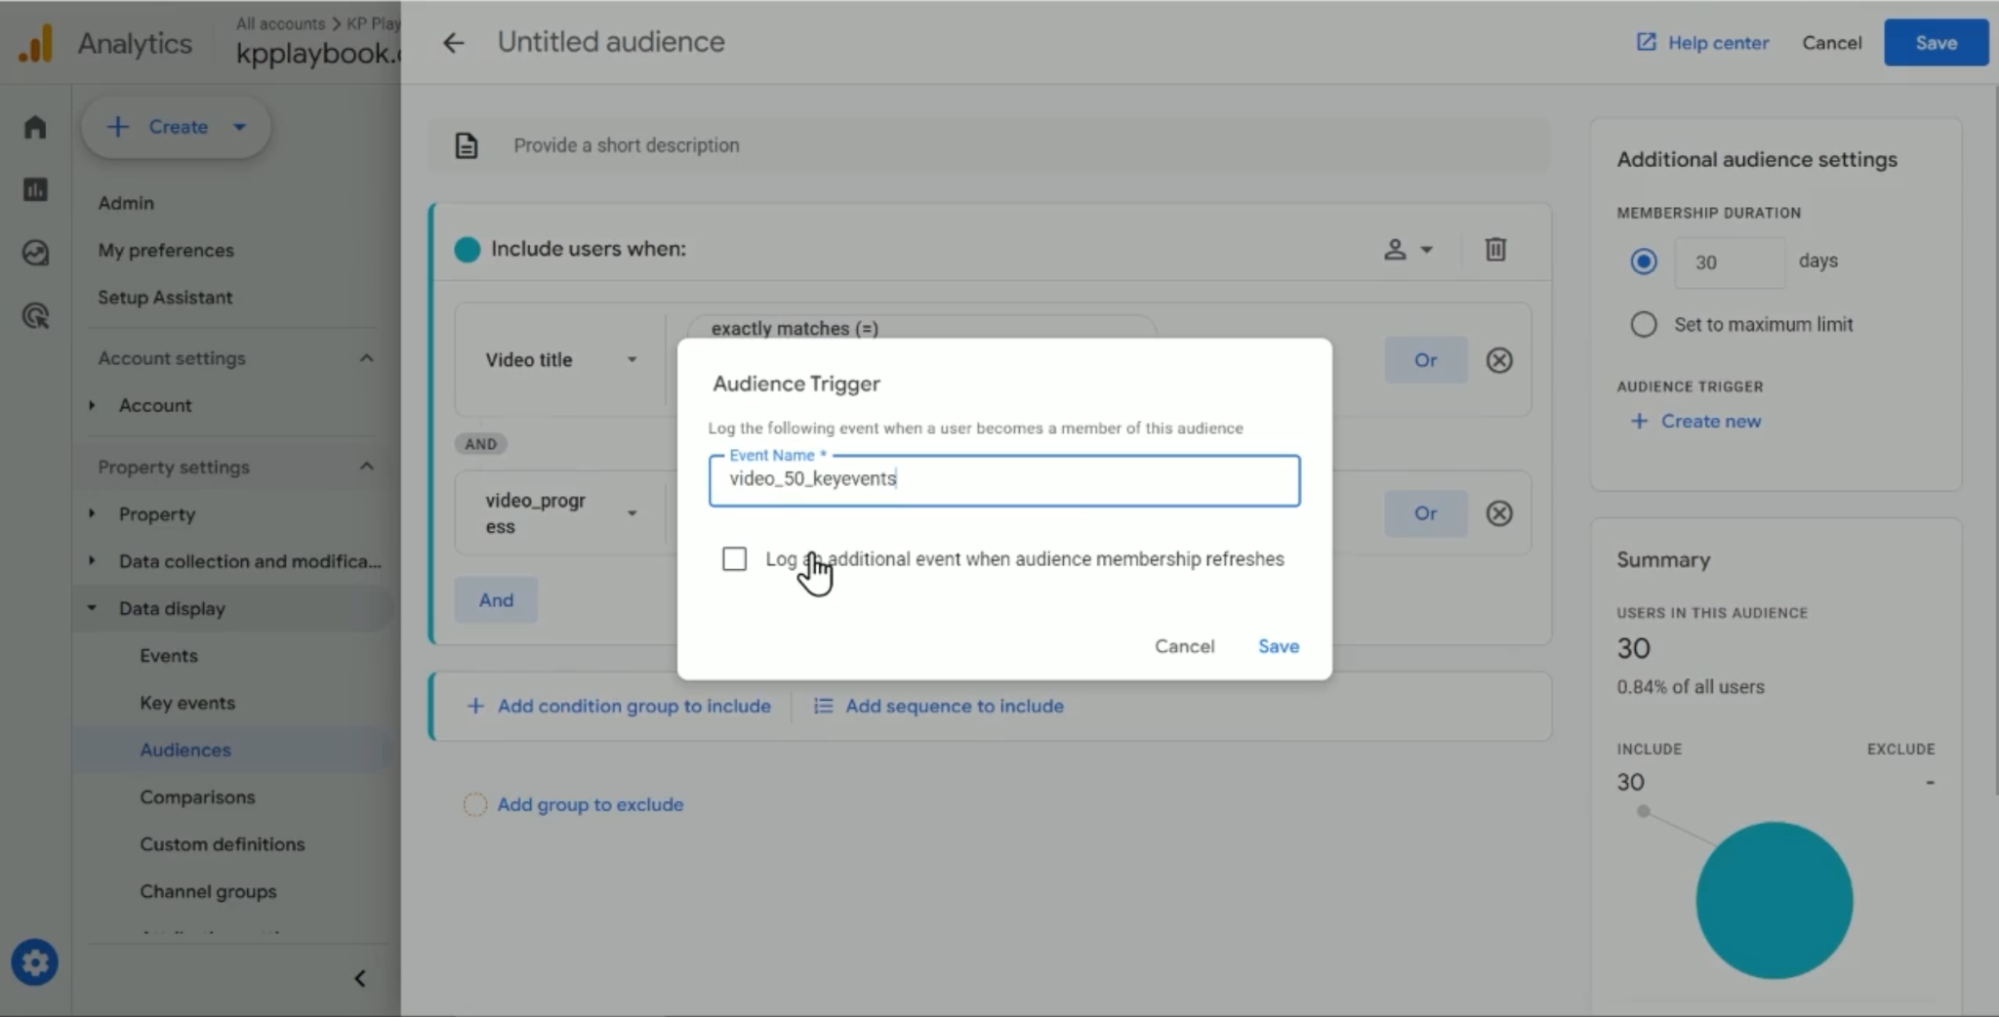
If you do want to trigger it every time the video is watched, check the “Log an event when audience membership refreshes” and then change the duration to “1” day so that this event will fire at least once a day.
How to see if someone views a specific percentage (%) of a page
You can use these same ideas to create audience triggered events based on sequences of events—for example, someone viewing at least 90% of a service page and then starting the form on the book appointment page.
1. Start by creating a custom audience.
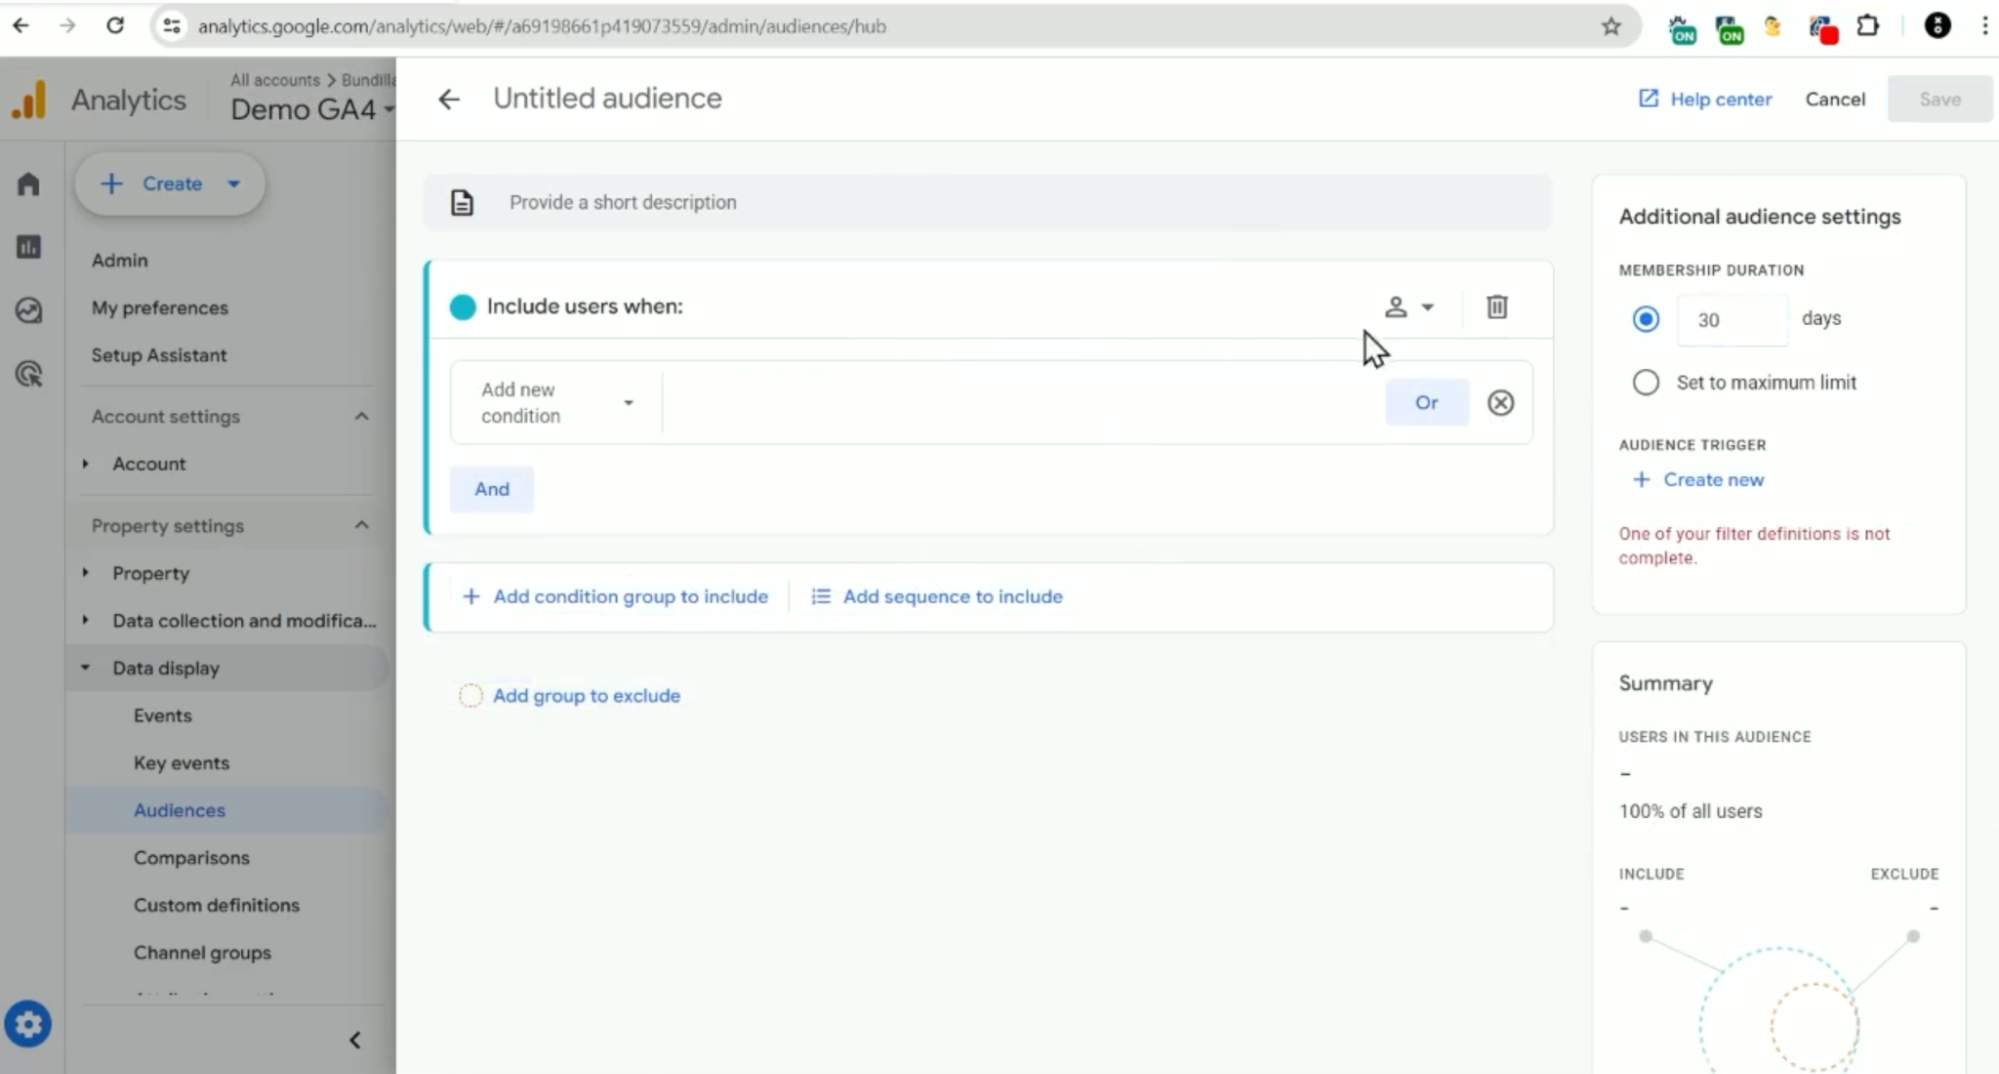
2. You’ll remove the first field of “Include users when”.
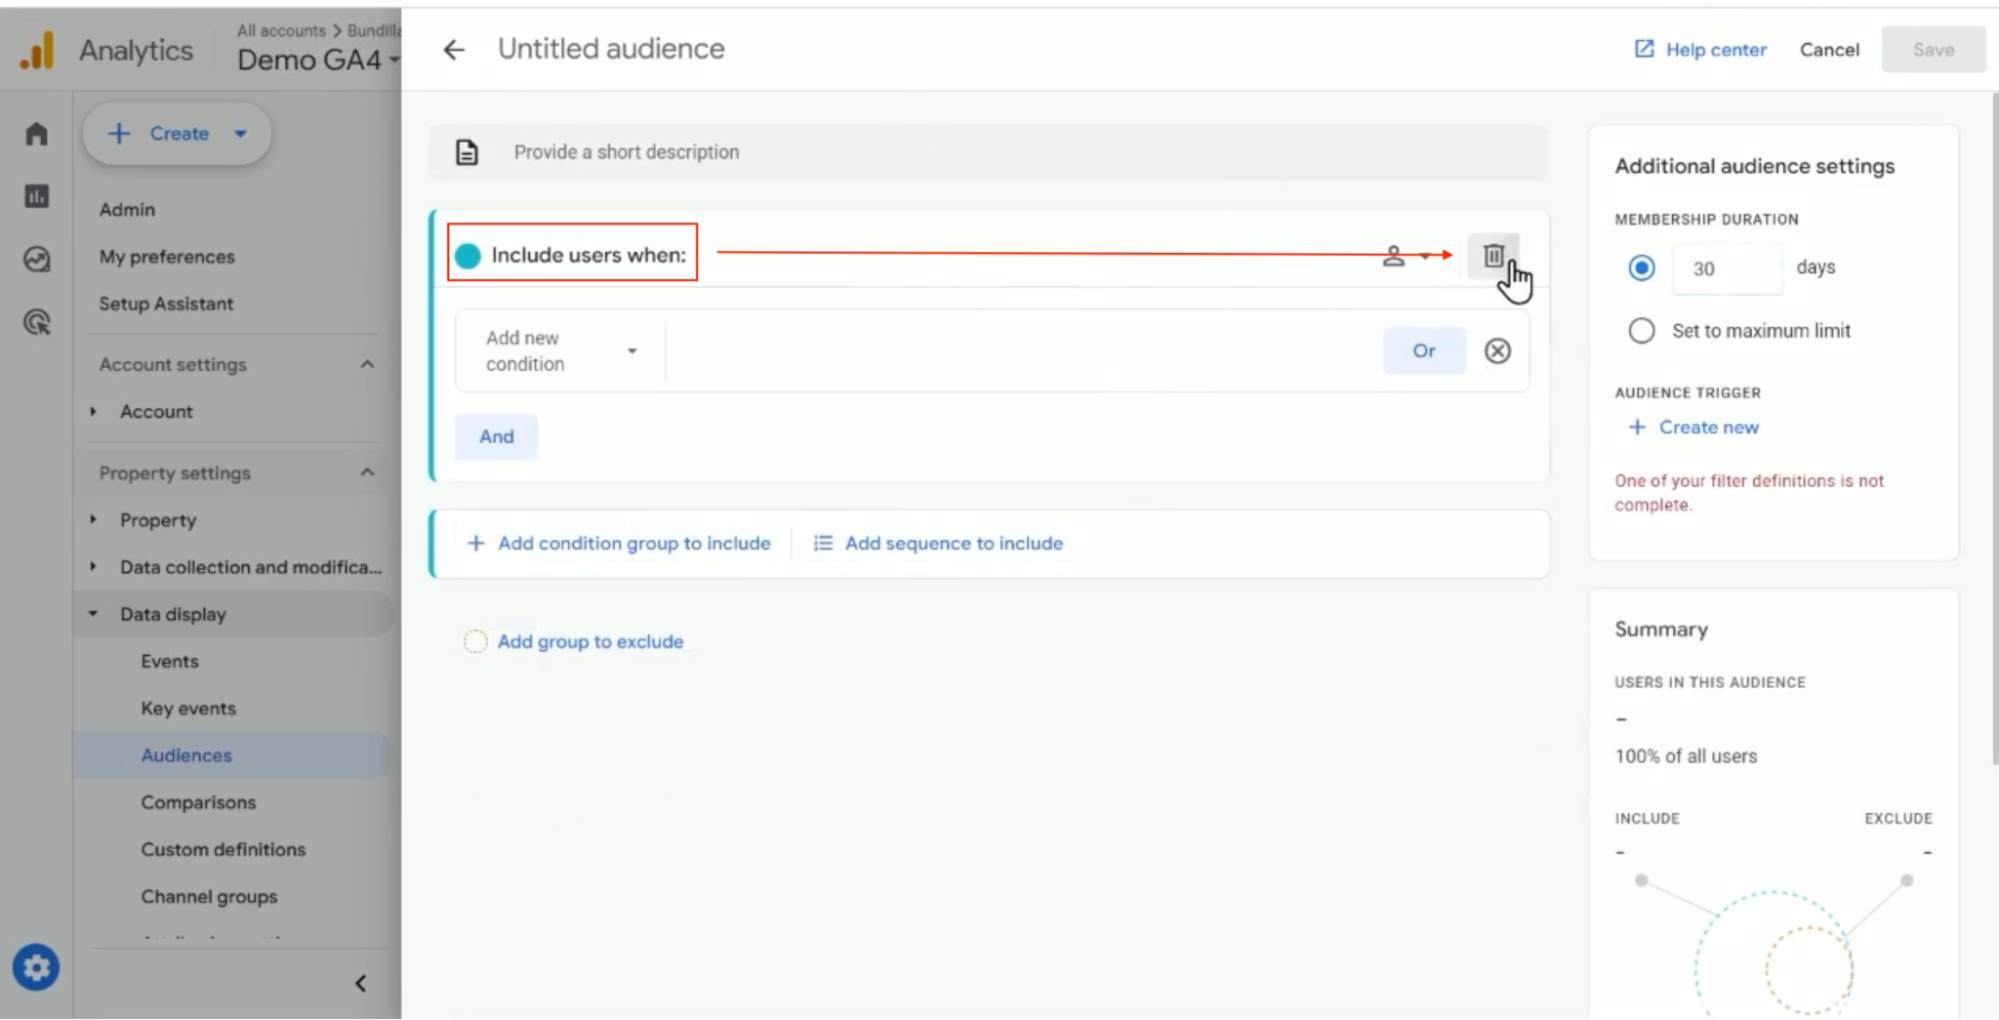
3. Then click on “Add sequence to include” to add a new condition.
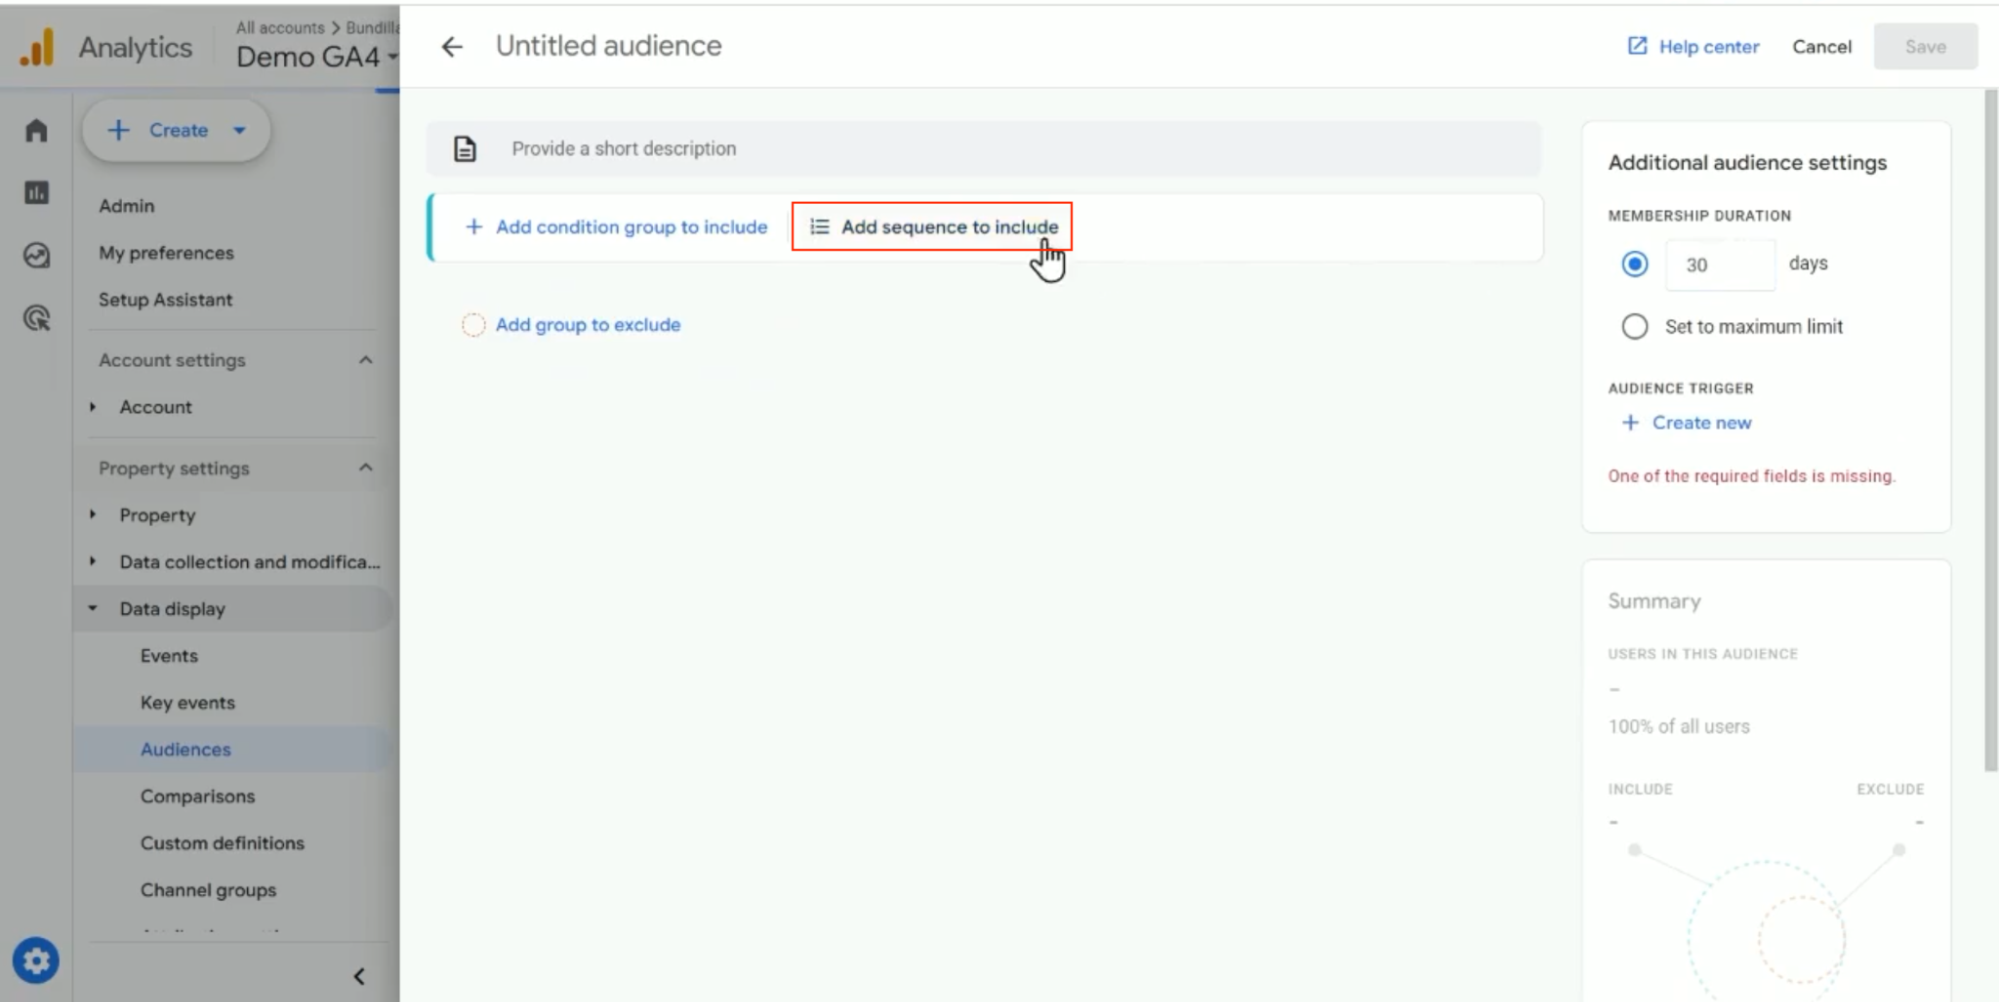
4. The first step of the sequence is where you will choose the “Page path and screen class” to “exactly matches (=)” slash (“/”), for the home page.
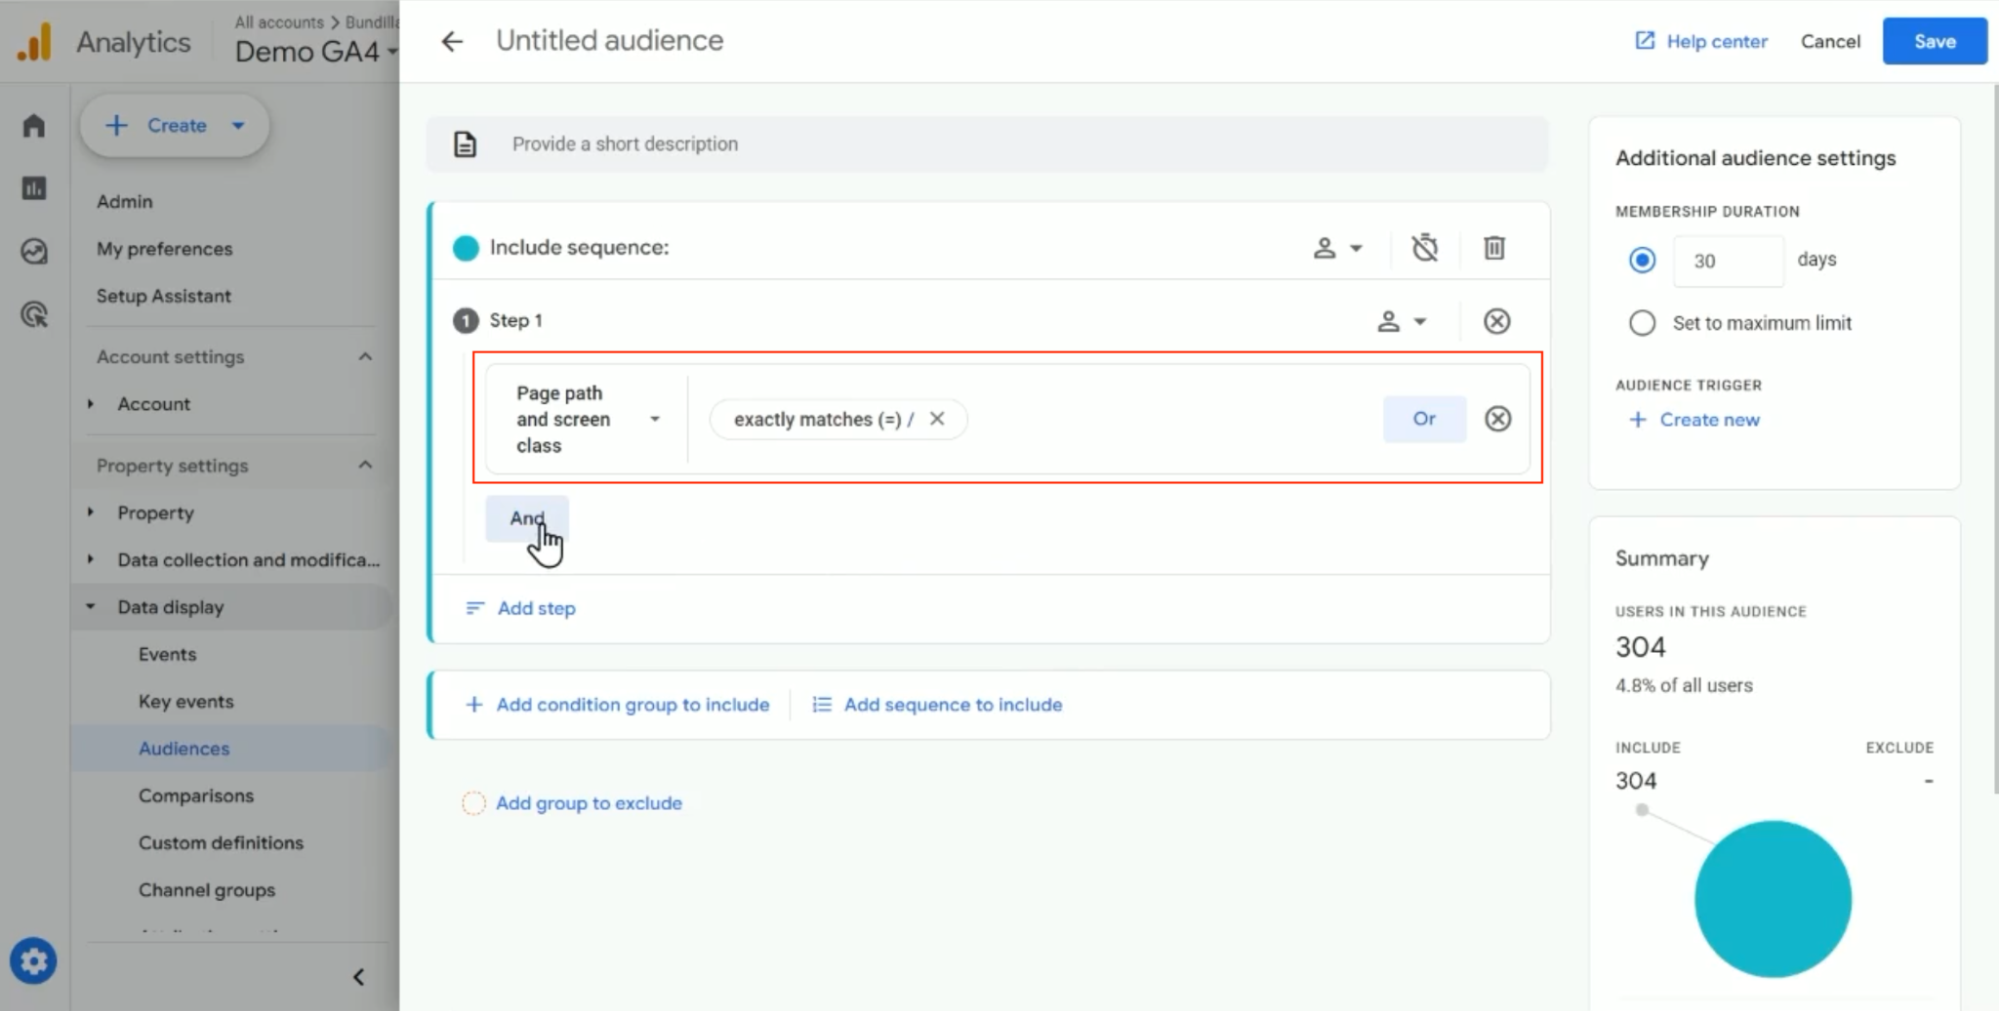
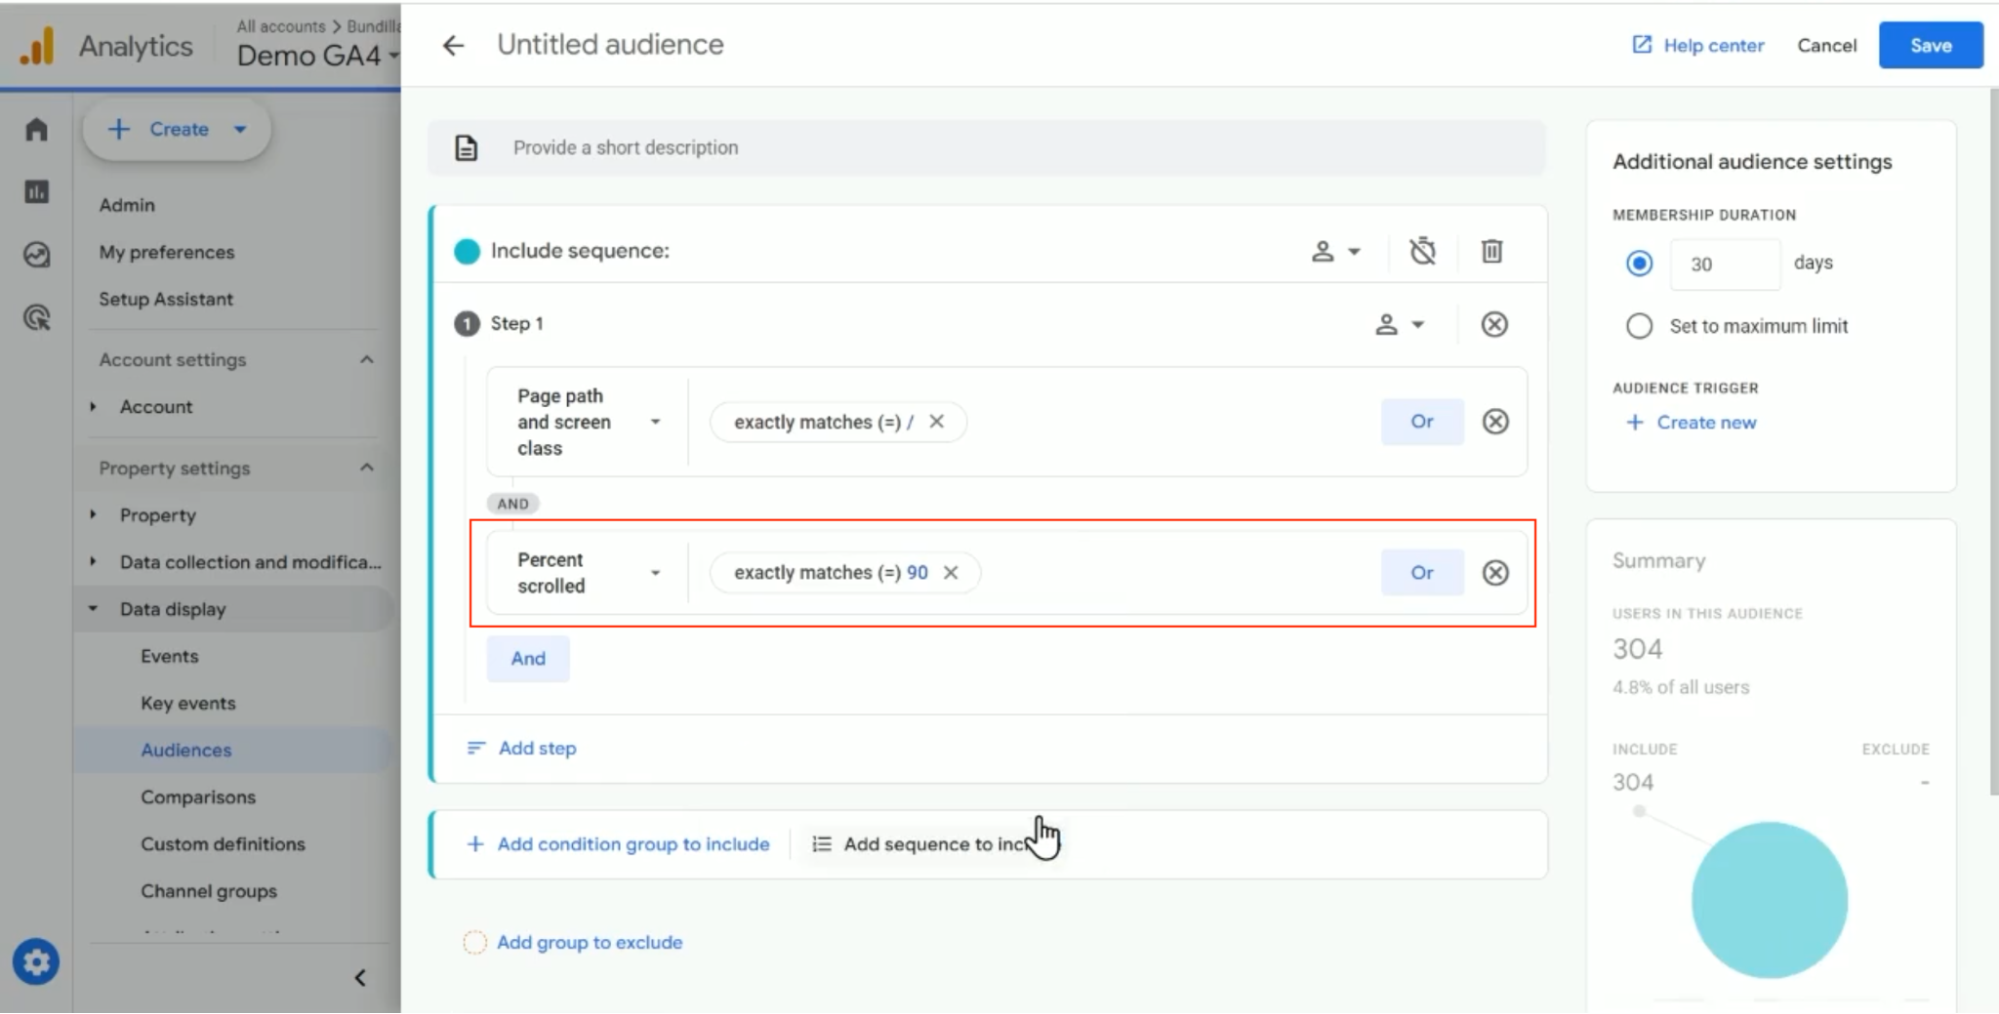
5. Then click “And” for the condition, and choose “Percent scrolled” where the percent “exactly matches (=) 90”.
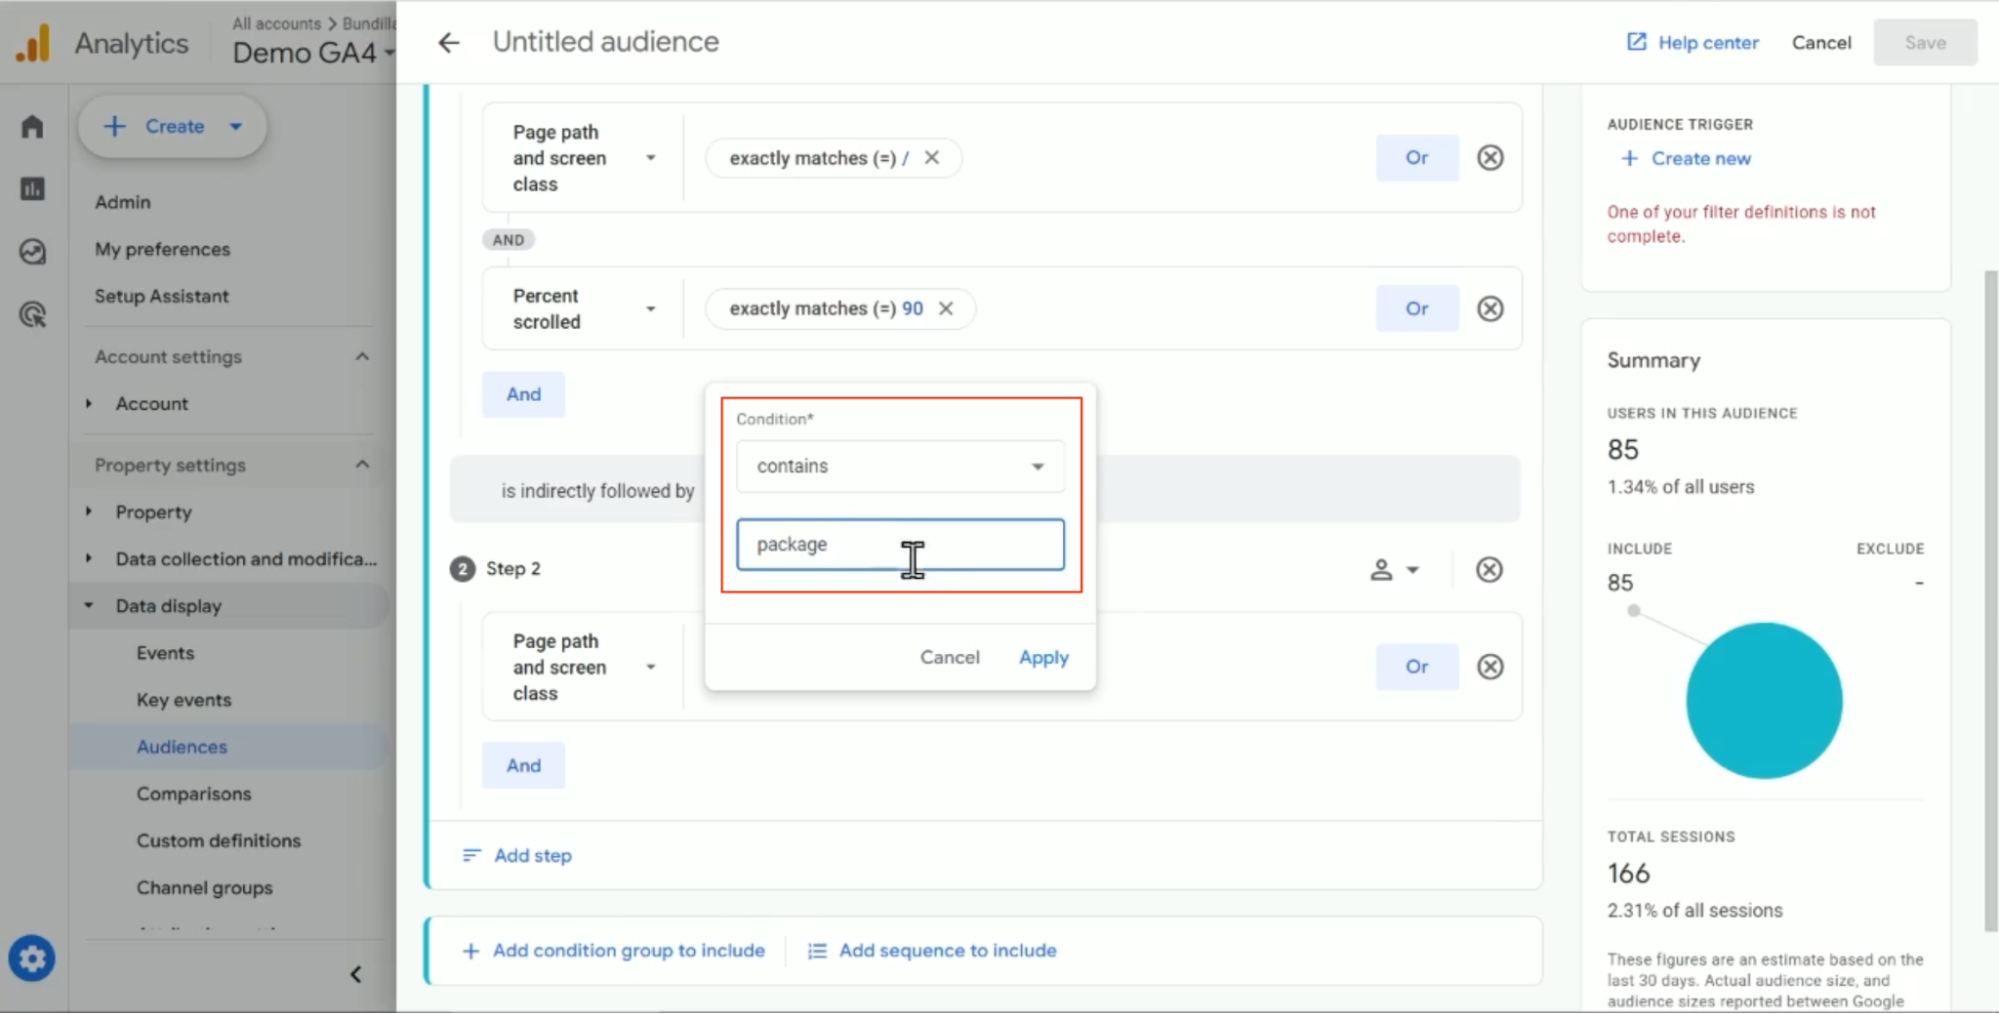
6. Then you’re going to “Add step” to capture any package page by selecting the page path again to contain “package”.
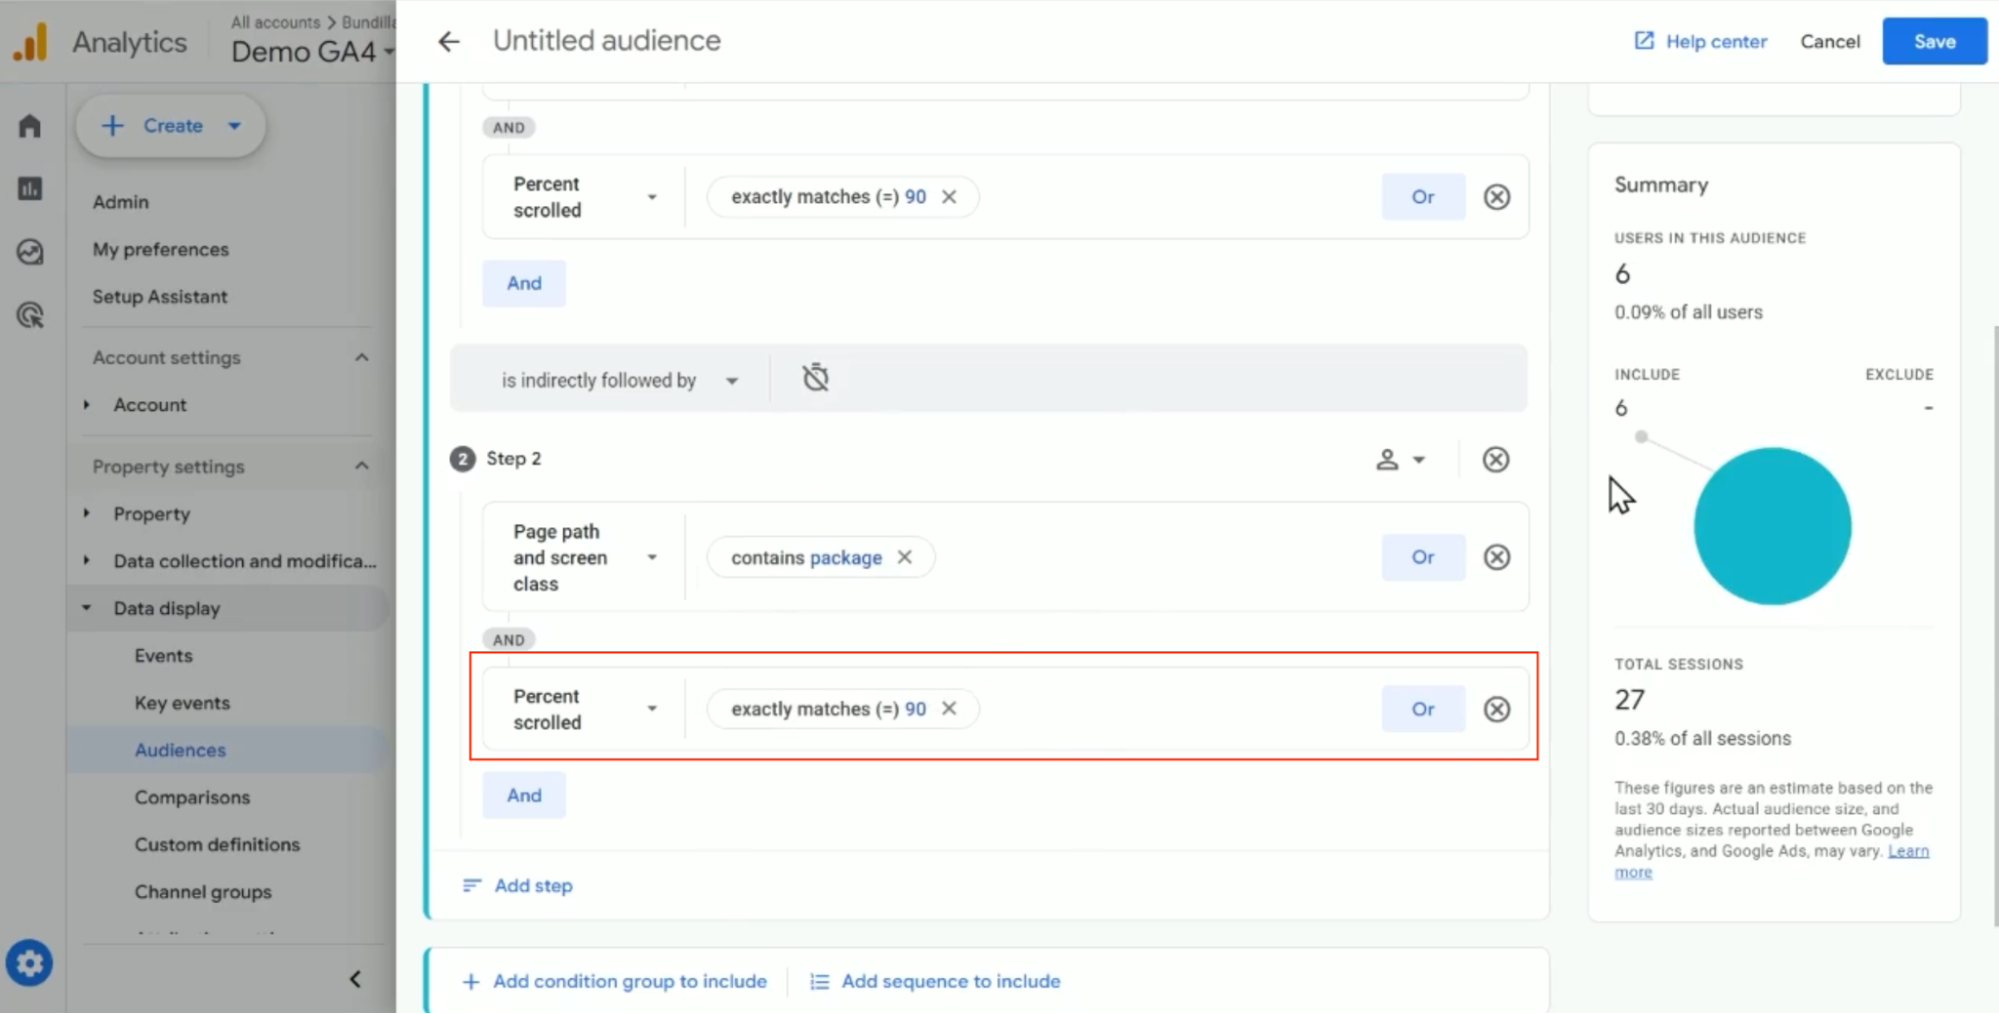
7. Then click “And” for the condition again, and choose “Percent scrolled” where the percent “exactly matches (=) 90”.
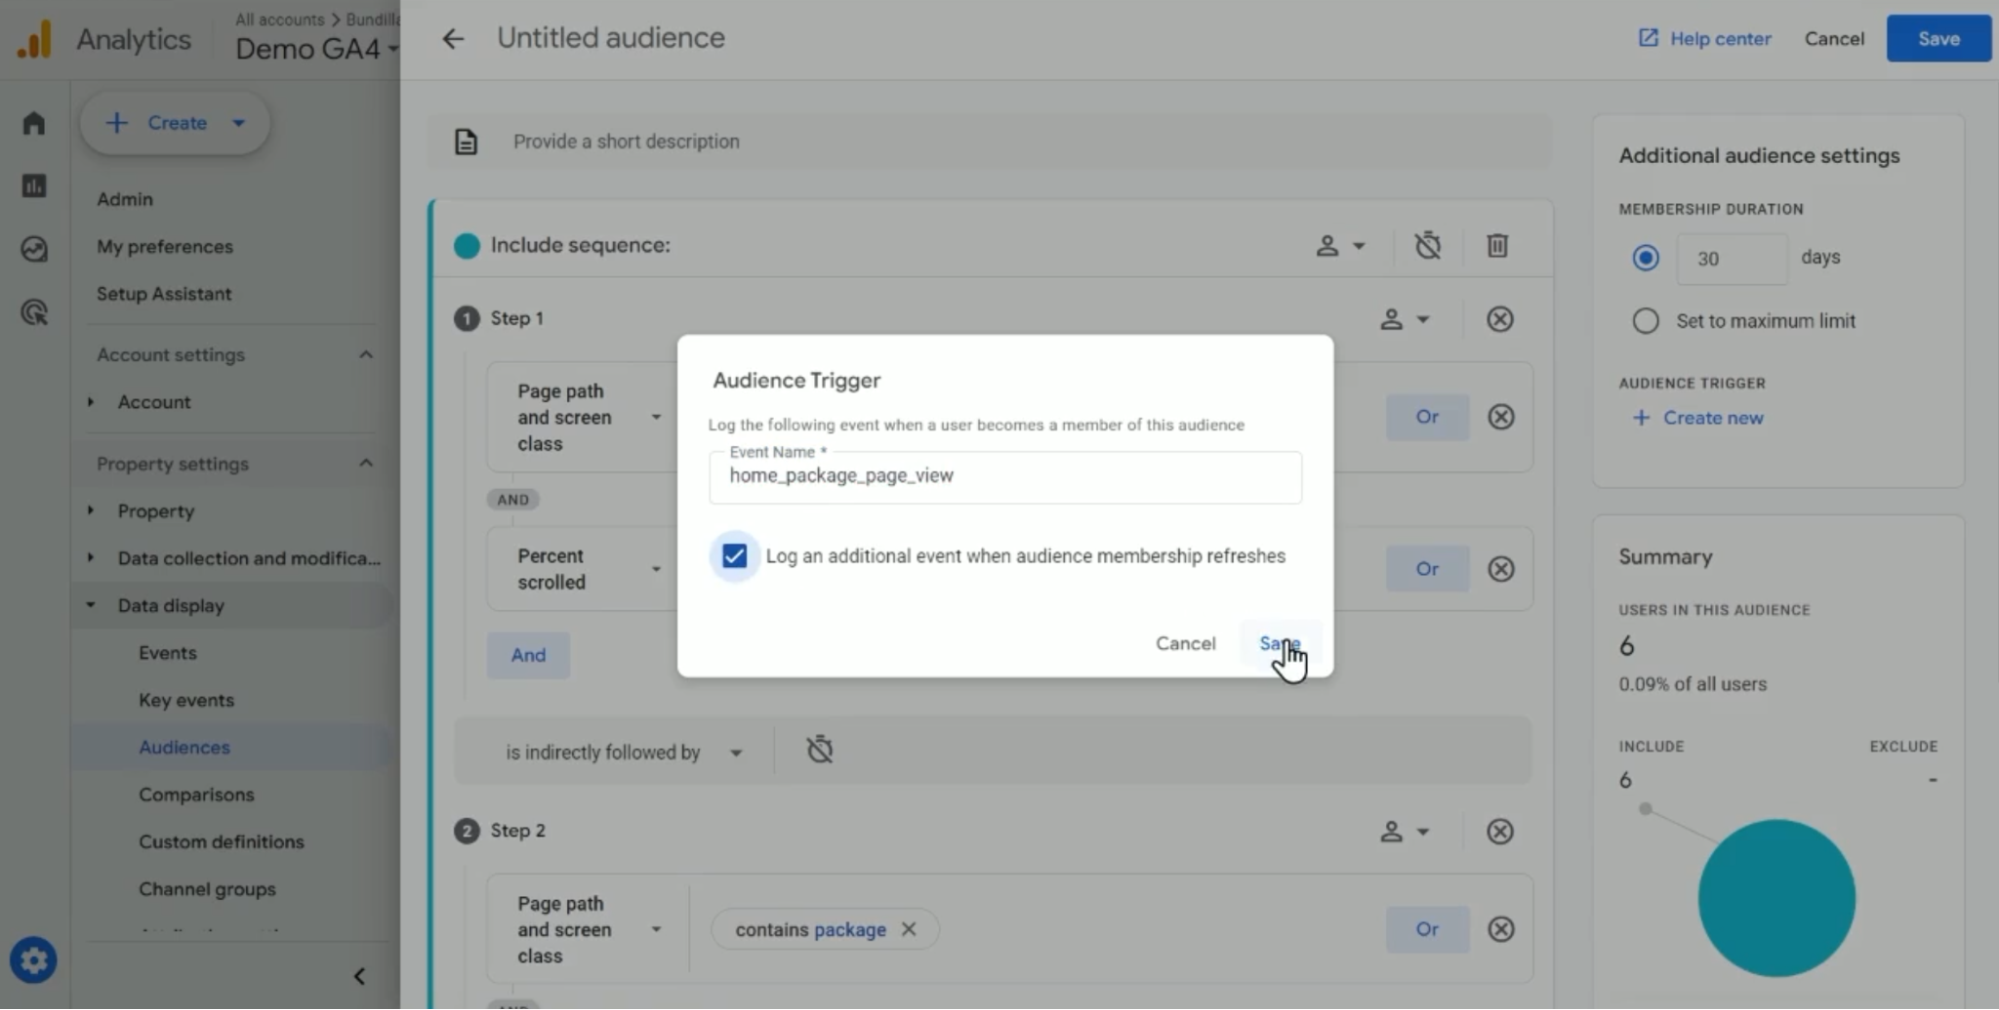
8. You can then add an Audience Trigger by selecting “Create new” to have an event fire when this is recorded.
9. You can call that trigger “home_package_page_view” and set the duration to 1 day so you’ll check the checkbox “Log an additional event when audience member refreshes” then click “Save.”
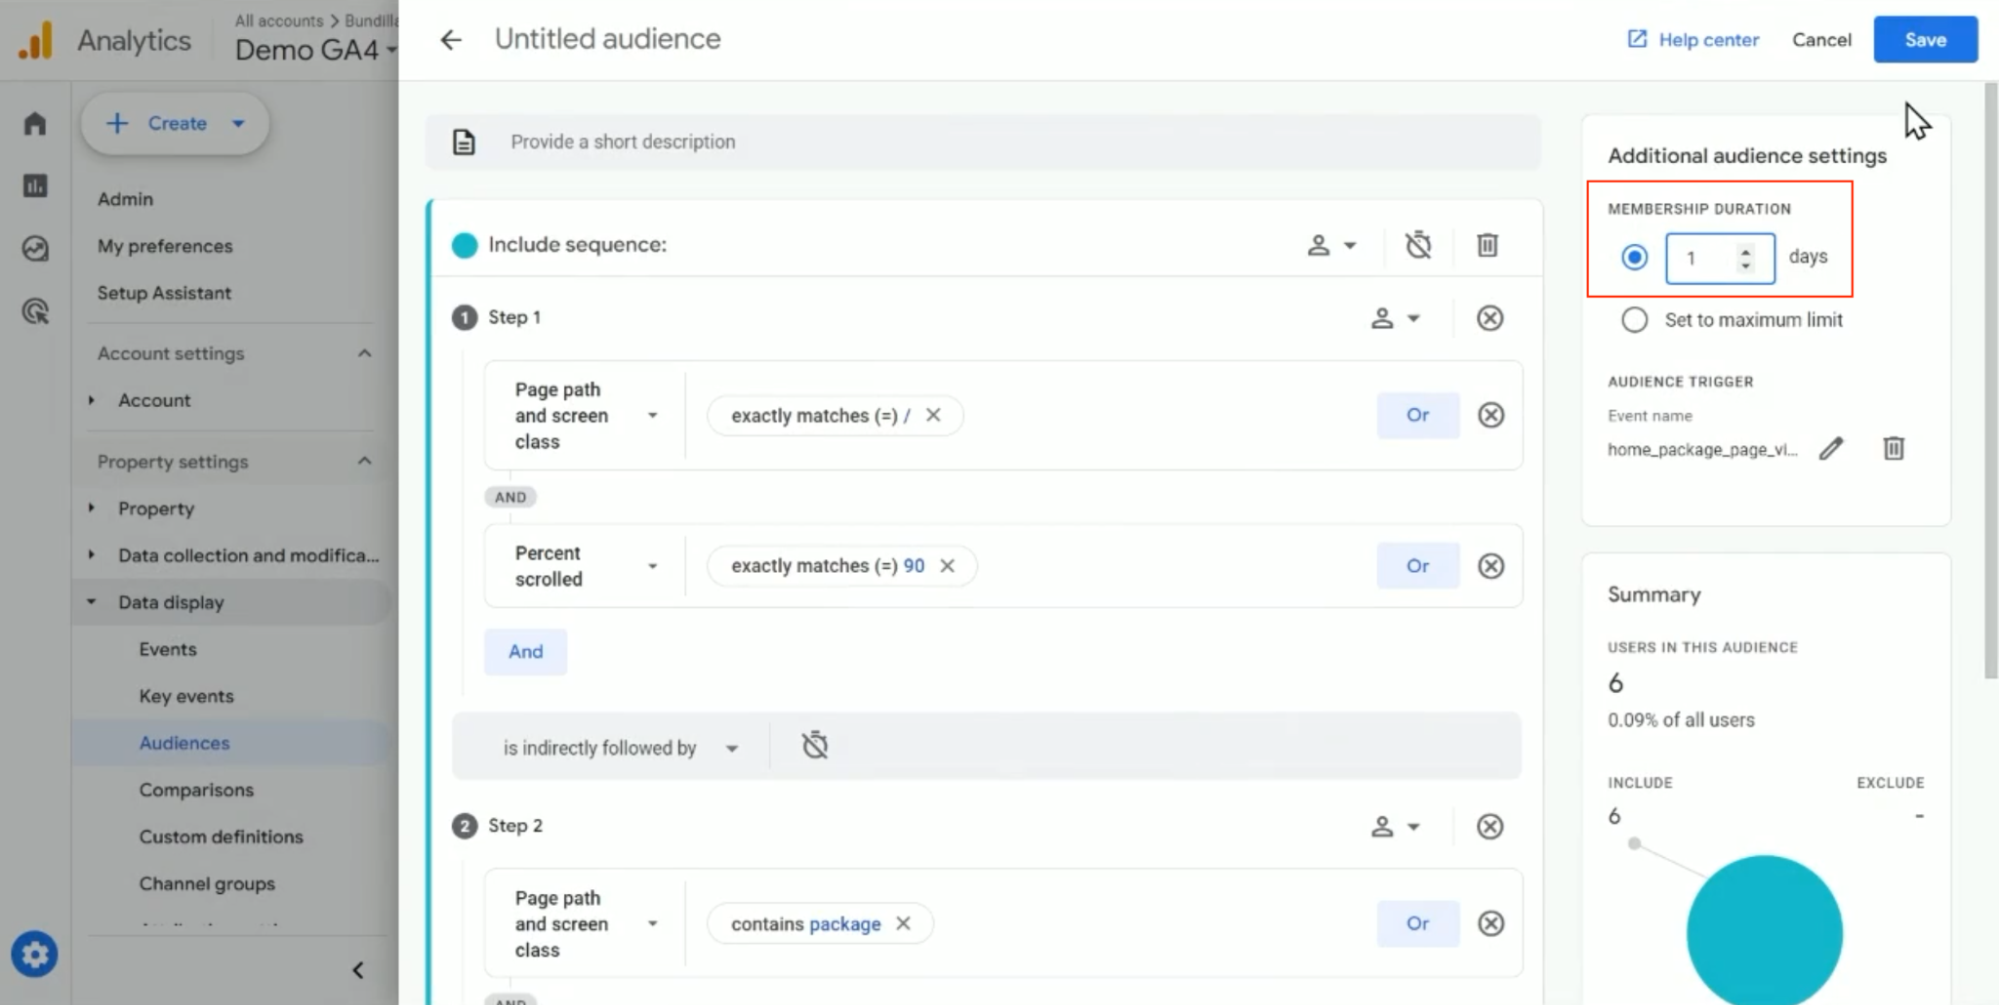
10. Then, you have to change the “Membership Duration” to 1 day, that way you’re recording this once a day and it will trigger an additional event if someone does this again in the future.
Hopefully this gives you some ideas on what you can do for advanced visitor engagement tracking fully within GA4 itself!


