If you were asked to report on how your website visitors were engaging with your content, you’d probably turn to two separate metrics in Google Analytics 4—page views and user engagement.
Page views suffer from the same problem as the “impressions” metric. We know that the page was viewed, but did the visitor actually read it? In GA4, user engagement shows the amount of time that your web page was the active tab, but doesn’t tell us exactly what happened during that time.
Google Tag Manager gave us another tool to help with this in the “timer” trigger—you could record an event in Google Analytics if someone spent a specific amount of time (however long you set your timer for) on that page. But not every page takes the same amount of time to read.
These measures weren’t good enough. So we came up with another method—introducing Content Consumption.
What is content consumption?
We’re measuring two things—did a visitor stay long enough on a page to read your content, and did they scroll far enough down the page to actually see your content? If both things are true, then your content was consumed.
When you’re measuring Content Consumption, you can separate every page view into four types of visitor behaviours:
- Bouncers: Didn’t stay on the page long enough to read it and didn’t scroll to the end of the content.
- Skimmers: Scrolled to the end of the content, but weren’t on the page long enough to read it fully.
- Tab Hoarders: Stayed long enough on the page to read it, but didn’t scroll to the end of the content. You know who you are.
- Consumers: Stayed long enough on the page to read it, and scrolled to the end of the content.
Don't let your data go to waste!
Learn how to make the most of it with our Analytics for Agencies course. Join today and take your marketing to the next level!
How we measure content consumption
We’ve put together two methods that you can use to measure content consumption—a WordPress plugin, or via Google Tag Manager. Either way, this is how content consumption works:
- When the page is loaded, a JavaScript function counts how many words are in the section of the page that you’ve decided counts as content. You only want to include a subset of words because you don’t want your sidebar, navigation, footer, etc. included in this calculation.
- That function then determines how long it would take to read that many words based on the “reading speed” time that you set and starts a timer.
- Once the timer hits the amount of time it would take to read that many words, a content_dwell event is broadcast.
- At the same time, the scroll tracker is seeing how far down the page that visitor is scrolling. If the visitor gets to the part of the content that you designated as the “end”, a content_scroll event is also broadcast.
- If both content_dwell and content_scroll have happened, a third content_consumed event is broadcast.
You’ll use Google Tag Manager to “listen” for these events and then save them in GA4 for analysis.
Implementing content consumption on WordPress
Adding the content consumption WordPress plugin
Download our WordPress plugin, and then use the “Upload Plugin” option on the Add Plugins page to add it to your site.
Once it is active, you’ll see a new option in your sidebar for Content Consumption. That is where you’ll set up your options for the section that should be read and the end of your content. The plugin automatically detects any custom post types you have registered and will provide a content container and content end option for each.
You will need to check your website’s code to see what you could use as your content container. If you’re unfamiliar with how to find a CSS class or ID selector, this post can help. For example, on this page that you’re reading right now, the content container has a class of “entry-content”, which means that we’ll put .entry-content in the content container field for our posts.
As for the end of your content, see what is at the very bottom of your container. On this page, the end of our content container has an ID of “comments”, which means that we’ll put #comments in the content container field for our posts.
Adding Content Consumption Measurement to Google Tag Manager for a WordPress Website
Next, we’ll need to ensure that the information that the plugin is broadcasting can be captured and sent off to GA4 for analysis. Download this Google Tag Manager container—it is already loaded up with the triggers and tags that you need to send this data off to GA4. Make sure to update the Configuration Tag option in each GA4 Event Tag so that you’re sending data to your GA4 property.
Additionally, register these parameters as custom metrics under Admin > Custom Definitions > Custom Metrics:
- content_consumed_count
- content_dwell_count
- content_scroll_count
Then you can use those custom metrics in your reporting, instead of counting the number of times that the individual events have occurred.
Implementing content consumption on any website
Configuring Google Tag Manager for content consumption
If you don’t use WordPress, you can instead run the content consumption code in Google Tag Manager – it only takes a little bit more work to set up and works on many different content management systems.
To start, download our Google Tag Manager container. This container has everything you need to implement content consumption on websites built in any CMS. There are two variables that you will need to adjust before it will work on your website.
Similar to the WordPress plugin, you’ll need to set up your options for the section that should be read and the end of your content. Since this may vary by page template, we’ve included two example Regex Lookup variables for you to work with. You will need to check your website’s code to see what you could use as your content container. If you’re unfamiliar with how to find a CSS class or ID selector, this post can help.
In the example that you’ll find in Google Tag Manager, which is based on our website, we know that the body class of each page tells us what template that page is using. We can then use that information to set the content container and the content end. For example:
- body class contains post-template-default = blog post
- body class contains page-template-default = page
- body class contains case_study-template-default = case study
Then based on the content container and content end items for each of these templates, we put the correct item in the output field of the Regex Lookup variable. For example, the content container for a blog post (body class contains post-template-default) is “.entry-content” and the content end is “#comments”.
If you don’t want to track content consumption on a page, you can either change the trigger so that the content consumption tag only triggers on the pages you wish to track, or don’t include content containers and content ends for those pages. The tag will only broadcast events if it finds a matching content container and content end on the current page.
Make sure to update the Configuration Tag option in each GA4 Event Tag so that you’re sending data to your GA4 property.
Additionally, register these parameters as custom metrics under Admin > Custom Definitions > Custom Metrics:
- content_consumed_count
- content_dwell_count
- content_scroll_count
Then you can use those custom metrics in your reporting, instead of counting the number of times that the individual events have occurred.
Is It Working?
Once you have either configured the WordPress plugin or the utility tag in Google Tag Manager, click the Preview button and check your site to ensure that you are seeing the events as expected. You can also use the DebugView in GA4 (found under Admin) and watch your events as they are recorded in GA4 to ensure that all is working as expected. We’ve also included a debug option in both the WordPress plugin and the utility tag in Google Tag Manager – enabling this will show additional information about the current page in the DevTools console.
Turning data into insights
Of course, we want to be sure that we can turn all this data into something actionable. Since we have registered the custom metrics in GA4, we can then calculate what percentage of page views also had a scroll, or a long enough dwell time, or a consumption.
Using Looker Studio (formerly Google Data Studio)
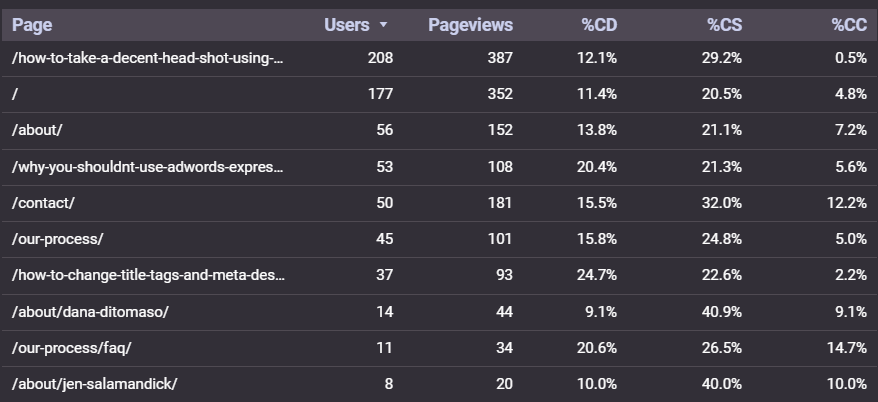
You can create basic custom fields in Looker Studio that (for example) calculate the content_consumed_count divided by the views for a given page. We recommend formatting these custom fields as a percentage. Once you’ve created these fields, you’ll end up with data similar to this:

Using Audiences in GA4
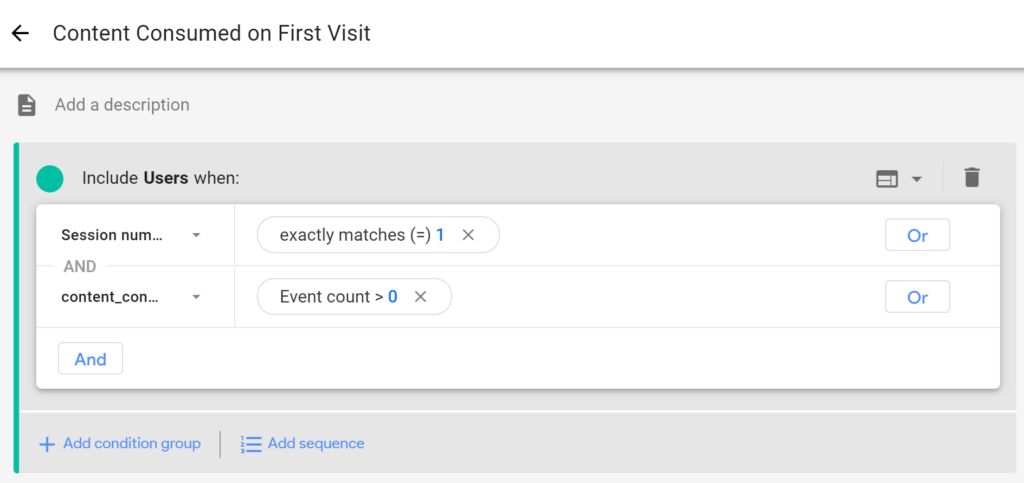
You can also use Audiences in GA4 to segment out users based on how much they consumed (or didn’t consume). For example, let’s say that we wanted to see how many people consumed a piece of content on their very first visit. Then we would create an audience in GA4 that looks like this:

The important thing to remember is that audiences in GA4 do not go back in time. Create your audiences early on to ensure that you are capturing as many visitors as possible.
Then, use these audiences to determine how content consumption affects your other metrics. Are tab hoarders more likely to buy, but only after the tab has sat around for a few days? Maybe everyone who comments on your blog are skimmers and that explains a thing or two about the types of comments you get. Have a really popular page that ranks well, but it turns out everyone who views it is a bouncer? You get the idea.
How are you using content consumption?
How are you using content consumption to make better decisions? Let us know by getting in touch or send us a Tweet!
Finally, if you got this far, hopefully you have been on the page long enough to have consumed this content. Thank you!
Find analytics overwhelming?
Sign up to hear when our Analytics for Agencies course launches later this year!


